


Contents: Valve body ⬇ Hydraulic tappets ⬇ Replacing hydraulic tappets ⬇ Dismantling ⬇ Dismantling ⬇ Checking the dismantled cylinder head ⬇ Installation ⬇
Valve body
In general, knocking in the cylinder head area indicates one or more defective hydraulic tappets. In this case, the corresponding tappet is not repaired, but replaced.
But noise in the valves can also occur with serviceable hydraulic tappets if:
- shortly before starting, the lubrication of the tappets is not yet ensured;
- before this, the car was operating at full load at high outside temperatures;
- the car has not been driven for a long time. In this case, the noise in the valves disappears when the engine warms up;
- when the oil level is extremely low, the oil pump sometimes sucks in air.
Tip: Knocking of hydraulic tappets may also be associated with a defect in the cylinder head gasket - in this case, combustion gases enter the lubrication channel.
Hydraulic tappets

Replacing hydraulic tappets
In an 8-valve engine, it is possible to remove a separate hydraulic tappet without removing the camshaft. This requires a valve clamp (see also section "Dismantling the camshaft"), with the help of which the corresponding valve can be pressed down and the given hydraulic tappet can be removed.
- Remove the camshaft as described above.
- In an 8-valve engine, remove the corresponding pendulum arm. Pay attention to the stops.
- Remove the old hydraulic lifter from the cylinder head. On a 16V, this is best done with a small vacuum suction cup.
- If the hydraulic lifter is re-installed, it must be installed in the same place.
- Fold the hydraulic lifters in the reverse installation position (with the bottom of the bowl down) to prevent oil from leaking out into the pusher.
- When installing a new pusher into the guide, lightly lubricate the working surface.
- Insert the push rod and reassemble the camshaft.
- When applying the timing belt, be sure to pay attention to the valve timing.
- Check the timing belt tension.
Advice: The engine must not be started for the next 30 minutes. The unloaded hydraulic tappets are pressed by their pressure springs to the maximum extension position. As a result, the valves open so much during the first revolutions of the camshafts that they collide with the pistons. Only after waiting for half an hour will the pressure in the hydraulic tappets be released. Then, for safety, turn the engine over manually twice to make sure that no piston can collide with a valve.
Dismantling
8-valve engine
The cylinder head can only be removed when the engine is cold, as a hot cylinder head can become deformed after removal. When installing the cylinder head, you will need a new gasket and new bolts.
- Disconnect the ground cable from the battery.
- Tag and disconnect all electrical wires on the cylinder head, intake manifold and injection system.
- Do the same with the hose wires.
- Drain the coolant into a container.
- Disconnect and remove the upper coolant hose at the thermostat housing. Also remove the upper coolant hose from the outlet pipe.
- Disconnect the wire connector on the thermostat housing.
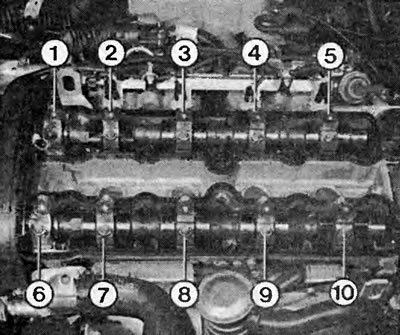
In a 16V engine, to remove the camshafts, you need to unscrew the bearing caps. The bearing caps are numbered from "1" to "10". When installing, you must reinstall them in the same place.
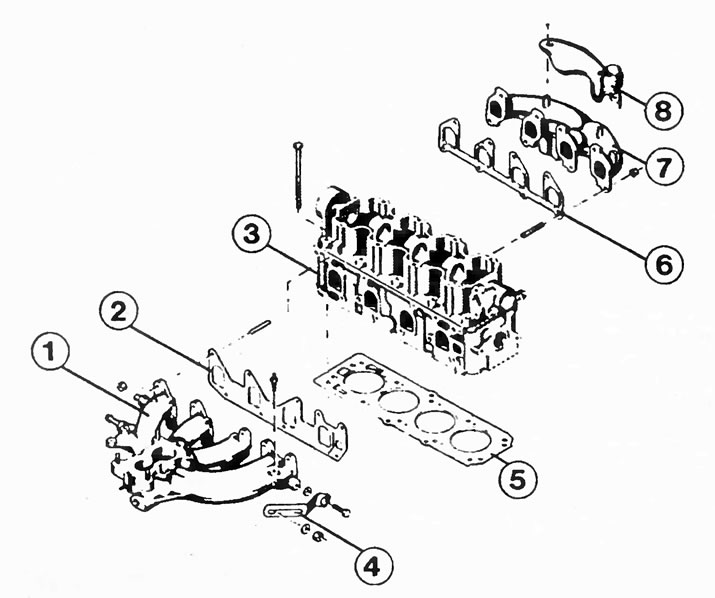
The photograph shows the components of an 8-valve engine. The numbers indicate:
1 - intake manifold;
2 - intake manifold gasket;
3 - cylinder head;
4 - Upper generator mount;
5 - cylinder head gasket;
6 - exhaust manifold gasket;
7 - exhaust manifold;
8 - branch pipe for preheating the intake air.
- Remove the support and cover on the generator.
- Remove the front timing belt cover.
- Set the crankshaft to 90° before the ignition moment of the 1st cylinder.
- Loosen and remove the timing belt.
- Unscrew the cylinder head cover mounting bolts and remove the cover.
- Remove the camshaft pulley, see section "Dismantling the camshaft".
- Remove the upper timing belt lower cover mounting bolts.
- Unscrew the front exhaust pipe from the exhaust manifold.
- Unhook the throttle cable and disconnect it from the counter support.
- Mark and remove the fuel supply and return lines.
- Loosen the cylinder head bolts in the reverse order as shown below. First by ¼ turn, then by ½ turn in the next step, then completely unscrew them.
- First remove the camshaft housing.
- Remove the pendulum arms, stops and hydraulic tappets from the cylinder head. Take into account their location.
- Remove the cylinder head with the intake manifold and the DIS ignition module. If it does not come off immediately, help with light blows from a plastic hammer.
Dismantling
16V
Dismantling the cylinder head in a 16V engine should, of course, be done in the same way as in an 8-valve engine. A star key is needed to unscrew the cylinder head bolts. Please note:
- The engine should be at 60° before TDC ignition point
- In a 16V engine with a displacement of 1.6 l, additionally remove the rear timing belt cover.
- On 16V 1.8L and 2.0L engines, remove both camshafts to gain access to the cylinder head bolts.
Checking the dismantled cylinder head
- Remove the old head gasket.
- The sealing surfaces of the cylinder head and engine block must be clean and free of gasket residue.
- If necessary, use a chemical gasket remover.
- Do not scrape the soft cylinder head sealing surface with hard tools. Notches may cause subsequent damage to the head.
- Check the cylinder head for warpage, especially if the cylinder head gasket has been damaged due to overheating.
- Place a long metal ruler or a guaranteed straight metal angle along the cleaned cylinder head sealing surface.
- Check with a template whether the deflection in any place exceeds 0.05 mm. In this case, the cylinder head must be ground flat before installation.
- The cylinder head can be bored only within certain limits. Its minimum height for an 8-valve engine, from the upper to the lower sealing surface, must be maintained within the tolerance of 96.00 ±0.1 mm.
- In 16V engine the minimum height is 135.63 mm ±0.05 mm.
- After overheating, cracks may also appear in the cylinder head. You should check this when repairing the dismantled head.
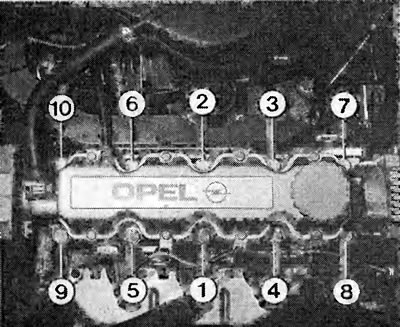
The photo shows the cylinder head bolts of an 8-valve engine. In order to prevent the cylinder head from deforming during installation, the sequence of tightening the head bolts must be followed very precisely. The final tightening torque is achieved in several stages, see the text below.
Installation
Naturally, the cylinder head is installed in the reverse order of dismantling. However, some points require special attention.
- The threads in the engine block bolt holes must be clean and undamaged, otherwise the tightening torque when tightening the bolts will be distorted.
- There must be no oil or water in the bolt holes in the engine block, otherwise the cast material may tear in the area of the threaded holes.
- Rotate the crankshaft so that no piston is in the TDC position, otherwise the open valve may collide with the piston when installing the cylinder head.
- Apply the cylinder head gasket to the engine block so that the "Top" designation ("OBEN/TOP") was facing up and towards the side of the engine timing belt.
- Install the cylinder head with clean sealing surfaces. Do not use any sealant.
- Lightly lubricate all bearing journals with oil.
- In an 8-valve engine, evenly lubricate the sealing surface of the cylinder head to the camshaft housing with Opel sealant No.1503166 and install the camshaft housing.
- Tighten the new cylinder head bolts until they are flush with the head surface.
- Tighten the cylinder head bolts in the sequence shown below.
- 1st pass 25 Nm.
- 2nd step, tighten the bolts in the same sequence by 60° (8-valve engine 1.6 l) or 90° (other engines), for this purpose use a rigid key with graduated division. As an auxiliary means you can use welding wire, which is placed on the key at an angle of 60° and 90°.
- In the 3rd pass, the bolts are tightened again by 60° or, respectively, by 90°.
- On the 4th pass, tighten the bolts one last time by 60° or 90°, respectively.
- After this, all bolts are finally tightened and should under no circumstances be tightened again.
- During further installation, pay attention to the adjustment of the throttle cable, the correct coolant and oil levels, and the correctness of all ground connections.
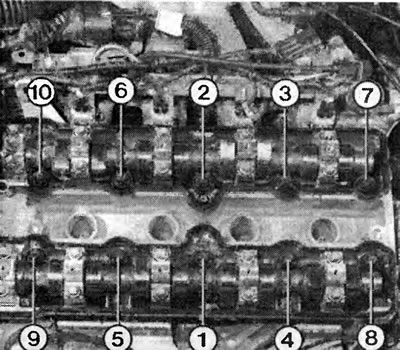
The photo shows the sequence in which the cylinder head bolts of the 16V engine with a displacement of 1.6 liters are tightened. The final tightening torque is achieved in several stages, see the text above. The cylinder head bolts of the 1.8/2.0 liter engines are tightened in the same sequence as shown here.
Visitor comments