
Removing
1. Pump out all fuel from the tank into a clean container.
2. Lift up the edge of the seal base surrounding the filler neck and unscrew the retaining screw at the bottom.
3. Block the front wheels, jack up the rear of the vehicle and place it securely on axle stands placed under the sidewalls of the body frame.
4. Unscrew the filler pipe mounting bolt from the bottom, then cut along the pipe or any brackets holding other tubes or hoses to the bottom. Release the clamps, disconnect the fill and vent hoses from the bottom end of the pipe, and the small diameter vent hoses from the couplers at the top end.
5. Check that all components that may interfere with removal have been removed or disconnected, remove the pipe from below the car.
6. To check the function of the valve against leakage in the filler pipe, turn the pipe over and fill the lower coupling with gasoline. If the valve functions correctly, gasoline should not leak from the other side. If gasoline leaks out, the valve is defective and the entire filler pipe must be replaced.
Installation
7. Installation is carried out in the reverse order of removal, and pay attention to the following.
- a) Check the condition of all hoses and brackets, replace any components that you think are worn or damaged
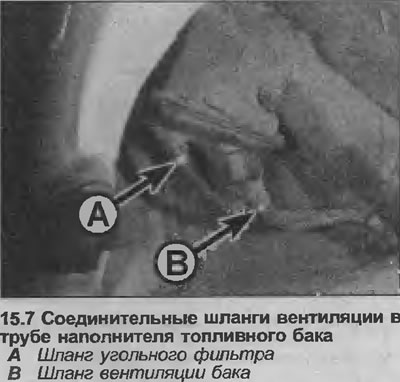
- b) Connect the ventilation hoses to the unions at the top end of the pipe, and also connect the hose from the carbon filter to the top union and the ventilation hose from the tank directly to the bottom union (see illustration).
- c) Replace any clips cut during removal that secure any pipes or hoses to the filler tube.
- d) Check carefully that there are no leaks when filling the tank; if found, fix the problem immediately.
Visitor comments