
OpelBook.ru
Cars AvtoVAZ Cars Mitsubishi Cars BMW Cars Mercedes Cars Nissan Cars Toyota Cars Chevrolet
English Русский
Български
Беларускі
Український
Српски
Hrvatski
Română
Polski
Slovenský
Magyar
 |  Sitemap  |  Contacts  |    


Main Astra Corsa Insignia Kadett Omega Vectra Zafira Others Articles
Vectra A (1988-1995, petrol) Vectra A (1988-1995) Vectra B (1995-2002, petrol) Vectra B (1995-2002) Vectra C (2002-2008)
  • Main
  • Vectra
  • Vectra A
  • Chassis
  • Brake system
  • Adjusting the parking brake

Adjusting the parking brake (Opel Vectra A)

            0

Contents: Cars with rear disc brakes ⬇ Cars with rear drum brakes ⬇

Cars with rear disc brakes


On vehicles with rear disc brakes, the parking brake is completely separate from the main braking system.

As a parking brake, drum brakes are additionally located in both brake discs of the rear wheels. Thanks to this, the parking brake is subject to only minor wear. However, due to corrosion of the brake drums or contamination of the brake shoes, braking efficiency may be reduced.

To achieve the best parking brake performance, it is usually sufficient to drive about 300 m with the parking brake slightly applied at low speed.

Release the parking brake, then tighten the lever until it clicks a second time.

Mark the position of the rear wheels relative to the hub so that the balanced wheels take their original position when installed. To mark, it is enough to make a stroke with chalk or paint on the disk and hub.

Raise the rear of the car and remove the wheels.

In all-wheel drive vehicles with a catalytic converter: remove the screen from the front muffler pipe.

Completely loosen the self-locking nut from the parking brake equalizer rod.

Turn the brake disc so that the adjustment hole is opposite the installation mechanism.

Turn the adjusting mechanism screw with a screwdriver through the unthreaded hole in the brake disc until the brake shoe rests against the disc. After this, the brake disc will not be able to rotate.
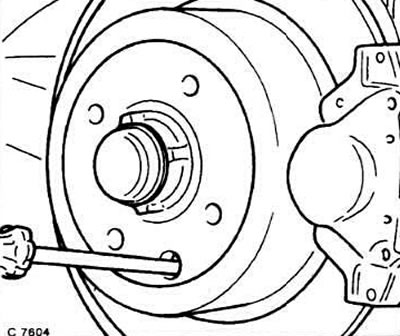
Turn the adjusting mechanism screw with a screwdriver through the unthreaded hole in the brake disc…


Turn the screw back until the brake disc can rotate freely.


Install the rear wheels in accordance with the previously applied markings and secure them.

Screw the self-locking nut onto the equalizer until the rear wheels begin to brake. Both wheels should have the same degree of braking (see fig.D0046).
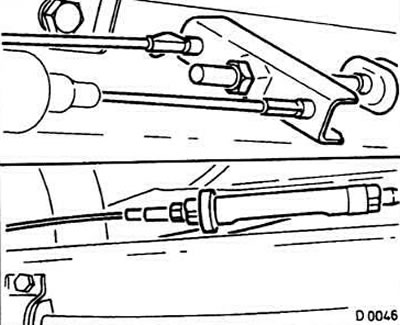
Screw the self-locking nut onto the equalizer until the rear wheels begin to brake. Both wheels…


Release the parking brake and tighten it again. At the sixth click, there should be normal braking.

In vehicles with a catalytic converter: install and secure the screen.

Lower the car.

Tighten the wheel bolts crosswise to 110 Nm.

Make a short drive of about 300 m at low speed with the parking brake slightly applied.

Cars with rear drum brakes


In such vehicles, the rear wheel drum brake is used as a parking brake. Since the rear drum brake shoes are installed automatically, the parking brake adjustment is only necessary after disassembling the rear wheel brakes.

Raise the car.

Release the parking brake.

Pull the parking brake cable to check its free play; replace the cable if necessary.
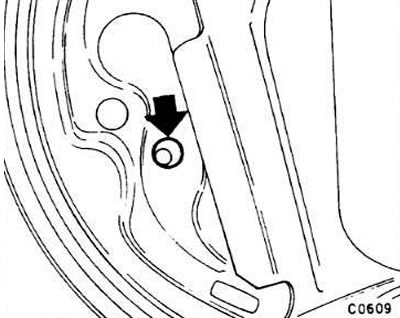
Pull the parking brake cable to check its free play; replace the cable if necessary.


Tighten the self-locking nut on the cable equalizer until the rear wheels can be turned by hand with difficulty.


Loosen the nut enough to allow the rear wheels to rotate freely.
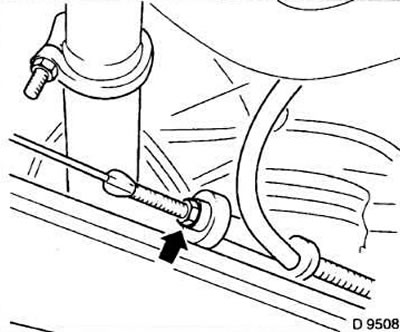
Loosen the nut enough to allow the rear wheels to rotate freely.


Remove the rear plugs from the brake shield.

Shine a flashlight into the inspection hole. The cam of the parking brake shoe lever should rest or be positioned a maximum of 2 mm.

Pull up the parking brake lever. The brake should engage on the second click.

Install the plugs. Lower the car.

Perform a test drive and check the operation of the parking brake.


This article is available at russian, bulgarian, belarusian, ukrainian, serbian, croatian, romanian, polish, slovak, hungarian
Checking the article: Zinoviev Kirill

Share information:

Previous articles
Opel Vectra A: Brake system
Next articles

Removal and installation parking brake pads
Removal and installation the parking brake lever
Checking, removing and installing the brake light switch
Brake force regulators
Checking the brake booster
Replacing the front brake hose
Removal and installation the parking brake cable
Anti-lock braking system (ABS)
Checking ABS
Checking the brake fluid level
Checking the thickness of brake pads
External inspection of brake pipes


See similar ones from other Opel car manuals:
▶ Adjusting the parking brake drive Opel Astra H (2004-2009)
▶ Adjusting the parking brake drive Opel Corsa B (1993-2000)
▶ Adjusting the parking brake Opel Insignia A (2008-2017)
▶ Adjusting the parking brake system Opel Kadett E (1984-1995)
▶ Adjusting the clearances of the parking brake shoes Opel Frontera B (1998-2004)
Link to this page in different formats

Visitor comments


No comments yet


How much will 49 + 46 =


Vectra C (2002-2008) 
  • General information
  • User manual
  • Vehicle device
  • Maintenance
  • Troubleshooting
  • Power unit
  • Engine repair
  • Cooling system
  • Power and control system
  • Engine electrics
  • Transmission
  • Clutch
  • Car gearbox
  • Drive shafts
  • Chassis
  • Car suspension
  • Steering
  • Brake system
  • Body
  • Exterior
  • Interior
  • Doors, locks and windows
  • Heating and ventilation
  • Electrical equipment
  • Equipment and devices
  • Headlights and lighting
  • Electrical circuits
Vectra B (1995-2002) 
  • General information
  • User manual
  • Weekly checks
  • Maintenance (gasoline)
  • Maintenance (diesel)
  • Troubleshooting
  • Power unit
  • SOHC gasoline engine
  • DOHC petrol engine
  • Diesel engine 1.7 liter
  • Diesel engine 2.0 liters
  • Engine repair
  • Cooling system
  • Fuel system (gasoline)
  • Fuel system (diesel)
  • Charging system
  • Launch system
  • Ignition and preheat
  • Transmission
  • Clutch
  • Mechanical gearbox
  • Automatic gearbox
  • Drive shafts
  • Chassis
  • Brake system
  • Wheel suspension
  • Steering
  • Body
  • Exterior
  • Interior
  • Doors and windows
  • Heating and ventilation
  • Electrical equipment
  • Equipment and devices
  • Electrical circuits
Vectra B (1995-2002, petrol) 
  • General information
  • Maintenance
  • Help with malfunctions
  • Power unit
  • Engine repair
  • Exhaust system
  • Cooling system
  • Fuel system
  • Multec injection system
  • Four point injection
  • Transmission
  • Clutch
  • Gearbox and drive
  • Chassis
  • Wheel suspension
  • Steering
  • Brake system
  • Wheels and tires
  • Body
  • Exterior
  • Interior
  • Electrical equipment
  • Fuses and electronics
  • Power devices
  • Ignition system
  • Lighting and signaling
  • Equipment and devices
  • Heating and ventilation
  • Electrical circuits
Vectra A (1988-1995) 
  • Power unit
  • Engine repair
  • Ignition system
  • Lubrication system
  • Cooling system
  • Injection system
  • Fuel system (carburetor)
  • Fuel system (diesel)
  • Exhaust system
  • Transmission
  • Clutch
  • Car gearbox
  • Chassis
  • Front suspension
  • Rear suspension
  • Steering
  • Brake system
  • Wheels and tires
  • Body
  • Exterior
  • Interior
  • Electrical equipment
  • Electrical circuits
Vectra A (1988-1995, petrol) 
  • General information
  • User manual
  • Maintenance
  • Power unit
  • SOHC engine
  • DOHC engine
  • Cooling and ventilation
  • Fuel system (carburetor)
  • Fuel system (injector)
  • Exhaust converter
  • Transmission
  • Clutch
  • Mechanical gearbox
  • Automatic gearbox
  • Drive shafts
  • Chassis
  • Brake system
  • Car suspension
  • Steering
  • Body
  • Body elements
  • Electrical equipment
  • Power devices
  • Equipment and devices
  • Electrical circuits
OpelBook.ru © 2017–2026 · Mobile version · · Sitemap: EN BG BY UA RS HR RO PL SK HU · Feedback · Site search
Astra F, petrol · Astra G, petrol · Astra G · Astra H · Astra J, petrol · Corsa B · Corsa C, petrol · Corsa C · Insignia A · Kadett D · Kadett E · Omega A · Omega B · Omega B2 · Vectra A, petrol · Vectra A · Vectra B, petrol · Vectra B · Vectra C · Zafira A, petrol · Frontera A, petrol · Frontera B · Ascona C · Vivaro A ·
We want your visit to be comfortable 🤝! We use cookies 🍪 to make that happen.