
OpelBook.ru
Cars AvtoVAZ Cars Mitsubishi Cars BMW Cars Mercedes Cars Nissan Cars Toyota Cars Chevrolet
English Русский
Български
Беларускі
Український
Српски
Hrvatski
Română
Polski
Slovenský
Magyar
 |  Sitemap  |  Contacts  |    


Main Astra Corsa Insignia Kadett Omega Vectra Zafira Others Articles
Frontera A (1991-1998, petrol) Frontera B (1998-2004) Ascona C (1981-1988) Vivaro A (2001-2014)
  • Main
  • Opel
  • Frontera B
  • Electrical equipment
  • Equipment and devices
  • Instrument panel

Instrument panel (Opel Frontera B)

            0

Contents: Removal ⬇ Installation ⬇
Removing and installing the instrument panel are operations that must be performed with care. When removing, make sure that the electrical connectors are completely disconnected. When reinstalling, ensure that the wiring harnesses are routed and secured correctly.

Warnings! Before removing the instrument panel, read the safety precautions for servicing the SRS components. Set the front wheels to straight ahead and turn off the ignition. Otherwise, the spiral wire may be damaged and the SRS additional safety system may be disabled. As a result, the airbag may deploy unauthorized, which may result in injury.


Note: To prevent damage to parts, wrap the screwdriver blade in a cloth. To avoid injuring your hands, wear gloves.


Removal


Disconnect the cable from the negative battery terminal and wait 1 minute.

Remove the center console (1) (see the relevant chapter).
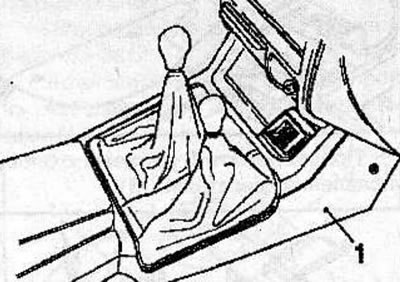
Remove the center console (1) (see the relevant chapter).


Remove the threshold trim (2) of the front door on the left side of the vehicle.
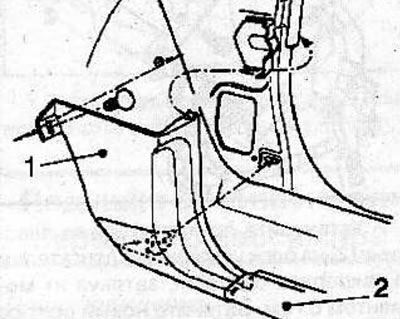
Remove the threshold trim (2) of the front door on the left side of the vehicle.


Remove the lower trim (1) of the front pillar.


Set the front wheels to the straight-ahead position.

Remove the driver's airbag (1) (see the relevant chapter).
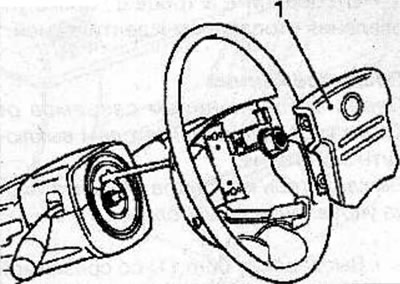
Remove the driver's airbag (1) (see the relevant chapter).


Loosen the steering wheel mounting nut. Place alignment marks on the end of the steering shaft and the steering wheel.
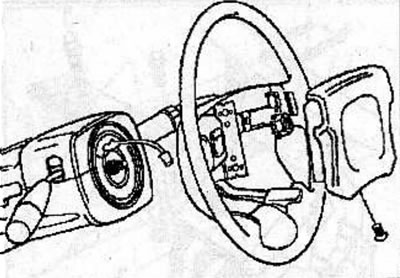
Loosen the steering wheel mounting nut. Place alignment marks on the end of the steering shaft and…


Remove the steering wheel using the KM-210-V puller.

Warning! Do not hit the steering wheel, as this may damage the steering column safety mechanism.


Remove the screws and steering column covers.
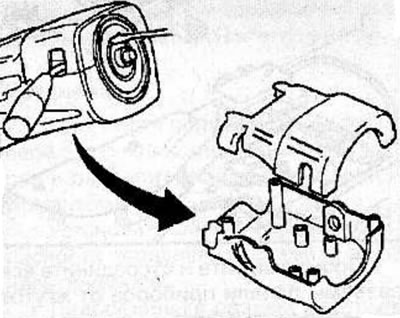
Remove the screws and steering column covers.


Disconnect the connectors and remove the steering column switches and the security system coil wire.


Warnings:
  • Store the removed driver airbag coil wire in a clean, dry place.
  • Do not rotate the center portion of the coiled wire.


Disconnect the connector from the brake pedal switch.

Disconnect the connector from the immobilizer control unit.

Disconnect the connector from the control unit.

Disconnect the 3 cables from the HVAC control unit.

Warnings:
  • Before disconnecting the connectors from the engine control unit, turn off the ignition.
  • Do not touch the engine control unit connector contacts.


Drill out the shear head bolt (1) securing the anti-theft plate (2) to the engine control unit (3), then unscrew the second bolt and remove the anti-theft plate.
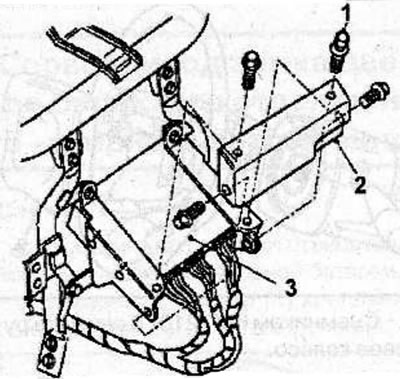
Drill out the shear head bolt (1) securing the anti-theft plate (2) to the engine control unit (3),…


Disconnect 3 connectors from the engine control unit.

Disconnect the connector (1) from the airbag control unit (2).
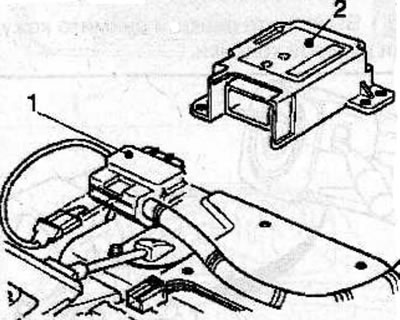
Disconnect the connector (1) from the airbag control unit (2).


Label and disconnect all instrument panel connectors from the vehicle's wiring harnesses.


Disconnect the antenna wire from the front pillar.

Disconnect the ground wire from the front pillar.

Move the front seats all the way back.

Remove the screws and remove the instrument panel from the vehicle.
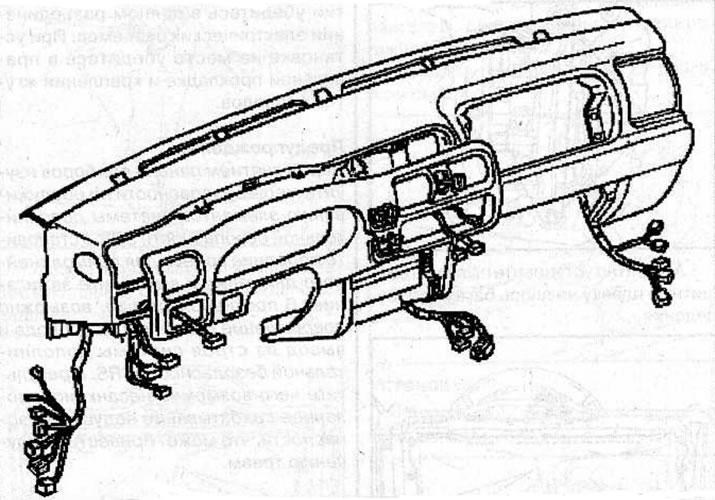
Remove the screws and remove the instrument panel from the vehicle.


Installation


Install the instrument panel and secure it with bolts, being careful not to pinch any wire harnesses or connectors.

Connect the ground wire to the front pillar.

Connect the antenna wire to the front pillar.

Connect all instrument panel connectors to the vehicle's wiring harness.

Connect the connector (1) to the airbag control unit (2).
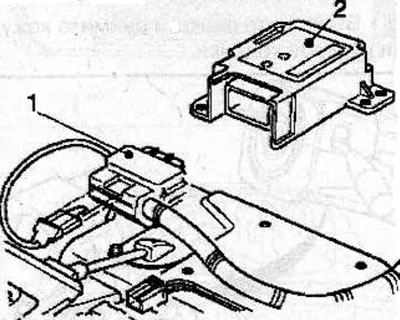
Connect the connector (1) to the airbag control unit (2).


Connect the 3 connectors to the engine control unit (3).
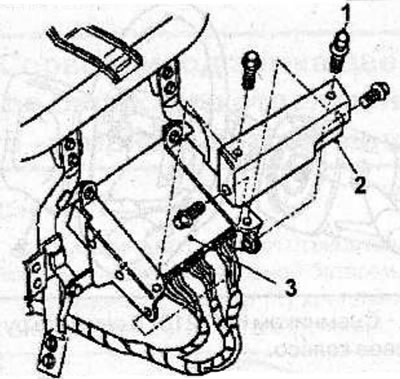
Connect the 3 connectors to the engine control unit (3).


Install the anti-theft plate (2) on the engine control unit and secure with bolts, tightening them to a torque of 8 N·m. Tighten a new shear-head bolt (1) until the head shears off.


Connect the 3 cables to the HVAC control unit.

Connect the connector to the control unit.

Connect the connector to the immobilizer control unit.

Connect the connector to the brake pedal switch.

Install the security system coil wire and steering column switches.

Install the steering column covers.
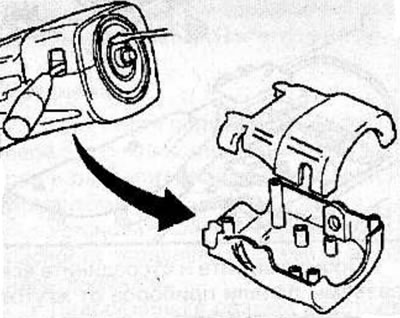
Install the steering column covers.


Align the previously applied marks and install the steering wheel onto the steering column shaft.

Secure the steering wheel with the nut, tightening it to a torque of 34 Nm.

(Material copied from this resource: OpelBook.ru)

Install the driver's airbag (1) (see the relevant chapter).
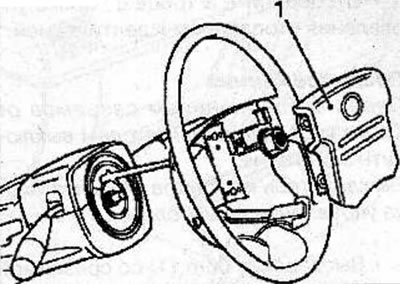
Install the driver's airbag (1) (see the relevant chapter).


Install the lower trim (1) of the front pillar.

Install the threshold trim (2).
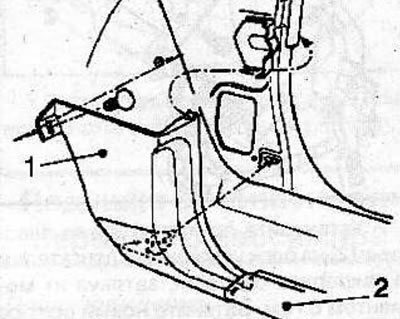
Install the threshold trim (2).


Install the center console (1) (see the relevant chapter).
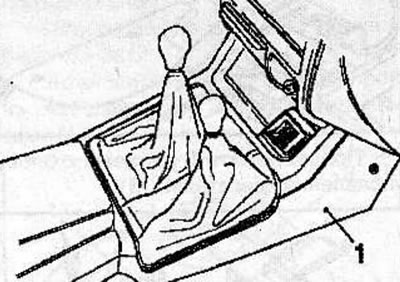


Install the center console (1) (see the relevant chapter).


Connect the cable to the negative terminal of the battery.


This article is available at russian, bulgarian, belarusian, ukrainian, serbian, croatian, romanian, polish, slovak, hungarian
Checking the article: Chernov Alexander

Share information:

Previous articles
Opel Frontera B: Equipment and devices
Next articles

5-door car trunk door lock servo drive
3-door car trunk lid lock servo drive
Driver's airbag
Front passenger airbag
Driver Airbag Spiral Wire
Airbag control unit
Electric sunroof (5-door vehicle)
Fuel tank filler cap hatch servo drive


See similar ones from other Opel car manuals:
▶ Instrument panel — removal and installation Opel Astra F (1991-1998, petrol)
▶ Description of the instrument panel Opel Corsa B (1993-2000)
▶ Side direction indicators and instrument panel lighting Opel Insignia A (2008-2017)
▶ Removal and installation the instrument panel Opel Kadett D (1979-1984)
▶ Instruments (pointer instrument panel) Opel Omega A (1986-1993)
Link to this page in different formats

Visitor comments


No comments yet


How much will 29 + 25 =


Vivaro A (2001-2014) 
  • General information
  • User manual
  • Power unit
  • Petrol engine F4R
  • Diesel engine F9Q
  • Diesel engine G9U
  • Transmission
  • Clutch and drive shafts
  • Manual gearbox
  • Chassis
  • Front suspension
  • Rear suspension
  • Brake system
  • Body
  • Exterior
  • Interior
  • Electrical equipment
  • Heating and ventilation
  • Air conditioner
  • Equipment and devices
  • Electrical diagrams
Ascona C (1981-1988) 
  • General information
  • Maintenance
  • Power unit
  • Gasoline engines
  • Diesel engines
  • Cooling system
  • Fuel and exhaust system
  • Contact ignition system
  • Contactless ignition system
  • Transmission
  • Clutch
  • Mechanical gearbox
  • Automatic gearbox
  • Drive shafts
  • Chassis
  • Steering
  • Brake system
  • Car suspension
  • Body
  • Exterior
  • Interior
  • Doors and windows
  • Electrical equipment
  • Equipment and devices
  • Power devices
  • Electrical circuits
Frontera B (1998-2004) 
  • General information
  • User manual
  • Maintenance
  • Power unit
  • Petrol engines 2.2 l
  • Petrol engines 3.2 l
  • Diesel engines 2.2 l
  • Cooling system
  • Fuel system (petrol)
  • Fuel system (diesel)
  • Ignition system
  • Transmission
  • Clutch
  • Manual gearbox MUA5C
  • Automatic gearbox 4L30E
  • Chassis
  • Suspension and axles
  • Steering
  • Brake system
  • Body
  • Exterior
  • Interior
  • Doors, locks and windows
  • Heating and air conditioning
  • Electrical equipment
  • Power devices
  • Equipment and devices
  • Lighting and signaling
  • Electrical diagrams
Frontera A (1991-1998, petrol) 
  • General information
  • Introduction to guide
  • User manual
  • Maintenance
  • Power unit
  • Engine repair
  • Lubrication system
  • Cooling system
  • Power and exhaust system
  • Engine electrics
  • Transmission
  • Clutch
  • Mechanical gearbox
  • Cardan shafts
  • Chassis
  • Brake system
  • Front suspension
  • Rear suspension
  • Steering
  • Body
  • Repair and care
  • Electrical equipment
  • Equipment and devices
  • Electrical circuits
OpelBook.ru © 2017–2026 · Mobile version · · Sitemap: EN BG BY UA RS HR RO PL SK HU · Feedback · Site search
Astra F, petrol · Astra G, petrol · Astra G · Astra H · Astra J, petrol · Corsa B · Corsa C, petrol · Corsa C · Insignia A · Kadett D · Kadett E · Omega A · Omega B · Omega B2 · Vectra A, petrol · Vectra A · Vectra B, petrol · Vectra B · Vectra C · Zafira A, petrol · Frontera A, petrol · Frontera B · Ascona C · Vivaro A ·
We want your visit to be comfortable 🤝! We use cookies 🍪 to make that happen.