
OpelBook.ru
Cars AvtoVAZ Cars Mitsubishi Cars BMW Cars Mercedes Cars Nissan Cars Toyota Cars Chevrolet
English Русский
Български
Беларускі
Український
Српски
Hrvatski
Română
Polski
Slovenský
Magyar
 |  Sitemap  |  Contacts  |    


Main Astra Corsa Insignia Kadett Omega Vectra Zafira Others Articles
Frontera A (1991-1998, petrol) Frontera B (1998-2004) Ascona C (1981-1988) Vivaro A (2001-2014)
  • Main
  • Opel
  • Frontera B
  • Chassis
  • Brake system
  • Rear Brake Caliper Repair

Rear Brake Caliper Repair (Opel Frontera B)

            0

Contents: Disassembly ⬇ Examination ⬇ Assembly ⬇
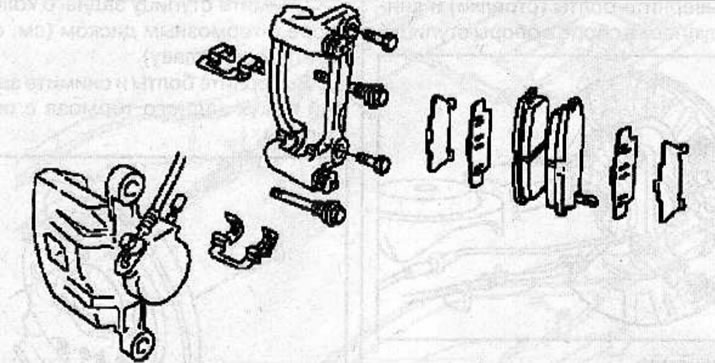
Rear brake caliper

Rear brake caliper


Disassembly


Remove the rear brake caliper (see the relevant chapter).

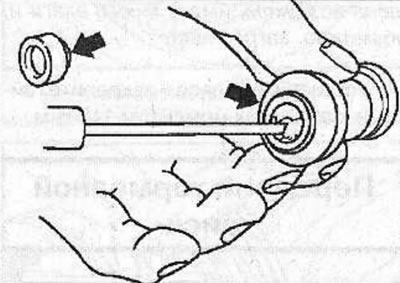
Using a small screwdriver, remove the dust seal ring from the caliper.
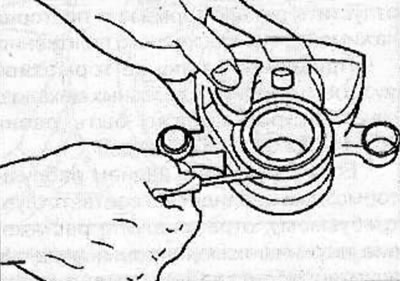
Using a small screwdriver, remove the dust seal ring from the caliper.


Material copied from this portal: Opelbook.ru

Remove 2 dust covers (2), bleeder cap (2), ring (3) and seal (4).
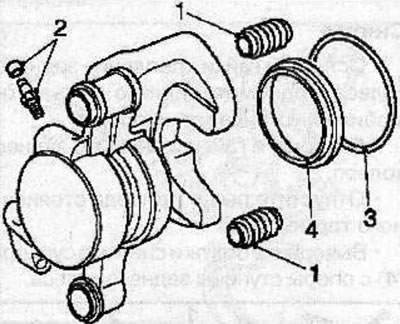
Remove 2 dust covers (2), bleeder cap (2), ring (3) and seal (4).


Remove the piston from the caliper. To do this, place a wooden block between the piston and the inside of the caliper body. To remove the protective boot and piston, apply compressed air to the brake hose hole.
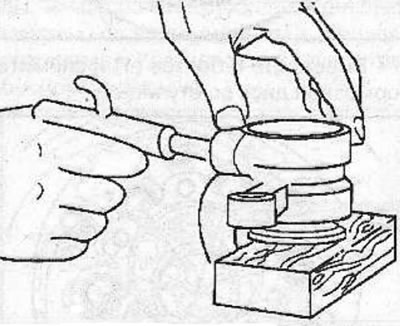


Remove the piston from the caliper. To do this, place a wooden block between the piston and the…


Warning:
  • If air is suddenly supplied to the brake cylinder body, the piston will fly out, damaging the caliper body.
  • Apply compressed air gradually. When pushing the piston out with compressed air, do not place your fingers in front of the piston.
  • Be careful, as the brake fluid will be blown out of the channel by compressed air along with the piston.


Discard the 2 dust boots (1), ring (3), seal (4) and piston seal ring (6).
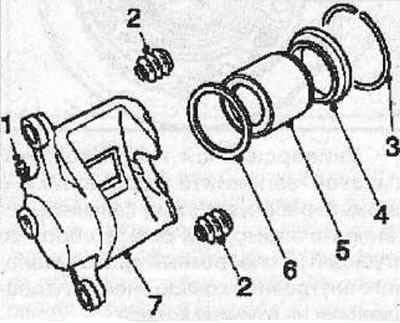
Discard the 2 dust boots (1), ring (3), seal (4) and piston seal ring (6).


Examination


Clean the bleed nipple (2), piston (5) and caliper body (7).

Check the caliper cylinder for wear, damage or rust. Minor rust damage can be removed by polishing with fine grit sandpaper.

Check the piston surface for wear, damage or rust.

Check the caliper body, guide pins and bushings for wear.


Assembly


Insert the piston seal into the cylinder groove.

Lubricate the caliper cylinder with a special lubricant.

Warning: To avoid damaging the cylinder walls and piston seals, use only finger pressure when lubricating.
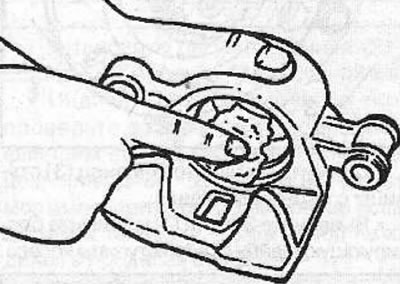

Warning: To avoid damaging the cylinder walls and piston seals, use only finger pressure when…


Apply 1 gram of special lubricant to the piston and install the piston into the cylinder.
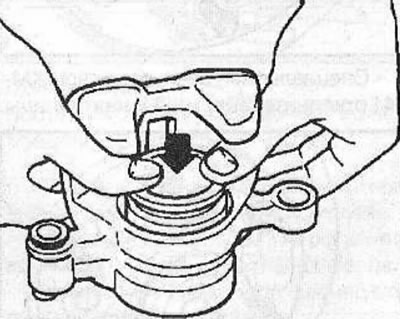
Apply 1 gram of special lubricant to the piston and install the piston into the cylinder.


Install the seal (2) and ring (1) on the piston.
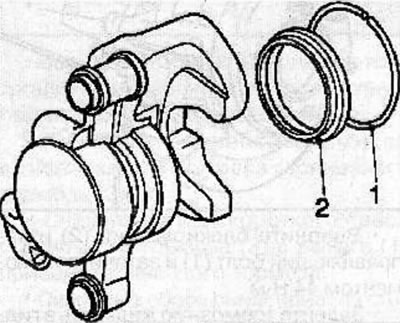
Install the seal (2) and ring (1) on the piston.


Apply 1 gram of special lubricant to the inner surface of the dust covers.


Apply 1 gram of special lubricant to the inner surface of the dust covers.


Install 2 dust covers on the caliper.
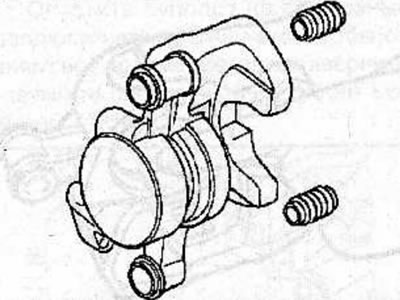
Install 2 dust covers on the caliper.


Screw the bleed nipple into the caliper and tighten it to 8 Nm.
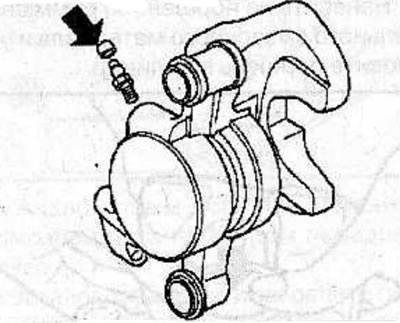
Screw the bleed nipple into the caliper and tighten it to 8 Nm.


Install the caliper onto the brake pad guide.

Apply special lubricant to the lock bolt (2), guide bolt (1) and into the brake shoe guide holes.
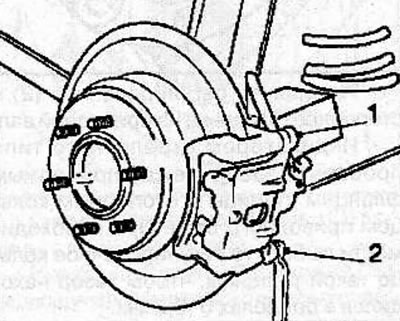
Apply special lubricant to the lock bolt (2), guide bolt (1) and into the brake shoe guide holes.


Screw in the locking (2) and guide bolt (1) and tighten them to a torque of 44 Nm.


Fill the brake fluid into the hydraulic drive of the brake system and remove air from it (see the relevant chapter).

Warnings:
  • Fill the brake system with new DOT 4 brake fluid only.
  • Do not use fluid that has been drained from the brake system, as it is saturated with air, contains a lot of moisture and may be contaminated.


Install the wheel and secure with nuts, tightening them to a torque of 118 Nm.


This article is available at russian, bulgarian, belarusian, ukrainian, serbian, croatian, romanian, polish, slovak, hungarian
Checking the article: Chernov Alexander

Share information:

Previous articles
Opel Frontera B: Brake system
Next articles

Replacing rear brake pads
Front brake guard
Front brake disc
Front Brake Caliper Repair
Front brake caliper
Replacing the front brake pads
Rear brake disc
Rear brake guard
Replacing the parking brake pads
Parking brake lever
Parking brake cables
Parking brake cable compensator


See similar ones from other Opel car manuals:
▶ Rear Wheel Brake Caliper (Rear Disc Brakes) — Removal,… Opel Astra F (1991-1998, petrol)
▶ Rear Brake Caliper — Removal, Repair and Installation Opel Omega A (1986-1993)
▶ Replacing the rear brake caliper bracket Opel Insignia A (2008-2017)
▶ Rear Disc Brake Caliper — Removal, Overhaul and Installation Opel Vectra A (1988-1995, petrol)
▶ Front Brake Caliper — Removal, Repair and Installation Opel Zafira A (1999-2005, petrol)
Link to this page in different formats

Visitor comments


No comments yet


How much will 45 + 18 =


Vivaro A (2001-2014) 
  • General information
  • User manual
  • Power unit
  • Petrol engine F4R
  • Diesel engine F9Q
  • Diesel engine G9U
  • Transmission
  • Clutch and drive shafts
  • Manual gearbox
  • Chassis
  • Front suspension
  • Rear suspension
  • Brake system
  • Body
  • Exterior
  • Interior
  • Electrical equipment
  • Heating and ventilation
  • Air conditioner
  • Equipment and devices
  • Electrical diagrams
Ascona C (1981-1988) 
  • General information
  • Maintenance
  • Power unit
  • Gasoline engines
  • Diesel engines
  • Cooling system
  • Fuel and exhaust system
  • Contact ignition system
  • Contactless ignition system
  • Transmission
  • Clutch
  • Mechanical gearbox
  • Automatic gearbox
  • Drive shafts
  • Chassis
  • Steering
  • Brake system
  • Car suspension
  • Body
  • Exterior
  • Interior
  • Doors and windows
  • Electrical equipment
  • Equipment and devices
  • Power devices
  • Electrical circuits
Frontera B (1998-2004) 
  • General information
  • User manual
  • Maintenance
  • Power unit
  • Petrol engines 2.2 l
  • Petrol engines 3.2 l
  • Diesel engines 2.2 l
  • Cooling system
  • Fuel system (petrol)
  • Fuel system (diesel)
  • Ignition system
  • Transmission
  • Clutch
  • Manual gearbox MUA5C
  • Automatic gearbox 4L30E
  • Chassis
  • Suspension and axles
  • Steering
  • Brake system
  • Body
  • Exterior
  • Interior
  • Doors, locks and windows
  • Heating and air conditioning
  • Electrical equipment
  • Power devices
  • Equipment and devices
  • Lighting and signaling
  • Electrical diagrams
Frontera A (1991-1998, petrol) 
  • General information
  • Introduction to guide
  • User manual
  • Maintenance
  • Power unit
  • Engine repair
  • Lubrication system
  • Cooling system
  • Power and exhaust system
  • Engine electrics
  • Transmission
  • Clutch
  • Mechanical gearbox
  • Cardan shafts
  • Chassis
  • Brake system
  • Front suspension
  • Rear suspension
  • Steering
  • Body
  • Repair and care
  • Electrical equipment
  • Equipment and devices
  • Electrical circuits
OpelBook.ru © 2017–2026 · Mobile version · · Sitemap: EN BG BY UA RS HR RO PL SK HU · Feedback · Site search
Astra F, petrol · Astra G, petrol · Astra G · Astra H · Astra J, petrol · Corsa B · Corsa C, petrol · Corsa C · Insignia A · Kadett D · Kadett E · Omega A · Omega B · Omega B2 · Vectra A, petrol · Vectra A · Vectra B, petrol · Vectra B · Vectra C · Zafira A, petrol · Frontera A, petrol · Frontera B · Ascona C · Vivaro A ·
We want your visit to be comfortable 🤝! We use cookies 🍪 to make that happen.