
Removing
When carrying out the work described below, a distinction should be made between vehicles up to mid-1995 and later models.
Vehicles up to mid-1995 release
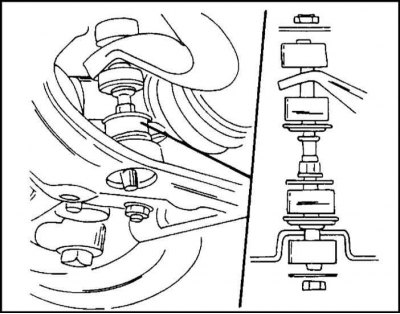
Fastening of the anti-roll bar of the car until the middle of 1995 of release. Left to stabilizer bar, right to transverse arm
1. Turn away bolts and remove a guard of the pallet of a case.
2. Remove the bolts and disconnect the stabilizer mounts and remove the rubber bushings from the front cross member and from the stabilizer.
3. Turn away bolts of hinges of the stabilizer, remove rubber pillows and cups.
4. Carry out work on both sides of the car. The location of the listed elements is shown in the illustration.
5. Fasten the mounting clamps on the chassis with a torque of 28 Nm.
6. Tighten nuts of bolts of hinges on the cross-section lever with the moment of 10 Nm.
Vehicles since mid-1995 release
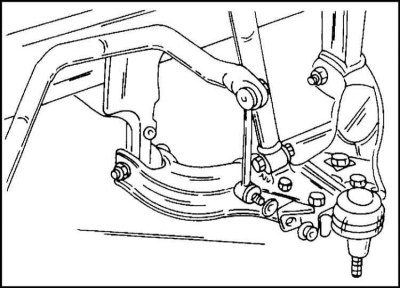
Mounting the anti-roll bar to the transverse arm of the car from the middle of 1995 of release.
Connecting rods with ball joints are used.
Each end of the stabilizer is attached to the transverse arm with a connecting rod.
1. Remove the sump guard.
2. Disconnect the connecting rods between the stabilizer and the lower transverse arm by unscrewing the nuts, and press out the pins of the ball joints from above and below.
3. Remove the stabilizer from the chassis. To do this, unscrew the mounting clamp bolts and remove the clamps. Remove the stabilizer. Remove the rubber pads from the ends of the stabilizer.
Installation
Installation of the stabilizer is carried out in the reverse order of removal. Keep in mind that a washer is inserted from the bottom side between the connecting rod and the transverse arm. The bolts for fastening the mounting clamps are fastened with a torque of 20 Nm, tighten the nuts of the connecting rods with a torque of 50 Nm.
Other work is performed in the reverse order of removal. Wheels establish according to marking.
Visitor comments