
OpelBook.ru
Cars AvtoVAZ Cars Mitsubishi Cars BMW Cars Mercedes Cars Nissan Cars Toyota Cars Chevrolet
English Русский
Български
Беларускі
Український
Српски
Hrvatski
Română
Polski
Slovenský
Magyar
 |  Sitemap  |  Contacts  |    


Main Astra Corsa Insignia Kadett Omega Vectra Zafira Others Articles
Frontera A (1991-1998, petrol) Frontera B (1998-2004) Ascona C (1981-1988) Vivaro A (2001-2014)
  • Main
  • Opel
  • Frontera A
  • Chassis
  • Front suspension
  • Removal and installation the upper wishbone

Removal and installation the upper wishbone (Opel Frontera A)

            0

Contents: Removal ⬇ Installation ⬇ Replacing the bushings of the…⬇

Removal


1. Place a garage or hydraulic lift under the lower control arm.

2. Raise the lift so that the wishbone is slightly under load.

3. Remove the bolt and disconnect the brake hose holder from the upper suspension arm.

4. If you have ABS, also disconnect the wheel speed sensor cable from the suspension arm.
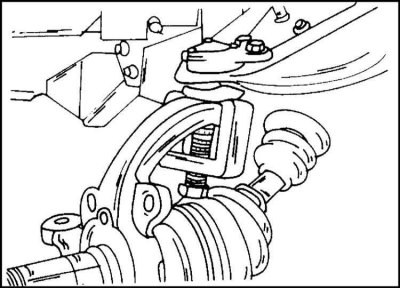
5. Disconnect the upper ball joint from the steering knuckle. For this purpose, the puller shown in…


5. Disconnect the upper ball joint from the steering knuckle. For this purpose, the puller shown in the illustration is used. Be careful not to damage the protective cover.

6. Disconnect the upper wishbone from the inside of the chassis. Fastening is carried out with two bolts.

When removing the wishbone, mark the camber and caster angle adjusting washers. There may be a different number of washers on the left and right. This needs to be taken into account. The design of the transverse suspension arm in the new series of cars has been changed. This also needs to be taken into account.

Installation


The upper control arm is installed as follows:

1. Install the wishbone with adjusting washers for camber and caster angle. The transverse arm has two protrusions in the center (since mid-1995), which should be facing inward. The groove for the ball joint should also face that way. The earlier model's wishbone has only one protrusion in the middle.


2. Tighten the suspension arm axle mounting bolts to a torque of 155 Nm, and the ball joint nut to a torque of 105 Nm.

3. If the position of the suspension arm axis has been changed in relation to the arm, which could happen, for example, when replacing the arm bushings, it is necessary to re-establish the dimension shown in the illustration. 5.12 (15 mm until mid-1995 and 25 mm from mid-1995).

4. After this, tighten the nuts to a torque of 108 Nm.

5. Other work is carried out in the reverse order of removal. Tighten the brake hose/sensor bracket mounting bolts to 28 Nm.

Replacing the bushings of the transverse control arm


The control arm bushings can be replaced. To do this, you need to remove the suspension arm axle. To replace the bushings, it is recommended to take the control arm to a car repair shop. Temporarily tighten the left and right axle mounting nuts by hand.


This article is available at russian, bulgarian, belarusian, ukrainian, serbian, croatian, romanian, polish, slovak, hungarian
Checking the article: Meshcheryakov Damir

Share information:

Previous articles
Opel Frontera A: Front suspension
Next articles

Removal and installation the lower wishbone
Removal and installation the anti-roll bar
Removal and installation shock absorbers
Removal and installation the torsion bar
Front Wheel Suspension and Front Axle — General Information
Suspension and steering specifications
Removal and installation the ball joint
Removal and installation the steering knuckle
Front axle — removal, installation and repair
Checking and adjusting work on the car


See similar ones from other Opel car manuals:
▶ Upper hatch Opel Astra H (2004-2009)
▶ Upper hatch Opel Corsa C (2000-2006)
▶ Replacing the upper ball joint of the front suspension GNB Opel Insignia A (2008-2017)
▶ Removal and installation the upper part of the carburetor Opel Kadett D (1979-1984)
▶ Upper hatch elements Opel Omega B (1993-1999)
Link to this page in different formats

Visitor comments


No comments yet


How much will 20 + 17 =


Vivaro A (2001-2014) 
  • General information
  • User manual
  • Power unit
  • Petrol engine F4R
  • Diesel engine F9Q
  • Diesel engine G9U
  • Transmission
  • Clutch and drive shafts
  • Manual gearbox
  • Chassis
  • Front suspension
  • Rear suspension
  • Brake system
  • Body
  • Exterior
  • Interior
  • Electrical equipment
  • Heating and ventilation
  • Air conditioner
  • Equipment and devices
  • Electrical diagrams
Ascona C (1981-1988) 
  • General information
  • Maintenance
  • Power unit
  • Gasoline engines
  • Diesel engines
  • Cooling system
  • Fuel and exhaust system
  • Contact ignition system
  • Contactless ignition system
  • Transmission
  • Clutch
  • Mechanical gearbox
  • Automatic gearbox
  • Drive shafts
  • Chassis
  • Steering
  • Brake system
  • Car suspension
  • Body
  • Exterior
  • Interior
  • Doors and windows
  • Electrical equipment
  • Equipment and devices
  • Power devices
  • Electrical circuits
Frontera B (1998-2004) 
  • General information
  • User manual
  • Maintenance
  • Power unit
  • Petrol engines 2.2 l
  • Petrol engines 3.2 l
  • Diesel engines 2.2 l
  • Cooling system
  • Fuel system (petrol)
  • Fuel system (diesel)
  • Ignition system
  • Transmission
  • Clutch
  • Manual gearbox MUA5C
  • Automatic gearbox 4L30E
  • Chassis
  • Suspension and axles
  • Steering
  • Brake system
  • Body
  • Exterior
  • Interior
  • Doors, locks and windows
  • Heating and air conditioning
  • Electrical equipment
  • Power devices
  • Equipment and devices
  • Lighting and signaling
  • Electrical diagrams
Frontera A (1991-1998, petrol) 
  • General information
  • Introduction to guide
  • User manual
  • Maintenance
  • Power unit
  • Engine repair
  • Lubrication system
  • Cooling system
  • Power and exhaust system
  • Engine electrics
  • Transmission
  • Clutch
  • Mechanical gearbox
  • Cardan shafts
  • Chassis
  • Brake system
  • Front suspension
  • Rear suspension
  • Steering
  • Body
  • Repair and care
  • Electrical equipment
  • Equipment and devices
  • Electrical circuits
OpelBook.ru © 2017–2026 · Mobile version · · Sitemap: EN BG BY UA RS HR RO PL SK HU · Feedback · Site search
Astra F, petrol · Astra G, petrol · Astra G · Astra H · Astra J, petrol · Corsa B · Corsa C, petrol · Corsa C · Insignia A · Kadett D · Kadett E · Omega A · Omega B · Omega B2 · Vectra A, petrol · Vectra A · Vectra B, petrol · Vectra B · Vectra C · Zafira A, petrol · Frontera A, petrol · Frontera B · Ascona C · Vivaro A ·
We want your visit to be comfortable 🤝! We use cookies 🍪 to make that happen.