
Differential housing seal
1. Place a container under the gearbox housing, unscrew the drain plug and drain the oil.
2. Remove the gearbox housing as described below.
3. Thoroughly clean the mating surfaces of the crankcase and axle housing and lubricate them with sealant.
4. Reinstall the gearbox housing (see below).
Removal and installation of the gearbox housing
1. Place a container under the bridge, unscrew the drain plug and drain the oil.
2. Remove the bridge and drives as described separately.
3. Loosen the bolts and disconnect the gearbox housing from the axle housing
4. Collect escaping oil in a container.
5. Thoroughly clean the mating surfaces of the crankcase and axle housing.
6. Lubricate them with sealant.
7. Insert the gearbox housing into the axle housing.
8. Fasten it with screws. For three-door models (the bridge has the designation 9HU) tighten bolts of fastening the moment of 28 Nm. For five door models (bridge designation 12HU) torque 54 Nm.
9. Install the bridge and drives as described below.
10. Fill the front axle with oil up to the lower edge of the hole.
Oil seal replacement
In order not to violate the adjustment of the gearbox, before unscrewing the nut of the drive gear, it is necessary to measure the moment of its rotation using a dynamometer. Since when installing the drive flange of the pinion, it is easy to overtighten the nut in question and thereby damage the gearbox, it is recommended that the oil seal be replaced in a car workshop. The seal is replaced when leaks appear.
Removal and installation of the forward bridge
Removing
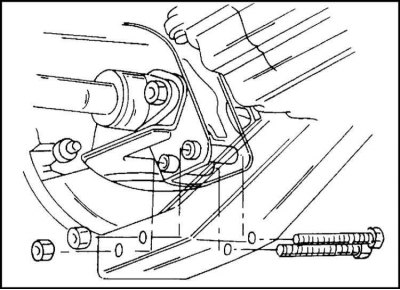
1. Turn away four bolts and nuts of fastening of a crossbar of a forward suspension bracket.
2. Disconnect the front propeller shaft from the drive gear flange.
3. Remove both front suspension arms along with wheel hub and steering knuckle as described above.
4. To do this, disconnect the suspension unit at the suspension arms in the area where the ball joints are located.
5. Disconnect the center ball joints from the steering arm and from the intermediate arm using a puller.
6. Move a garage lift under the center of the axle and disconnect the axle from the chassis. Bolts and washers are used to fasten the bridge at the rear, bolts, nuts and washers are used at the front.
7. Slowly lower the axle onto the lift and roll it out.
If necessary, the suspension bushings can be pressed out and replaced.
Installation
The bridge is installed in the reverse order of removal.
1. Bolts and bolts/nuts of fastening tighten the moment of 152 Nm.
2. Steering knuckles, wishbones, etc. are installed in accordance with the instructions above.
3. Bolts of fastening of a crossbar of a suspension bracket shown on an illustration, tighten the moment of 75 Nm.
4. Finally, check the oil level in the gearbox housing and top up if necessary.
Main gear repair
Repair of the final drive must be carried out in a workshop. Since the repaired differential is installed in place without any adjustments, only the main gear can be handed over for repair.
Visitor comments