
OpelBook.ru
Cars AvtoVAZ Cars Mitsubishi Cars BMW Cars Mercedes Cars Nissan Cars Toyota Cars Chevrolet
English Русский
Български
Беларускі
Український
Српски
Hrvatski
Română
Polski
Slovenský
Magyar
 |  Sitemap  |  Contacts  |    


Main Astra Corsa Insignia Kadett Omega Vectra Zafira Others Articles
Omega A (1986-1993) Omega B (1993-1999) Omega B2 (1999-2003)
  • Main
  • Omega
  • Omega B2
  • Power unit
  • Diesel engines 2.0 l
  • Crankshaft — checks

Crankshaft — checks (Opel Omega B2)

            0

Contents: Checking the axial displacement of…⬇ Checking the crankshaft runout ⬇ Measuring the clearance of…⬇

Checking the axial displacement of the crankshaft


1. Attach the holder with the MKM-571-V pointer indicator to the cylinder block, the contact pin of which should rest against the end of the shaft secured in the block with bearings (see illustration).
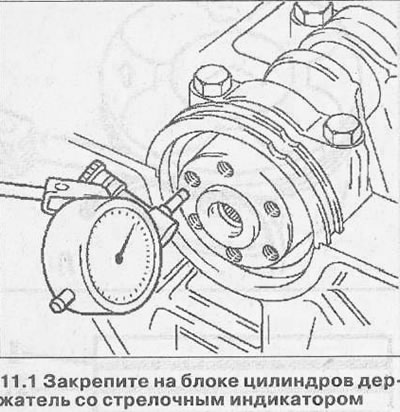
1. Attach the holder with the MKM-571-V pointer indicator to the cylinder block, the contact pin of…


2. Move the crankshaft in the longitudinal direction. The maximum permissible axial displacement of the crankshaft should be within 0.01-0.02 mm.

Checking the crankshaft runout


3. Unscrew the main bearing cap mounting bolts and remove the caps.

4. Attach the holder with the MKM-571-V pointer indicator to the cylinder block, the contact pin of which should rest against the end of the shaft (see illustration 11.1).

5. Turn the crankshaft and read the dial indicator. Check the runout of the crankshaft journal surfaces in the same way (see illustration).
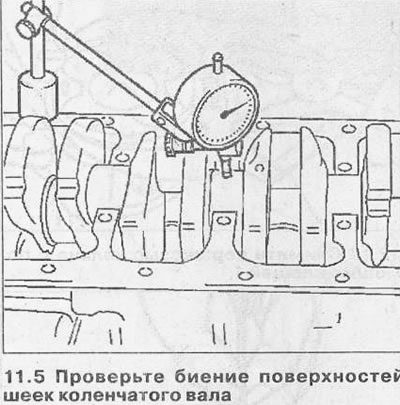
5. Turn the crankshaft and read the dial indicator. Check the runout of the crankshaft journal…


Permissible ovality value 0.03 mm. Clearance between the liners and the journals of the main bearings of the crankshaft. Measurement using a calibrated plastic wire "Plastigage"


The clearance between the liners and the journals of the crankshaft main bearings is checked by calculation, measuring the parts. Before this, the crankshaft and its journals are cleaned, and the liners are lubricated with a thin layer of motor oil.

Typically, a calibrated plastic wire is used to check the gap.

6. Clean the working surface of the liners and the corresponding neck and place a piece of plastic wire on its surface (see illustration).
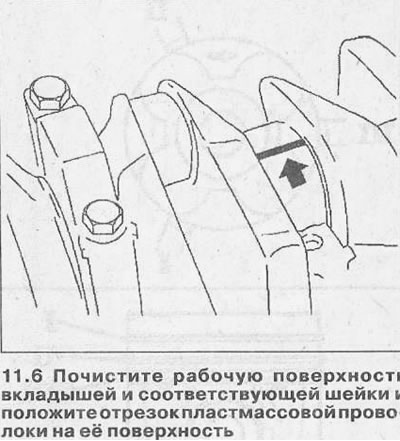
6. Clean the working surface of the liners and the corresponding neck and place a piece of plastic…


7. Install the main bearing cap onto the journal being checked and tighten the mounting bolts to the specified torque.

8. Unscrew the bolts and remove the bearing cover, then use the scale on the plastic wire package to determine the gap size by flattening the wire (see illustration). The permissible gap between the liners and covers is 0.016-0.069 mm.
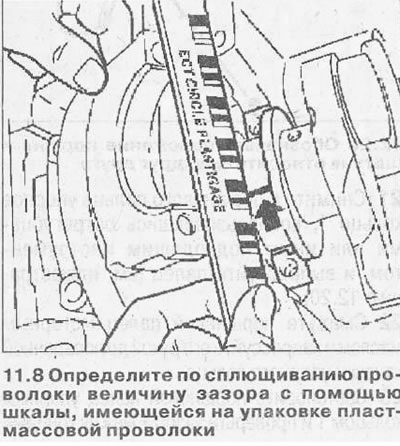
8. Unscrew the bolts and remove the bearing cover, then use the scale on the plastic wire package…


8. Unscrew the bolts and remove the bearing cover, then use the scale on the plastic wire package…


Measuring the clearance of connecting rod bearings using a bore gauge


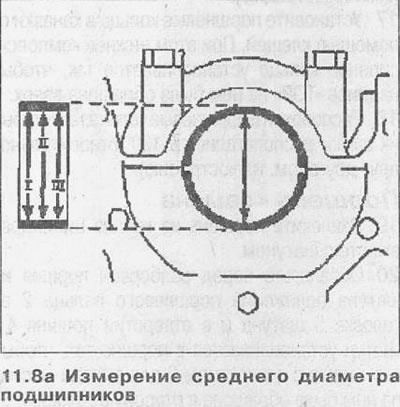
In this case, the clearance between the connecting rod bearing liners is determined by measuring the bearing diameter with a bore gauge at three points. The results obtained are summed up and divided by 3. The result is the average diameter value (see illustration 11.8a).

Example:

I - the result obtained when measuring at point I - 54.972 mm
II - the result obtained when measuring at point II - 54.981 mm
III - the result obtained when measuring at point III - 54.984 mm
164.937 mm: 3 = 54.979 mm

9. Measure the diameter of the corresponding crankpin at two points using a micrometer, add up the obtained values and divide them by 2.

Example:

I - the result obtained when measuring at point I - 54.962 mm
II - the result obtained when measuring at point II - 54.964 mm
109.926 mm: 2 = 54.963 mm


This article is available at russian, bulgarian, belarusian, ukrainian, serbian, croatian, romanian, polish, slovak, hungarian
Checking the article: Shapovalov Yaroslav

Share information:

Previous articles
Opel Omega B2: Diesel engines 2.0 l
Next articles

Crankshaft — removal and installation
Oil pump — removal and installation
Timing Gear Housing — Removal and Installation
Vacuum pump — removal and installation
Camshaft — Removal and Installation
Cylinder head — overhaul
Connecting rod and piston group — removal and installation
Flywheel — removal and installation
Rear Crankshaft Oil Seal — Removal and Installation
Torsional vibration damping unit — removal and installation
V-ribbed auxiliary drive belt — removal and installation
Oil pan — removal and installation


See similar ones from other Opel car manuals:
▶ Crankshaft pulley — removal and installation Opel Astra F (1991-1998, petrol)
▶ Removal and installation the crankshaft pulley Opel Corsa B (1993-2000)
▶ Checks on the car before driving Opel Insignia A (2008-2017)
▶ Installing the crankshaft Opel Kadett E (1984-1995)
▶ Pre-departure checks Opel Vectra A (1988-1995, petrol)
Link to this page in different formats

Visitor comments


No comments yet


How much will 16 + 36 =


Omega B2 (1999-2003) 
  • General information
  • User manual
  • Maintenance
  • Troubleshooting
  • Power unit
  • Petrol 4-cylinder
  • Petrol 6-cylinder
  • Engine overhaul
  • Diesel engines 2.0 l
  • Diesel engines 2.5 l
  • Cooling and heating
  • Injection system (gasoline)
  • Fuel system (diesel)
  • Fuel system
  • Exhaust system
  • Ignition system
  • Transmission
  • Clutch
  • Mechanical gearbox
  • Automatic gearbox
  • Main gear and shafts
  • Chassis
  • Brake system
  • Car suspension
  • Steering
  • Body
  • Body elements
  • Electrical equipment
  • Equipment and devices
  • Electrical circuits
Omega B (1993-1999) 
  • General information
  • User manual
  • Tips for the car owner
  • Maintenance (gasoline)
  • Maintenance (diesel)
  • Power unit
  • Petrol engine SOHC 2.0 l
  • Petrol engine DOHC 2.0 l
  • Petrol engines 2.5 and 3.0 l
  • Repair of gasoline engines
  • Diesel engine 2.0 l
  • Diesel engine repair 2.0 l
  • Diesel engine 2.5 l
  • Cooling and heating
  • Power system (petrol)
  • Emission reduction
  • Fuel system (diesel 2.0 l)
  • Fuel system (diesel 2.5 l)
  • Launch system
  • Ignition system
  • Transmission
  • Clutch
  • Mechanical gearbox
  • Automatic gearbox
  • Drive shafts
  • Chassis
  • Brake system
  • Wheel suspension
  • Steering
  • Body
  • Exterior
  • Interior
  • Doors and windows
  • Electrical equipment
  • Equipment and devices
  • Wiring diagrams (early)
  • Wiring diagrams (late)
Omega A (1986-1993) 
  • General information
  • User manual
  • Maintenance
  • Changes and additions
  • Troubleshooting
  • Power unit
  • Gasoline engines
  • Diesel engines
  • Cooling system
  • Fuel system (gasoline)
  • Fuel system (diesel)
  • Ignition system
  • Transmission
  • Clutch
  • Mechanical gearbox
  • Automatic gearbox
  • Cardan shaft
  • Drive shafts
  • Chassis
  • Brake system
  • Car suspension
  • Steering
  • Body
  • Exterior
  • Interior
  • Electrical equipment
  • Power devices
  • Lighting and appliances
  • Electrical circuits
OpelBook.ru © 2017–2026 · Mobile version · · Sitemap: EN BG BY UA RS HR RO PL SK HU · Feedback · Site search
Astra F, petrol · Astra G, petrol · Astra G · Astra H · Astra J, petrol · Corsa B · Corsa C, petrol · Corsa C · Insignia A · Kadett D · Kadett E · Omega A · Omega B · Omega B2 · Vectra A, petrol · Vectra A · Vectra B, petrol · Vectra B · Vectra C · Zafira A, petrol · Frontera A, petrol · Frontera B · Ascona C · Vivaro A ·
We want your visit to be comfortable 🤝! We use cookies 🍪 to make that happen.