
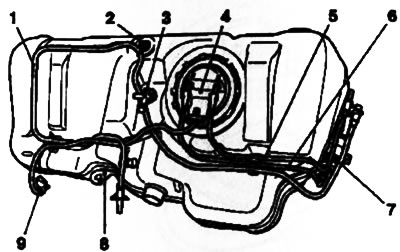
10.1a. Fuel tank for Corsa C models: 1. EVAP system tube; 2. Fitting for the rear hose of the EVAP system; 3. EVAP hose fitting; 4. Fuel pump assembly cover; 5. Return fuel line; 6. Rear section of the supply fuel line; 7. Fuel filter (only petrol models); 8. Heat shield; 9. Wiring harness | 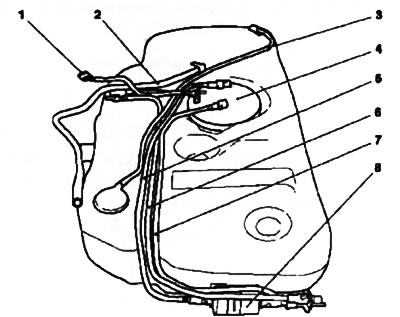
10.1b. Fuel tank of Meriva models: 1. Wiring harness; 2, 3, 6. EVAP system lines; 4. Fuel pump assembly cover; 5. Rear section of the supply fuel line; 7. Return fuel line; 8. Fuel filter (only petrol models) |
2. Disconnect the negative cable from the battery (see chapter 5). Relieve residual pressure in the supply system (petrol models) (see section 2).
3. Before removing the fuel tank, all fuel must be removed from it. Since the manufacturers do not provide a drain plug, pump out the fuel with a special pump - be careful, there will still be some fuel left in the tank.
4. On models with drum-type rear brakes, remove the rear right wheel, mark the position of the wheel hub. Release the parking brake cable from the connector (see resist. illustration) and remove from the guide on the rear suspension beam.
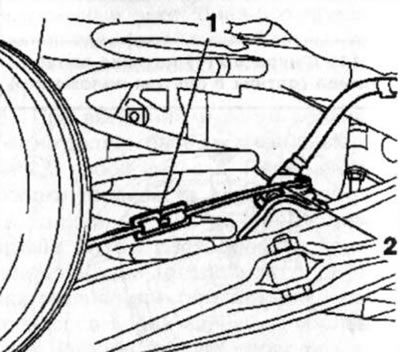
10.4. Fastening of a cable of a drive of a parking brake (models with drum brakes): 1. Connecting element; 2. Guide
5. On models with rear drum brakes, loosen the parking brake cable (see chapter 9).
6. If necessary (depending on the model) Disconnect the handbrake cable ends from the actuating levers of both rear brake mechanisms and release the tips from the holders (see chapter 9).
7. On Corsa-Eco models, remove the spoiler from the bottom of the car.
8. Release the parking brake cables from the holders on the fuel tank and move them aside.
Note: Depending on the model and type of rear brakes, cable routes differ from each other.
9. Release the rear section of the exhaust system from the damping holders (see resist. illustration) and lay it on the rear suspension beam.
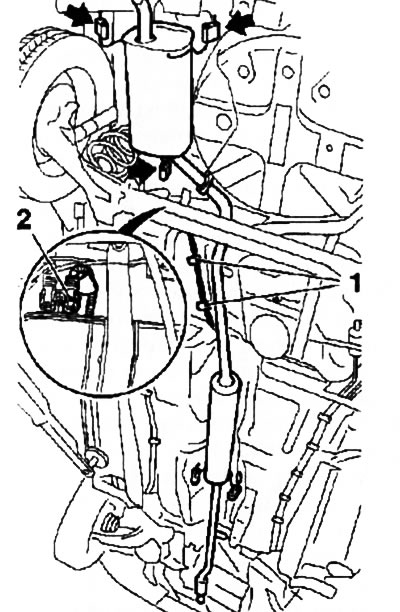
10.9. damping holders (indicated by arrows) rear section of the exhaust system (on the example of a model with a Z10XE engine):
1. Parking brake cable holders
2. Electrical wiring connector installed on the fuel tank units
Note: On some models (e.g. Meriva) complete removal of the exhaust system may be required (see Part D).
10. Disunite a socket of an electroconducting of the fuel pump (see illustration 10.9).
11. Substitute a suitable container to collect fuel, disconnect the fuel line connectors and close them with suitable plugs. A special tool KM-796 is used to undock quick couplings.
12. If necessary (depending on the model) release from the EVAP system line holders. Loosen fastening (loosen the fixing screw if necessary) and disconnect the fuel filler hose from the fuel tank.
13. Support the tank with a cart jack (see resist. illustration), previously, to distribute the load, laying the last piece of the board on the head, unscrew the fixing bolts and remove 2 mounting strips.
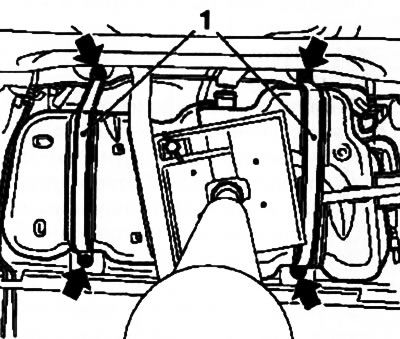
10.13. Removing the fuel tank using a lifting jack - the arrows indicate the mounting strip mounting bolts (1)
14. Gently lower the fuel tank, while using the help of an assistant to take it aside and not damage the exhaust system. Disconnect all supply lines from the tank. If necessary, remove the fuel pump assembly from the tank (see Section 8).
15. Installation is carried out in the reverse order. If the tank is being replaced, reinstall all removable elements from the old to the new one. Before the first trip, fill the tank with a small amount of fuel and check it for signs of leaks.
Visitor comments