
OpelBook.ru
Cars AvtoVAZ Cars Mitsubishi Cars BMW Cars Mercedes Cars Nissan Cars Toyota Cars Chevrolet
English Русский
Български
Беларускі
Український
Српски
Hrvatski
Română
Polski
Slovenský
Magyar
 |  Sitemap  |  Contacts  |    


Main Astra Corsa Insignia Kadett Omega Vectra Zafira Others Articles
Corsa B (1993-2000) Corsa C (2000-2006, petrol) Corsa C (2000-2006)
  • Main
  • Corsa
  • Corsa C
  • Power unit
  • Power and exhaust system
  • Removal and installation lambda probes (petrol models)

Removal and installation lambda probes (petrol models) (Opel Corsa C)

            0

19. Lambda probes are designed to monitor and adjust the composition of exhaust gases. The sensors are screwed into the pipe before and after the catalytic converter. To remove the probes, as a rule, a special socket wrench with a slotted hole for the electric wire is used. Depending on the length and location of the sensor, the wrenches can have different designs. The procedure for removing/installing the probe is not complicated, but requires accuracy.

20. The pre-catalytic lambda probe is installed in the receiving section of the catalytic converter or on the exhaust manifold. Disconnect the lambda probe wiring connector. Using a special key (Opel-KM-6129), carefully unscrew and remove the probe.

21. The post-catalytic lambda probe is usually installed on the first (intake) section of the exhaust system. Raise the car on a lift, disconnect the probe wiring connector. Carefully unscrew the lambda probe using a socket attachment (see accompanying illustration) and take it off.
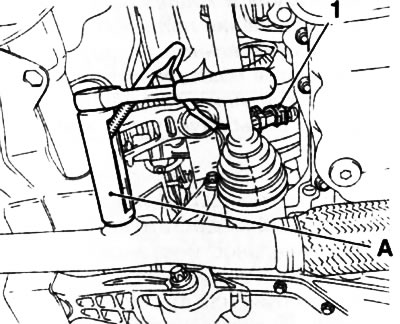
20.21. Removing the post-catalytic lambda probe using the end cap KM-6129 (A): 1. Electrical wiring…

20.21. Removing the post-catalytic lambda probe using the end cap KM-6129 (A): 1. Electrical wiring connector


22. Installation is carried out in the reverse order of removal. Before installation, lubricate the lambda probe thread with a thin layer of heat-resistant mounting paste BOSCH or Opel (black, No.1948569/90513210) (petrol engine: black grease, diesel engine: white grease), put it back in place.


Attention: The mounting paste should be applied only to the threads, do not allow it to come into contact with the lambda probe body!


(Article posted on a web portal OpelBook.ru)

Note: If the lambda probe is installed without using heat-resistant grease, the thread will start to stick over time. As a result, it will be impossible to unscrew the probe during the next service. New sensors already have the necessary grease.


This article is available at russian, bulgarian, belarusian, ukrainian, serbian, croatian, romanian, polish, slovak, hungarian
Checking the article: Kornev Georgy

Share information:

Previous articles
Opel Corsa C: Power and exhaust system
Next articles

Removal and installation of the exhaust system
Exhaust system — general information
Turbocharger and Intercooler — General Information
Removal and installation the fuel tank
Removal and installation the fuel filter mounting clamp (diesel)
Removal and installation the fuel pump/fuel level sensor
Emission control systems


See similar ones from other Opel car manuals:
▶ Replacing the air cleaner filter element — all petrol and… Opel Astra G (1998-2004)
▶ Removal and installation lambda probes Opel Vectra C (2002-2008)
▶ Filling the cooling system — petrol engines 1.6 and 1.8 l Opel Insignia A (2008-2017)
▶ Instrument cluster of the Opel «Kadett E» models «GLS» and… Opel Kadett E (1984-1995)
▶ Maintenance Procedures (Gasoline Models) Opel Omega A (1986-1993)
Link to this page in different formats

Visitor comments


No comments yet


How much will 27 + 24 =


Corsa C (2000-2006) 
  • General information
  • Introduction to guide
  • Troubleshooting
  • Vehicle device
  • User manual
  • Maintenance
  • Power unit
  • Engine repair
  • Cooling system
  • Power and exhaust system
  • Control system
  • Engine electrical equipment
  • Transmission
  • Clutch
  • Mechanical gearbox
  • Automatic gearbox
  • Drive shafts
  • Chassis
  • Brake system
  • Wheel suspension
  • Steering
  • Body
  • Exterior
  • Interior
  • Doors and windows
  • Heating and air conditioning
  • Electrical equipment
  • Equipment and devices
  • Lamps and lighting
  • Electrical circuits
Corsa C (2000-2006, petrol) 
  • User manual
  • Car access
  • Governing bodies
  • Seat control
  • Heating and air conditioning
  • Driving and maintenance
  • Engines 1.0 and 1.2 l
  • Engine repair
  • Cooling and lubrication system
  • Injection system
  • Engines 1.4, 1.6 and 1.8 l
  • Engine repair
  • Cooling and lubrication system
  • Injection system
  • Transmission
  • Clutch
  • Mechanical gearbox
  • Automatic gearbox
  • Drive shafts
  • Chassis
  • Wheels and tires
  • Wheel suspension
  • Steering
  • Brake system
  • Body
  • Exterior
  • Doors and windows
  • Electrical equipment
  • Equipment and devices
  • Lighting system
  • Electrical circuits
Corsa B (1993-2000) 
  • General information
  • Introduction to guide
  • User manual
  • Maintenance
  • Power unit
  • SOHC gasoline engines
  • DOHC gasoline engines
  • Diesel engines
  • Engine repair
  • Cooling system
  • Supply system
  • Injection system (gasoline)
  • Injection system (diesel)
  • Exhaust systems
  • Control system (gasoline)
  • Preheat system (diesel)
  • Charge and launch system
  • Transmission
  • Mechanical gearbox
  • Automatic gearbox
  • Clutch and drive shafts
  • Chassis
  • Brake system
  • Front suspension
  • Rear suspension
  • Steering
  • Body
  • Ventilation and heating
  • Exterior
  • Interior
  • Doors and windows
  • Electrical equipment
  • Equipment and devices
  • Lamps and lighting
  • Electrical circuits
OpelBook.ru © 2017–2026 · Mobile version · · Sitemap: EN BG BY UA RS HR RO PL SK HU · Feedback · Site search
Astra F, petrol · Astra G, petrol · Astra G · Astra H · Astra J, petrol · Corsa B · Corsa C, petrol · Corsa C · Insignia A · Kadett D · Kadett E · Omega A · Omega B · Omega B2 · Vectra A, petrol · Vectra A · Vectra B, petrol · Vectra B · Vectra C · Zafira A, petrol · Frontera A, petrol · Frontera B · Ascona C · Vivaro A ·
We want your visit to be comfortable 🤝! We use cookies 🍪 to make that happen.