
OpelBook.ru
Cars AvtoVAZ Cars Mitsubishi Cars BMW Cars Mercedes Cars Nissan Cars Toyota Cars Chevrolet
English Русский
Български
Беларускі
Український
Српски
Hrvatski
Română
Polski
Slovenský
Magyar
 |  Sitemap  |  Contacts  |    


Main Astra Corsa Insignia Kadett Omega Vectra Zafira Others Articles
Vectra A (1988-1995, petrol) Vectra A (1988-1995) Vectra B (1995-2002, petrol) Vectra B (1995-2002) Vectra C (2002-2008)
  • Main
  • Vectra
  • Vectra A
  • Power unit
  • Fuel system (injector)
  • Throttle body (except Multec system) — removal and installation

Throttle body (except Multec system) — removal and installation (Opel Vectra A)

            0

Contents: Single overhead camshaft engine ⬇ Double overhead cam engine ⬇

Single overhead camshaft engine


Removal


1. Disconnect the negative cable from the battery.

2. Loosen the clamp screws securing the main air duct to the throttle body and air flow meter, then remove the main air duct.

3. Loosen the clamp screw, disconnect the idle speed control hose from the throttle body.

4. Disconnect the breather hose from the camshaft cover to the throttle body.

5. Disconnect the coolant hoses from the throttle body. Cap the open ends of the hoses to prevent further coolant loss.

6. Disconnect the wiring from the throttle position sensor.

7. Release the retaining clip, then disconnect the throttle cable ball end from the lever.

8. Pull the throttle cable O-ring off the bracket on the intake manifold, then disconnect the throttle return spring from the bracket (see illustration).
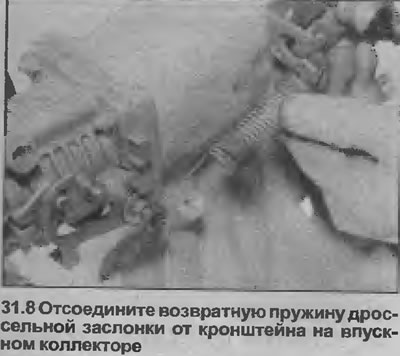
8. Pull the throttle cable O-ring off the bracket on the intake manifold, then disconnect the…


9. Make a final check to ensure all relevant hoses and wires are disconnected and clear of the throttle body.

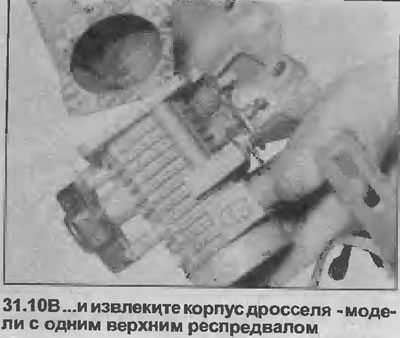
10. Unscrew the four mounting nuts, remove the throttle body from the intake manifold (see illustrations). The lower nuts are difficult to access, so you may have to move the two fuel hoses to the side. Be careful not to deform the hoses.
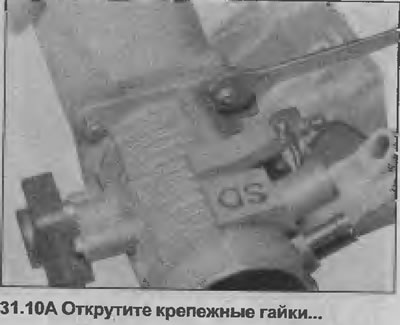

10. Unscrew the four mounting nuts, remove the throttle body from the intake manifold (see…


10. Unscrew the four mounting nuts, remove the throttle body from the intake manifold (see…


11. Remove the gasket.

12. If required, the throttle position sensor can be removed from the throttle body, see. Chapter 23.

Installation


13. Perform installation in reverse order, paying attention to the following.

14. Where applicable, install the throttle position sensor as described in Chapter 23.

15. Install the throttle body using a new gasket (see illustration).
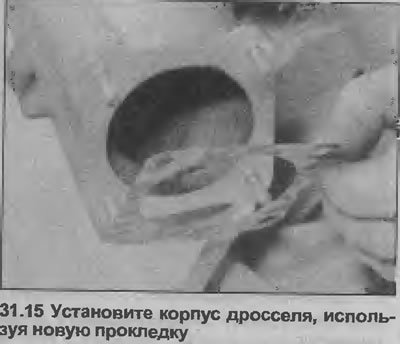
15. Install the throttle body using a new gasket (see illustration).


16. Make sure all hoses and wires are connected correctly.


17. Check the coolant level and, if necessary, top it up as described in Section 3.

18. Check and, if necessary, adjust the throttle cable play as described in Chapter 19.

Double overhead cam engine


Removal


19. Disconnect the negative cable from the battery.

20. Loosen the clamp screw securing the main air duct to the left side of the air flow meter.

21. Using a socket wrench, remove the four bolts securing the heater assembly to the throttle body. Lift the heater assembly off the throttle body, disconnect the hose from the base of the assembly, then remove the heater assembly.

22. Disconnect the wiring from the throttle position sensor.

23. Loosen the mounting nut, remove the fuel supply hose bracket on the left side of the throttle body (see illustration).
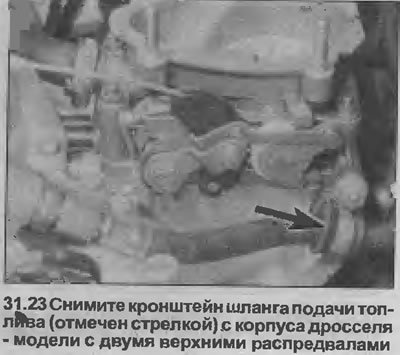
23. Loosen the mounting nut, remove the fuel supply hose bracket on the left side of the throttle…


24. Pull the cable off the throttle lever.

25. Disconnect the breather hose from the throttle body.

26. Disconnect the vacuum line from the top of the fuel pressure regulator.

27. Make a final check to ensure all relevant hoses, pipes and wires are disconnected and clear of the throttle body.

28. Unscrew the four mounting nuts, remove the throttle body from the intake manifold. Remove the gasket.


29. If necessary, the throttle position sensor can be removed from the throttle body, if necessary, follow the instructions Chapter 31.

30. Never attempt to adjust the throttle linkage. If the linkage is defective, contact your Opel dealer.

Installation


31. Perform installation in reverse order, paying attention to the following.

32. Where applicable, install the throttle position sensor as described in Chapter 23.

33. Install the throttle body using a new gasket.

34. Make sure all hoses, pipes and wires are connected correctly.

35. Finally, check and, if necessary, adjust the throttle cable play as described in Chapter 19.


This article is available at russian, bulgarian, belarusian, ukrainian, serbian, croatian, romanian, polish, slovak, hungarian
Checking the article: Chernov Alexander

Share information:

Previous articles
Opel Vectra A: Fuel system (injector)
Next articles

Fuel injector (Multec system) — check
Fuel injector (Multec system) — removal and installation
Fuel injectors (except Multec system) — removal and installation
Air Mass Flow Meter Tape — Removal and Installation
Air mass meter (if equipped) — removal and installation
Air Flow Meter (if equipped) — Removal and Installation
Throttle Body (Multec System) — Removal and Installation
Idle Air Control Stepper Motor — Removal and Installation
Throttle Potentiometer — Removal and Installation
Electronic Control Unit (ECU) — Removal and Installation
Knock Sensor and Module (X16 SZ Models) — Removal and Installation
Knock sensor (Simtec system) — removal and installation


See similar ones from other Opel car manuals:
▶ Multec Single Point Fuel Injection System Components —… Opel Astra F (1991-1998, petrol)
▶ Removal and installation the throttle body — petrol models Opel Corsa B (1993-2000)
▶ Body control system Opel Insignia A (2008-2017)
▶ Checking and adjusting the GM «Multec SPI» fuel injection… Opel Kadett E (1984-1995)
▶ Fuel injection system throttle switch — checking and… Opel Omega A (1986-1993)
Link to this page in different formats

Visitor comments


No comments yet


How much will 48 + 28 =


Vectra C (2002-2008) 
  • General information
  • User manual
  • Vehicle device
  • Maintenance
  • Troubleshooting
  • Power unit
  • Engine repair
  • Cooling system
  • Power and control system
  • Engine electrics
  • Transmission
  • Clutch
  • Car gearbox
  • Drive shafts
  • Chassis
  • Car suspension
  • Steering
  • Brake system
  • Body
  • Exterior
  • Interior
  • Doors, locks and windows
  • Heating and ventilation
  • Electrical equipment
  • Equipment and devices
  • Headlights and lighting
  • Electrical circuits
Vectra B (1995-2002) 
  • General information
  • User manual
  • Weekly checks
  • Maintenance (gasoline)
  • Maintenance (diesel)
  • Troubleshooting
  • Power unit
  • SOHC gasoline engine
  • DOHC petrol engine
  • Diesel engine 1.7 liter
  • Diesel engine 2.0 liters
  • Engine repair
  • Cooling system
  • Fuel system (gasoline)
  • Fuel system (diesel)
  • Charging system
  • Launch system
  • Ignition and preheat
  • Transmission
  • Clutch
  • Mechanical gearbox
  • Automatic gearbox
  • Drive shafts
  • Chassis
  • Brake system
  • Wheel suspension
  • Steering
  • Body
  • Exterior
  • Interior
  • Doors and windows
  • Heating and ventilation
  • Electrical equipment
  • Equipment and devices
  • Electrical circuits
Vectra B (1995-2002, petrol) 
  • General information
  • Maintenance
  • Help with malfunctions
  • Power unit
  • Engine repair
  • Exhaust system
  • Cooling system
  • Fuel system
  • Multec injection system
  • Four point injection
  • Transmission
  • Clutch
  • Gearbox and drive
  • Chassis
  • Wheel suspension
  • Steering
  • Brake system
  • Wheels and tires
  • Body
  • Exterior
  • Interior
  • Electrical equipment
  • Fuses and electronics
  • Power devices
  • Ignition system
  • Lighting and signaling
  • Equipment and devices
  • Heating and ventilation
  • Electrical circuits
Vectra A (1988-1995) 
  • Power unit
  • Engine repair
  • Ignition system
  • Lubrication system
  • Cooling system
  • Injection system
  • Fuel system (carburetor)
  • Fuel system (diesel)
  • Exhaust system
  • Transmission
  • Clutch
  • Car gearbox
  • Chassis
  • Front suspension
  • Rear suspension
  • Steering
  • Brake system
  • Wheels and tires
  • Body
  • Exterior
  • Interior
  • Electrical equipment
  • Electrical circuits
Vectra A (1988-1995, petrol) 
  • General information
  • User manual
  • Maintenance
  • Power unit
  • SOHC engine
  • DOHC engine
  • Cooling and ventilation
  • Fuel system (carburetor)
  • Fuel system (injector)
  • Exhaust converter
  • Transmission
  • Clutch
  • Mechanical gearbox
  • Automatic gearbox
  • Drive shafts
  • Chassis
  • Brake system
  • Car suspension
  • Steering
  • Body
  • Body elements
  • Electrical equipment
  • Power devices
  • Equipment and devices
  • Electrical circuits
OpelBook.ru © 2017–2026 · Mobile version · · Sitemap: EN BG BY UA RS HR RO PL SK HU · Feedback · Site search
Astra F, petrol · Astra G, petrol · Astra G · Astra H · Astra J, petrol · Corsa B · Corsa C, petrol · Corsa C · Insignia A · Kadett D · Kadett E · Omega A · Omega B · Omega B2 · Vectra A, petrol · Vectra A · Vectra B, petrol · Vectra B · Vectra C · Zafira A, petrol · Frontera A, petrol · Frontera B · Ascona C · Vivaro A ·
We want your visit to be comfortable 🤝! We use cookies 🍪 to make that happen.