
Note: When installing, use a new tie rod-to-steering gear bolt adapter plate and, where applicable, a new tie-rod end self-locking ball joint nut. If the tie rod is removed with the tip, a ball joint puller will be required.
Removing
1. The tie rod can be removed without or complete with a tip.
2. Proceed as described in point 1 Chapter 43.
3. If the steering rod is removed together: with a tip, then proceed as described in points 3 and 4 Chapter 43.
4. If the tie rod is removed without a tip, loosen the tie rod clamp bolt securing the tie rod to the adjuster threaded stud on the tip.
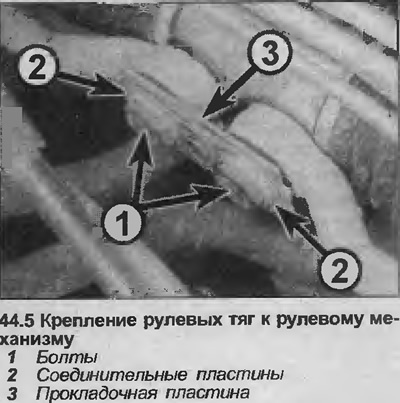
5. Remove using a screwdriver as a lever. connecting plate (plates) from the bolts securing the linkage to the steering gear, then unscrew the bolts and remove the washers and the gasket plate (see illustration).
6. If steering draft acts in film together with a tip, take assembly from under the car.
7. If the tie rod is removed independently of the tip, mark the position of the tip on the adjuster pin with paint or count the number of turns of the thread on the protruding end of the adjuster pin. Unscrew the tie rod of this tip and remove the rod from under the car.
Installation
8. Install in reverse order, paying attention to the following.
9. Connecting plate (plates) bolts of fastening of drafts to the steering mechanism should be replaced at installation.
10. If the tie rod is fitted with a tie rod end, connect the tie rod end ball joint to the suspension strut and tighten the new self-locking nut to the specified torque.
11. If the tie rod is installed independently of the tip, screw the rod onto the adjuster pin to the position marked during removal and tighten the clamp bolt.
12. Lower the car on wheels and finally tighten wheel bolts. Where applicable, install wheel cap.
13. Finally, check the front wheel alignment as described in Chapter 45 and adjust them if necessary.
Visitor comments