
OpelBook.ru
Cars AvtoVAZ Cars Mitsubishi Cars BMW Cars Mercedes Cars Nissan Cars Toyota Cars Chevrolet
English Русский
Български
Беларускі
Український
Српски
Hrvatski
Română
Polski
Slovenský
Magyar
 |  Sitemap  |  Contacts  |    


Main Astra Corsa Insignia Kadett Omega Vectra Zafira Others Articles
Corsa B (1993-2000) Corsa C (2000-2006, petrol) Corsa C (2000-2006)
  • Main
  • Corsa
  • Corsa C
  • Engines 1.4, 1.6 and 1.8 l
  • Engine repair
  • Checking the clearance in the connecting rod bearing

Checking the clearance in the connecting rod bearing (Opel Corsa C)

            0

Measurement


Measurement


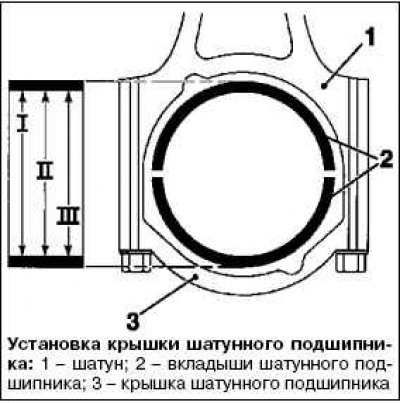
Install the connecting rod bearing cap (3) with the connecting rod bearing shells (2) onto the connecting rod.

Note: Do not change the connecting rod bearing cap and connecting rod during installation, and ensure that the contact surfaces are clean


Note: Old bolts can be reused for testing.


Tighten the 2 bolts to 13 Nm, then turn further by +60° +15°.
Tighten the 2 bolts to 13 Nm, then turn further by +60° +15°.


The connecting rod center diameter is measured with an internal micrometer in positions I, II, and arithmetically. The formula and example for calculating the connecting rod bearing diameter: I + II + III.

I – 43, 026 mm.

II – 43, 027 mm.

III – 43, 031 mm.

129.084 mm: 3 = 43.028 mm.

The average inner diameter of the connecting rod bearing is 43.028 mm.


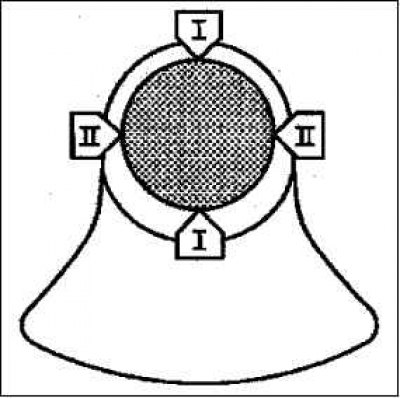
The journal diameter of the connecting rod bearing shaft is measured with an outside micrometer in positions I and II. Formula and example for calculating the journal diameter of the connecting rod bearing shaft:

I + II / 2;

I – 42.977 mm + II – 42.985 mm.

85.962 mm: 2 = 42.981 mm.

The average diameter of the connecting rod bearing shaft journal is 42.981 mm.

Determine the connecting rod bearing clearance using the connecting rod bearing mean inside diameter and the connecting rod bearing journal mean diameter.

Average inner diameter of connecting rod bearing: 4.028 mm.

Average diameter of connecting rod bearing journal: 2.981 mm.

Connecting rod bearing clearance: 0.047 mm.

The calculated connecting rod bearing clearance is 0.047 mm in this example. The allowable connecting rod bearing clearance is 0.013 mm to 0.061 mm.

Note: The check is carried out using a tool for measuring clearances in plain bearings.


Mark the installation position of the connecting rod bearing cap.
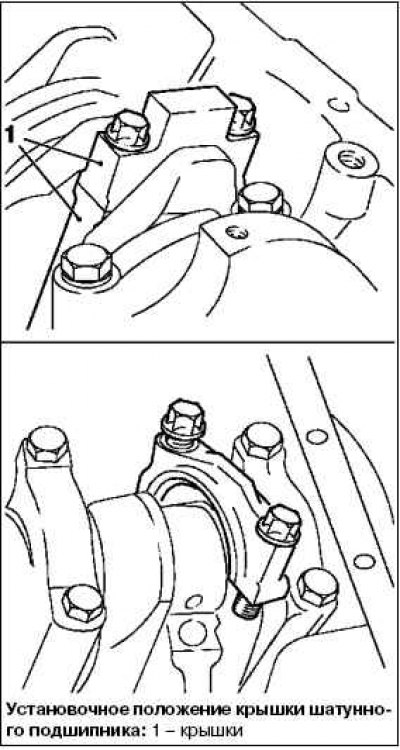
Mark the installation position of the connecting rod bearing cap.


Disconnect the connecting rod bearing shells and the connecting rod bearing cap by unscrewing the 2 mounting bolts.

Measure the connecting rod bearing clearance using a plain bearing clearance measuring tool (plastic wire).


Note: The plain bearing clearance measuring tool is available in different measuring ranges.


Cut the wire to a length that matches the width of the connecting rod bearing.

Place the wire along the axis between the crankshaft main journal of the connecting rod bearing and the connecting rod bearing shell.
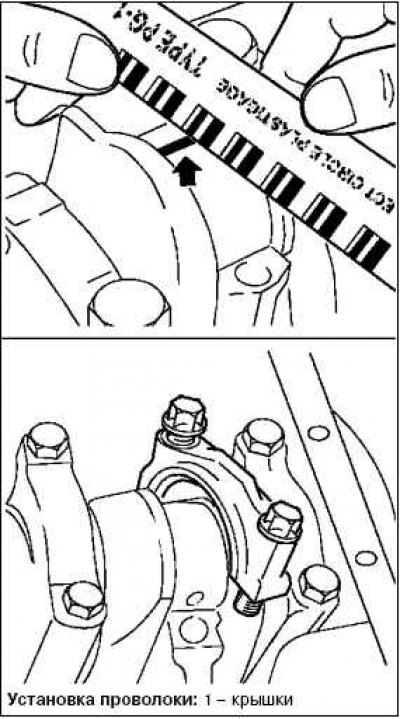
Place the wire along the axis between the crankshaft main journal of the connecting rod bearing and…


Install the connecting rod bearing cap

Note: To prevent the wire from breaking when removing the connecting rod bearing cap, remove the grease from the crankshaft journal and lightly lubricate the connecting rod bearing shell - do not turn the crankshaft.


Tighten the 2 bolts to 13 Nm and turn them further by +60° and +15°.

Remove the connecting rod bearing cover, unscrew the 2 bolts.

Attention! Do not confuse decimal and metric scale information.


Measure the width of the flattened section of plastic wire using a measuring scale.

Permissible clearance in the connecting rod bearing: from 0.013 mm to 0.061 mm.

Install the connecting rod bearing shell and connecting rod bearing cap.

Clean the crankshaft bearing journal and connecting rod bearing shell.

Lightly lubricate the connecting rod bearing shells.


Tighten the 2 bolts to 13 Nm and turn them further by +60° and +15°.

Caution: Always use M6.5 bolts. Use new bolts.


This article is available at russian, bulgarian, belarusian, ukrainian, serbian, croatian, romanian, polish, slovak, hungarian
Checking the article: Kornev Georgy

Share information:

Previous articles
Opel Corsa C: Engine repair
Next articles

Removal and installation the cylinder head (1.4-1.6 l engine)
Checking the axial free play of the crankshaft
Replacing valve stem seals (installed cylinder head)
Replacing the rear crankshaft oil seal
Removal and installation the flywheel (1.4L engine)
Measuring oil consumption
Replacing the connecting rod bearing
Replacing piston rings
Replacing the piston with the connecting rod


See similar ones from other Opel car manuals:
▶ Piston/Connecting Rod Assemblies — Installing and Checking… Opel Omega B2 (1999-2003)
▶ Checking the operating clearance of the lower connecting… Opel Vectra B (1995-2002)
▶ Crankshaft — Installation and Checking the Main Bearing… Opel Astra F (1991-1998, petrol)
▶ Cleaning and checking the technical condition of the… Opel Insignia A (2008-2017)
▶ Checking the diametrical clearance between the bearings and… Opel Kadett E (1984-1995)
Link to this page in different formats

Visitor comments


No comments yet


How much will 35 + 35 =


Corsa C (2000-2006) 
  • General information
  • Introduction to guide
  • Troubleshooting
  • Vehicle device
  • User manual
  • Maintenance
  • Power unit
  • Engine repair
  • Cooling system
  • Power and exhaust system
  • Control system
  • Engine electrical equipment
  • Transmission
  • Clutch
  • Mechanical gearbox
  • Automatic gearbox
  • Drive shafts
  • Chassis
  • Brake system
  • Wheel suspension
  • Steering
  • Body
  • Exterior
  • Interior
  • Doors and windows
  • Heating and air conditioning
  • Electrical equipment
  • Equipment and devices
  • Lamps and lighting
  • Electrical circuits
Corsa C (2000-2006, petrol) 
  • User manual
  • Car access
  • Governing bodies
  • Seat control
  • Heating and air conditioning
  • Driving and maintenance
  • Engines 1.0 and 1.2 l
  • Engine repair
  • Cooling and lubrication system
  • Injection system
  • Engines 1.4, 1.6 and 1.8 l
  • Engine repair
  • Cooling and lubrication system
  • Injection system
  • Transmission
  • Clutch
  • Mechanical gearbox
  • Automatic gearbox
  • Drive shafts
  • Chassis
  • Wheels and tires
  • Wheel suspension
  • Steering
  • Brake system
  • Body
  • Exterior
  • Doors and windows
  • Electrical equipment
  • Equipment and devices
  • Lighting system
  • Electrical circuits
Corsa B (1993-2000) 
  • General information
  • Introduction to guide
  • User manual
  • Maintenance
  • Power unit
  • SOHC gasoline engines
  • DOHC gasoline engines
  • Diesel engines
  • Engine repair
  • Cooling system
  • Supply system
  • Injection system (gasoline)
  • Injection system (diesel)
  • Exhaust systems
  • Control system (gasoline)
  • Preheat system (diesel)
  • Charge and launch system
  • Transmission
  • Mechanical gearbox
  • Automatic gearbox
  • Clutch and drive shafts
  • Chassis
  • Brake system
  • Front suspension
  • Rear suspension
  • Steering
  • Body
  • Ventilation and heating
  • Exterior
  • Interior
  • Doors and windows
  • Electrical equipment
  • Equipment and devices
  • Lamps and lighting
  • Electrical circuits
OpelBook.ru © 2017–2026 · Mobile version · · Sitemap: EN BG BY UA RS HR RO PL SK HU · Feedback · Site search
Astra F, petrol · Astra G, petrol · Astra G · Astra H · Astra J, petrol · Corsa B · Corsa C, petrol · Corsa C · Insignia A · Kadett D · Kadett E · Omega A · Omega B · Omega B2 · Vectra A, petrol · Vectra A · Vectra B, petrol · Vectra B · Vectra C · Zafira A, petrol · Frontera A, petrol · Frontera B · Ascona C · Vivaro A ·
We want your visit to be comfortable 🤝! We use cookies 🍪 to make that happen.