
OpelBook.ru
Cars AvtoVAZ Cars Mitsubishi Cars BMW Cars Mercedes Cars Nissan Cars Toyota Cars Chevrolet
English Русский
Български
Беларускі
Український
Српски
Hrvatski
Română
Polski
Slovenský
Magyar
 |  Sitemap  |  Contacts  |    


Main Astra Corsa Insignia Kadett Omega Vectra Zafira Others Articles
Vectra A (1988-1995, petrol) Vectra A (1988-1995) Vectra B (1995-2002, petrol) Vectra B (1995-2002) Vectra C (2002-2008)
  • Main
  • Vectra
  • Vectra B
  • Power unit
  • Engine repair
  • Checking the operating clearance of the lower connecting rod bearing

Checking the operating clearance of the lower connecting rod bearing (Opel Vectra B)

            0

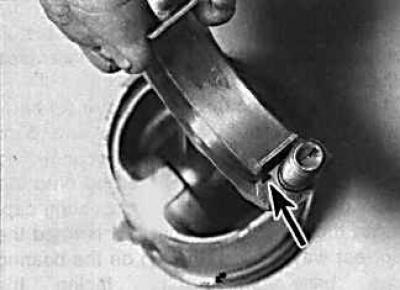
1. Clean the back of the bearing and its installation area in the connecting rod and the connecting rod cap.

1. Clean the back of the bearing and its installation area in the connecting rod and the connecting…


2. Install the liners into place.

3. One method is to install the connecting rod bearing caps with the bearing shell onto the connecting rods and tighten them to the specified torque. Measure the inside diameter of each assembled pair of bearing shells. Measure the diameter of each crankshaft journal. Subtract the corresponding crankshaft journal diameter from the measured bearing diameter.

4. The second and more accurate method is to use a product known as Plastigage. This is a round plastic rod that is compressed between the bearing shell and the crankshaft journal. After removing the connecting rod bearing cap, the deformed plastic rod is measured with a special template that is included with the Plastigage. The procedure for using Plastigage is as follows. Install the connecting rods on the crankshaft without lubrication, the crankshaft journals and bearings must be completely clean and dry. Cut several pieces of plastic rod and install them on each crankshaft journal. Install the caps with the lower bearing shells and tighten the mounting bolts to the specified torque.


5. When measuring the clearance using the Plastigage method, do not rotate the engine crankshaft. Unscrew the bearing cap, remove it and apply the scale ruler printed on the package to the deformed plastic rod. By comparing the width of the deformed plastic rod with the reference width on the scale ruler, determine the clearance value. Finally, carefully clean off any traces of Plastigage from the bearings and crankshaft.

Source is on the website [OpelBook]


This article is available at russian, bulgarian, belarusian, ukrainian, serbian, croatian, romanian, polish, slovak, hungarian
Checking the article: Pavlovsky Nikolay

Share information:

Previous articles
Opel Vectra B: Engine repair
Next articles

Pistons and connecting rods, checking the working clearances of connecting rod bearings
Installing the crankshaft
Selection of bearings
Installing piston rings
Sequence of engine assembly during major repairs
Inspection of main and connecting rod bearings
Installing pistons with connecting rods
Starting the engine after major repairs


See similar ones from other Opel car manuals:
▶ Checking the clearance in the connecting rod bearing Opel Corsa C (2000-2006, petrol)
▶ Piston/Connecting Rod Assemblies — Installing and Checking… Opel Omega B2 (1999-2003)
▶ Crankshaft — Installation and Checking the Main Bearing… Opel Astra F (1991-1998, petrol)
▶ Cleaning and checking the technical condition of the… Opel Insignia A (2008-2017)
▶ Checking the diametrical clearance between the bearings and… Opel Kadett E (1984-1995)
Link to this page in different formats

Visitor comments


No comments yet


How much will 33 + 38 =


Vectra C (2002-2008) 
  • General information
  • User manual
  • Vehicle device
  • Maintenance
  • Troubleshooting
  • Power unit
  • Engine repair
  • Cooling system
  • Power and control system
  • Engine electrics
  • Transmission
  • Clutch
  • Car gearbox
  • Drive shafts
  • Chassis
  • Car suspension
  • Steering
  • Brake system
  • Body
  • Exterior
  • Interior
  • Doors, locks and windows
  • Heating and ventilation
  • Electrical equipment
  • Equipment and devices
  • Headlights and lighting
  • Electrical circuits
Vectra B (1995-2002) 
  • General information
  • User manual
  • Weekly checks
  • Maintenance (gasoline)
  • Maintenance (diesel)
  • Troubleshooting
  • Power unit
  • SOHC gasoline engine
  • DOHC petrol engine
  • Diesel engine 1.7 liter
  • Diesel engine 2.0 liters
  • Engine repair
  • Cooling system
  • Fuel system (gasoline)
  • Fuel system (diesel)
  • Charging system
  • Launch system
  • Ignition and preheat
  • Transmission
  • Clutch
  • Mechanical gearbox
  • Automatic gearbox
  • Drive shafts
  • Chassis
  • Brake system
  • Wheel suspension
  • Steering
  • Body
  • Exterior
  • Interior
  • Doors and windows
  • Heating and ventilation
  • Electrical equipment
  • Equipment and devices
  • Electrical circuits
Vectra B (1995-2002, petrol) 
  • General information
  • Maintenance
  • Help with malfunctions
  • Power unit
  • Engine repair
  • Exhaust system
  • Cooling system
  • Fuel system
  • Multec injection system
  • Four point injection
  • Transmission
  • Clutch
  • Gearbox and drive
  • Chassis
  • Wheel suspension
  • Steering
  • Brake system
  • Wheels and tires
  • Body
  • Exterior
  • Interior
  • Electrical equipment
  • Fuses and electronics
  • Power devices
  • Ignition system
  • Lighting and signaling
  • Equipment and devices
  • Heating and ventilation
  • Electrical circuits
Vectra A (1988-1995) 
  • Power unit
  • Engine repair
  • Ignition system
  • Lubrication system
  • Cooling system
  • Injection system
  • Fuel system (carburetor)
  • Fuel system (diesel)
  • Exhaust system
  • Transmission
  • Clutch
  • Car gearbox
  • Chassis
  • Front suspension
  • Rear suspension
  • Steering
  • Brake system
  • Wheels and tires
  • Body
  • Exterior
  • Interior
  • Electrical equipment
  • Electrical circuits
Vectra A (1988-1995, petrol) 
  • General information
  • User manual
  • Maintenance
  • Power unit
  • SOHC engine
  • DOHC engine
  • Cooling and ventilation
  • Fuel system (carburetor)
  • Fuel system (injector)
  • Exhaust converter
  • Transmission
  • Clutch
  • Mechanical gearbox
  • Automatic gearbox
  • Drive shafts
  • Chassis
  • Brake system
  • Car suspension
  • Steering
  • Body
  • Body elements
  • Electrical equipment
  • Power devices
  • Equipment and devices
  • Electrical circuits
OpelBook.ru © 2017–2026 · Mobile version · · Sitemap: EN BG BY UA RS HR RO PL SK HU · Feedback · Site search
Astra F, petrol · Astra G, petrol · Astra G · Astra H · Astra J, petrol · Corsa B · Corsa C, petrol · Corsa C · Insignia A · Kadett D · Kadett E · Omega A · Omega B · Omega B2 · Vectra A, petrol · Vectra A · Vectra B, petrol · Vectra B · Vectra C · Zafira A, petrol · Frontera A, petrol · Frontera B · Ascona C · Vivaro A ·
We want your visit to be comfortable 🤝! We use cookies 🍪 to make that happen.