


Contents: Removal the air filter housing ⬇ Removal the ignition module ⬇ Removal camshaft sensors ⬇ Removal the cylinder head cover ⬇ Removal the right engine cowling ⬇ Setting the crankshaft to the top…⬇ Recommended tightening torques for…⬇
Removal the air filter housing
Note: Before the inspection procedure, warm up the engine to operating temperature (oil temperature – 80°C).
Open the hood.
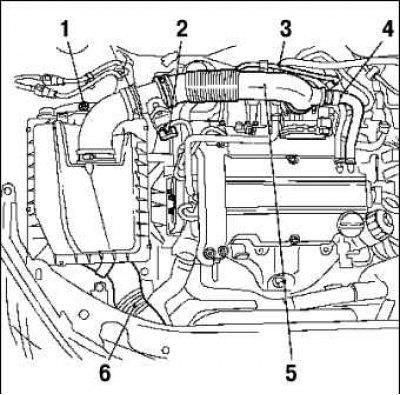
Components removed when dismantling the air filter: 1 - lower rubber support mounting bolt; 2 – Mass air flow sensor wiring harness; 3 – fuel tank ventilation line; 4 – engine ventilation hose; 5 – air intake hose; 6 – inlet pipe
Remove the air filter housing.
Disconnect the mass air flow sensor wiring harness.
Disconnect the fuel tank vent line.
Disconnect the engine ventilation hose from the air intake hose.
After removing the clamp, disconnect the air intake hose from the throttle body.
After removing the clamp, disconnect the air filter housing.
Loosen the lower rubber support mounting bolt and remove it.
Disconnect the intake pipe.
Removal the ignition module
Remove the ignition module wiring harness.
Remove the ignition module cover from the cylinder head cover in the direction of the arrow.
Unscrew the two mounting bolts.
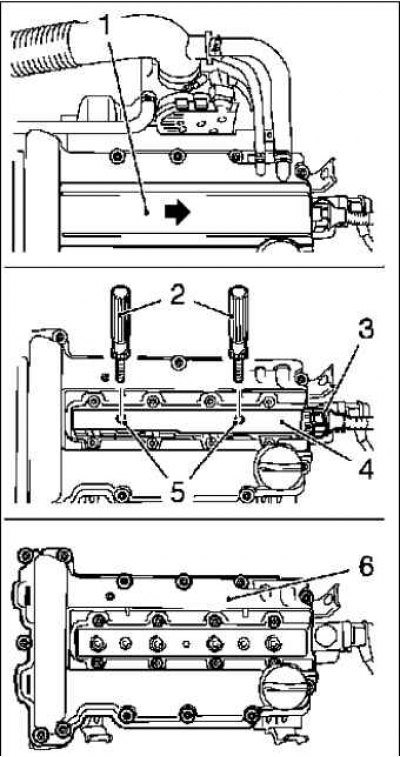
Components removed when dismantling the ignition module: 1 – ignition module cover; 2 – special tool; 3 – ignition module wiring harness; 4 – ignition module; 5 – mounting bolts; 6 – cylinder head cover
Separate the ignition module from the spark plugs using the special tool KM 6009 2.
Removal camshaft sensors
Disconnect the connectors of the camshaft sensor, film mass air flow sensor, oil pressure sensor and coolant temperature sensor.
Disconnect the wiring from the cylinder head cover.
Take her back.
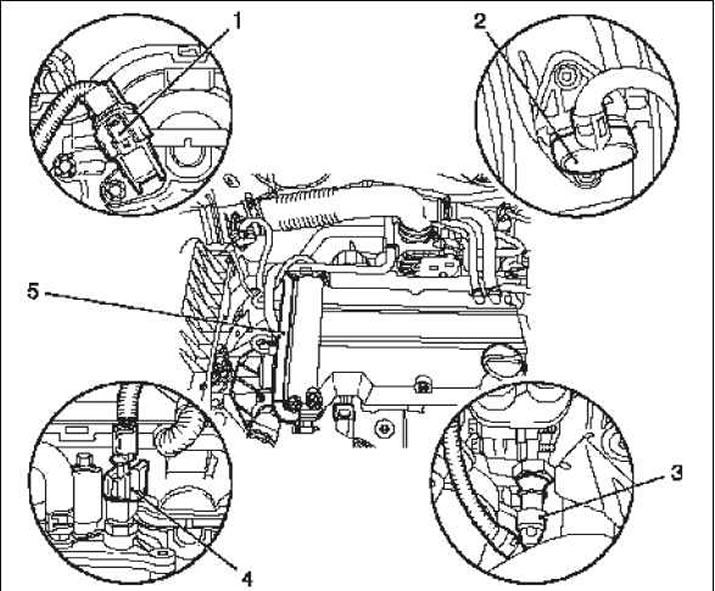
Components removed when dismantling the camshaft sensors: 1 - camshaft sensor connector; 2 – Mass air flow sensor connector; 3 – oil pressure sensor connector; 4 – coolant temperature sensor connector; 5 – wiring
Removal the cylinder head cover
Remove the two clamps and disconnect the engine hoses from the cylinder head cover.
Disconnect the ignition module wiring harness connector.
Remove the ignition module cover from the cylinder head cover in the direction of the arrow.
Unscrew the two mounting bolts.
Separate the ignition module from the spark plugs using the special tool KM 6009 3.
Remove from cylinder head.
Remove 13 mounting bolts.
Remove any remaining gasket material and clean the sealing surfaces.
Remove the spark plugs using the special tool KM-194-E.
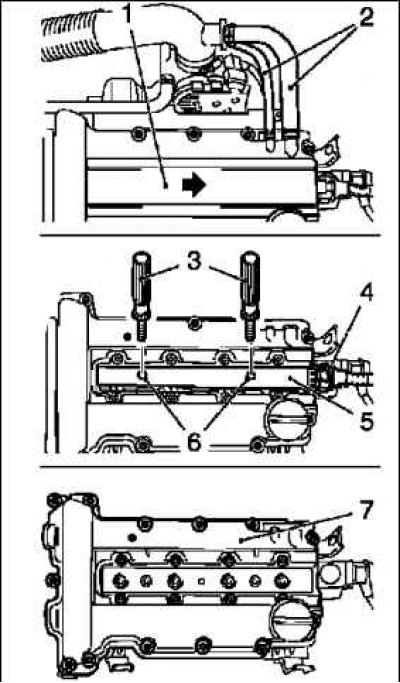
Components removed when dismantling the cylinder head cover: 1 - ignition module cover; 2 – engine hoses; 3 – ignition module wiring harness; 4 – ignition module wiring harness connector; 5 – ignition module; 6 – mounting bolts; 7 – special tool
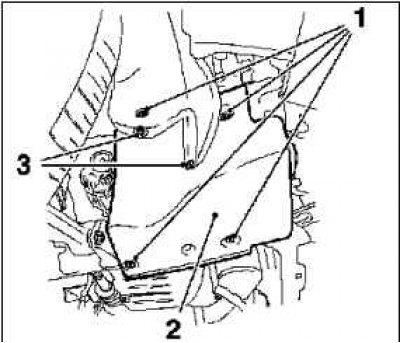
Components removed when dismantling the cylinder head cover: 1 - right engine mudguard; 2 – mounting bolts; 3 – rivets
Warning! Open the lid carefully and slowly. There is a risk of burns.
Unscrew the cap of the coolant expansion tank.
Remove the oil dipstick.
Raise the car.
Removal the right engine cowling
Unscrew the 4 mounting bolts and remove the right engine mudguard.
Remove the two rivets installed on the body.
Setting the crankshaft to the top dead center (TDC) position of the piston of cylinder No.1
Use the bolt on the crankshaft hub to set the crankshaft to the top dead center (TDC) position of the piston of cylinder No.1 in the direction of engine rotation.
The mark on the crankshaft pulley must align with the protrusion on the housing.
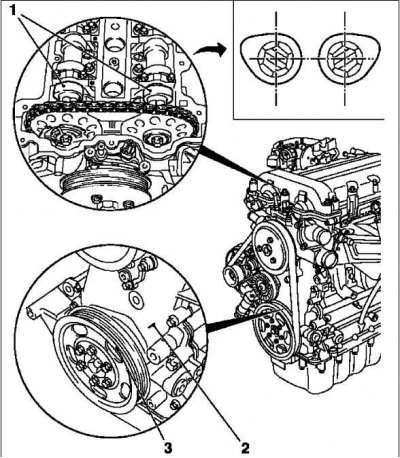
Setting the crankshaft to the top dead center (TDC) position of the piston of cylinder No.1: 1 - cams of cylinder No.1; 2 – ledge; 3 – label
Note: In this position, the cams of cylinder #1 are at TDC (both cams facing outward).
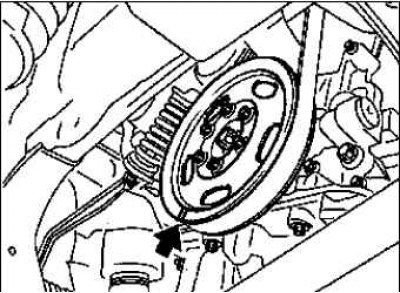
Move the marks on the belt pulley 180° relative to the TDC mark of the first cylinder (arrow).
Lower the car.
Connect the pressure drop tester to the compressed air supply system.
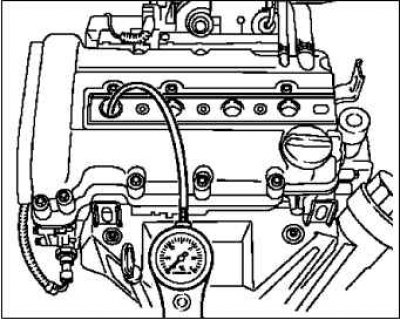
Calibrate the pressure drop tester.
Screw the connector into the spark plug hole of cylinder No.1 and connect the pressure drop tester to the connector (in accordance with the manufacturer's instructions).
Select a gear and apply the handbrake.
Note: All wheels must touch the ground.
Recommended tightening torques for threaded connections
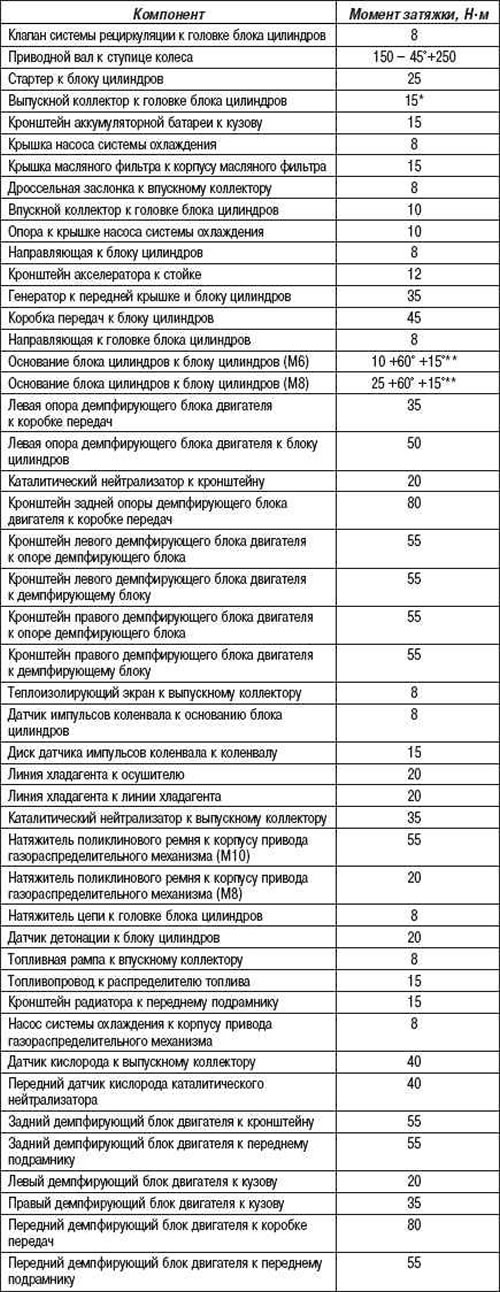
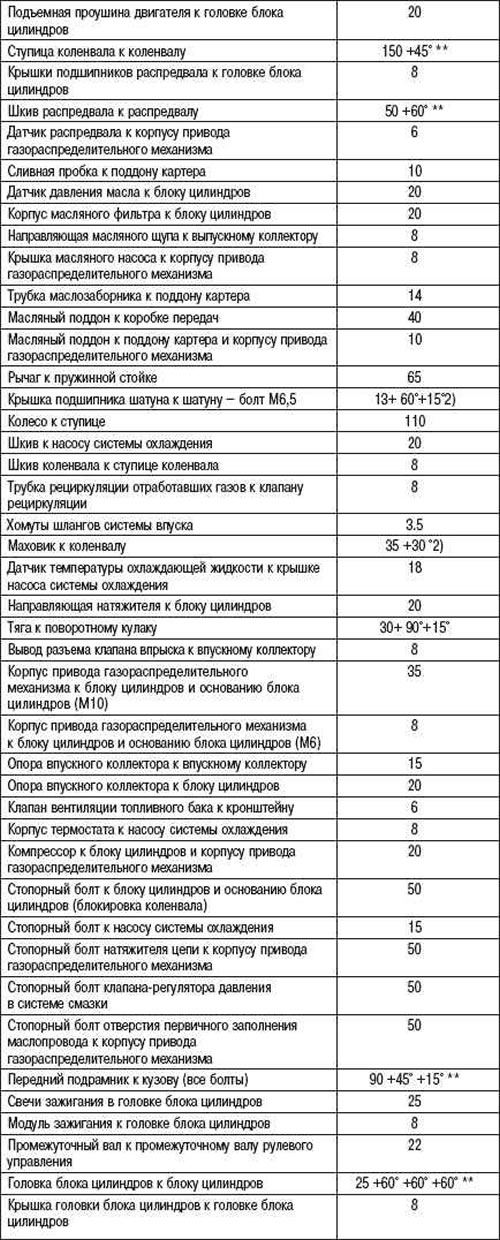
* two passes
** use new bolts
On an automatic transmission, move the selector lever to the "P" position.
Check the pressure drop in cylinder #1.
Read the pressure drop readings on the tester as a percentage.
Note: Be aware of any noise from air leaks from the intake manifold, exhaust system or crankcase, as well as bubbles in the coolant expansion tank.
Set the crankshaft to the ignition position in cylinder No.3 (TDC).
Check the pressure drop in cylinder #3.
Set the crankshaft to the ignition position in cylinder No.4 (TDC).
Check the pressure drop in cylinder #4.
Set the crankshaft to the ignition position in cylinder No.2 (TDC).
Check the pressure drop in cylinder #2.
Compare the results obtained.
The maximum pressure spread between individual cylinders is approximately 10%.
The maximum pressure drop in an individual cylinder must not exceed 25%.
Installing components
Raise the car.
Attach the right engine splash shield.
Tighten the 4 bolts.
Install two rivets.
Lower the car.
Install the coolant expansion tank cap and dipstick.
Install the spark plugs using the special tool KM-194-E into the cylinder head and tighten to a torque of 25 N·m.
Installing the cylinder head cover
Install the cylinder head cover.
Replace the seal.
Caution! Complete assembly within 10 minutes after installing the seal.
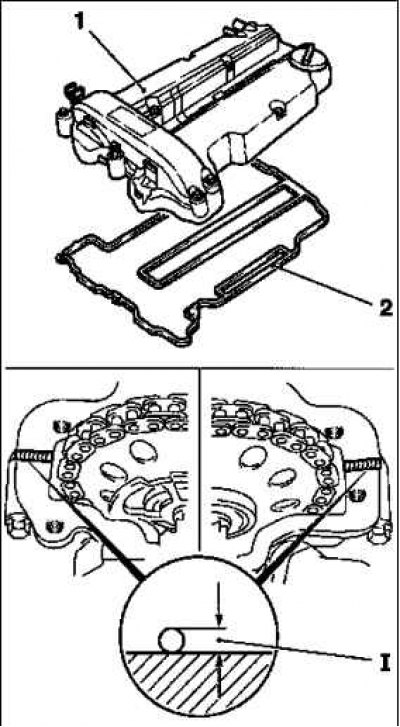
Installing the cylinder head cover: 1 – cylinder head cover; 2 – seal
Apply a layer of silicone sealant (grey) approximately 2 mm thick (size I) to the joint between the timing case and the cylinder head.
Caution! Visually inspect the bolts and make sure the seal is not damaged. Replace the bolts with new ones if necessary.
Tighten the 13 mounting bolts to 8 Nm.
Install the ignition module.
Connect the module to the spark plugs.
Tighten the two mounting bolts to 8 Nm.
Install the ignition module cover onto the cylinder head cover.
Connect the ignition module wiring harness connector.
Secure the wiring harness to the cylinder head cover.
Connect the connectors of the camshaft sensor, mass air flow sensor, oil pressure sensor and coolant temperature sensor.
Install the air filter housing onto the wheel arch and tighten the mounting bolt.
Attach the air intake hose to the throttle module and secure with a clamp.
Connect the engine ventilation hose to the air intake hose and secure the clamp.
Connect the wire harness connector to the mass air flow sensor.
Connect the fuel tank vent tube.
Close the hood.
Visitor comments