
Note: Each time the transverse arm is removed, check the condition of its ball joint and the reliability of fastening to the steering knuckle (see Chapter 8, Section 5).
1. Remove the front wheels and place the front of the car on stands.
2. Loosen the nut (see resist. illustration) and remove the coupling bolt of the clamp securing the ball joint to the steering knuckle. Press the transverse lever down and disconnect it from the steering knuckle. If necessary, use a suitable tool to loosen the clamp.
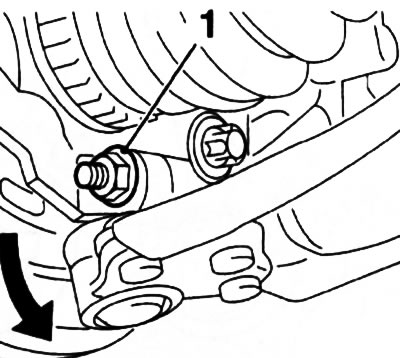
6.2. screw (1) of the coupling bolt of the clamp of fastening the ball joint to the steering knuckle - the arrow indicates the direction of pressing the transverse lever
3. Turn out a bolt of fastening of a hydraulic support to a subframe and a back fixing bolt. Remove the lever from the subframe (see resist. illustration).
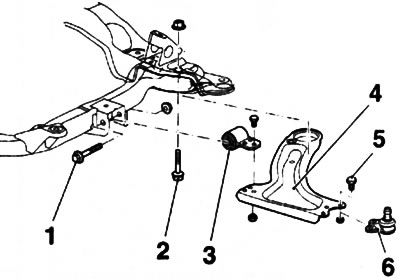
6.3. Wishbone Assembly Mount (4): 1. A bolt of fastening of a hydraulic support to a subframe; 2. Rear arm mounting bolt; 3. Hydraulic support; 5. Ball joint bolt; 6. Ball joint
4. If necessary, remove the ball joint from the lever (see illustration 6.3), for which drill the rivets with a ∅ 10 mm drill.
5. Before installation, clean the mating surfaces and bolt holes on the arm and subframe. Lubricate the edges of the holes for installing the ball joint with an anti-corrosion compound or special paint.
6. The new ball joint must be fastened with special bolts. The compilers of this manual strongly recommend the use of genuine Opel bolts for this purpose. Bolts should be inserted into the holes from above (see resist. illustration).
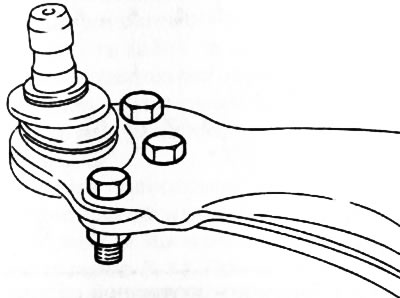
6.6. Fastening a new ball joint to the transverse arm
7. Attach the transverse arm to the subframe. Only new self-locking bolts should be used for fastening. Initially, the bolts for fastening the inner arm supports to the subframe are tightened by hand, and then, after installing and tightening the bolt of the outer (ball) lever supports, reach with the required force (see specs).
Visitor comments