
OpelBook.ru
Cars AvtoVAZ Cars Mitsubishi Cars BMW Cars Mercedes Cars Nissan Cars Toyota Cars Chevrolet
English Русский
Български
Беларускі
Український
Српски
Hrvatski
Română
Polski
Slovenský
Magyar
 |  Sitemap  |  Contacts  |    


Main Astra Corsa Insignia Kadett Omega Vectra Zafira Others Articles
Corsa B (1993-2000) Corsa C (2000-2006, petrol) Corsa C (2000-2006)
  • Main
  • Corsa
  • Corsa C
  • Chassis
  • Wheel suspension
  • Removal and installation the front wheel hub assembly

Removal and installation the front wheel hub assembly (Opel Corsa C)

            0

Attention: Wheel bearings are pressed into steering knuckles! Removal and installation of the bearing must be performed only using a hydraulic press and other special devices! If the master is sufficiently qualified, pipes of the appropriate diameter can be used instead of some devices. Never knock off the bearing using a heavy hammer and a metal rod (mandrel)! This may lead to distortion of the bearing and damage to the steering knuckle!


Attention: The removed bearing must be replaced with a new one without fail! Re-use of a previously installed bearing is not allowed!


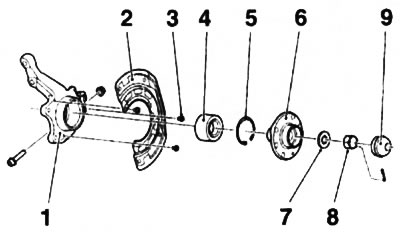
1. Hub assemblies and wheel bearings do not require adjustments and routine maintenance. If signs of wheel bearing failure appear, replace the corresponding bearing. The main signs of bearing damage are characteristic noise when taking sharp turns, heavy wheel travel with the brake released. The elements of the hub assembly are shown in the accompanying illustration.
5.1. Elements of the hub assembly: 1. Steering knuckle; 2. Brake shield (shield); 3. Shield…

5.1. Elements of the hub assembly: 1. Steering knuckle; 2. Brake shield (shield); 3. Shield mounting bolts; 4. Wheel bearing; 5. Retaining ring; 6. Hub; 7. Washer; 8. Hub nut; 9. Protective cap (corsa C models only)


2. Remove the steering knuckle (see section 4).

3. Clamp the steering knuckle in a vice. Unscrew the 3 mounting bolts and remove the brake shield (see illustration 5.1). Note: Access to the mounting bolts is provided through the mounting holes in the hub.

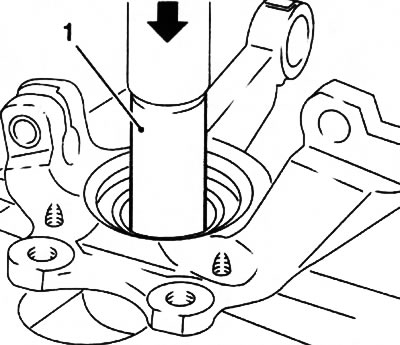
4. Install the special tool Opel-KM-466-5 (see accompanying illustration) and, using a hydraulic press, press the hub off the wheel bearing. This will damage the wheel bearing and it must be replaced without fail.
5.4. Installation of the KM 466-5 device (1)

5.4. Installation of the KM 466-5 device (1)


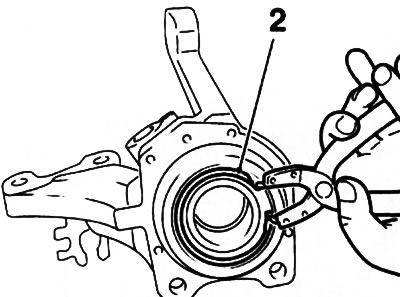
5. Clamp the steering knuckle again in a vice and use special pliers to remove the wheel bearing retaining ring (see accompanying illustration).
5.5. Removing the wheel bearing retaining ring (2)

5.5. Removing the wheel bearing retaining ring (2)


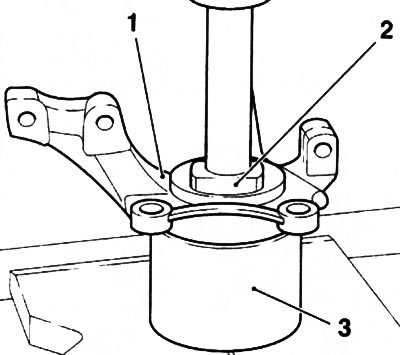
6. Install the steering knuckle into the special device KM-500-2 (see accompanying illustration) and press the wheel bearing with a hydraulic press using the Opel-KM-248-1 device and the appropriate punch.
5.6. Removing the wheel bearing from the steering knuckle (1): 2. Device KM-248-1; 3. Device…

5.6. Removing the wheel bearing from the steering knuckle (1): 2. Device KM-248-1; 3. Device KM-500-2


7. Before installing a new bearing, clean the working surfaces of the steering knuckle and lubricate with bearing grease.

8. Install the steering knuckle on the KM-466-2 tool and press in the new bearing using the KM-466-A device (see accompanying illustration).
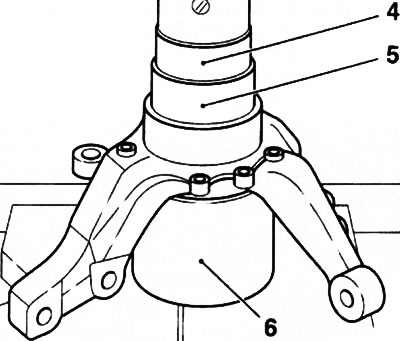
5.8. Installing the wheel bearing (5): 4. Device KM-466-A; 6. Device KM-466-2

5.8. Installing the wheel bearing (5): 4. Device KM-466-A; 6. Device KM-466-2


9. Clamp the steering knuckle in a vice and insert the retaining ring. Make sure the ring fits into its groove.


10. Install the steering knuckle on the Opel-KM-500-3 tool and press the hub into the wheel bearing on a hydraulic press using the KM-466-5 device (see accompanying illustration).
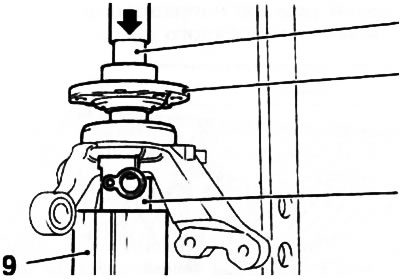
5.10. Installing the hub (7) into the wheel bearing: 6. Device KM-466-5; 8. Device KM-500-3; 9.…

5.10. Installing the hub (7) into the wheel bearing: 6. Device KM-466-5; 8. Device KM-500-3; 9. Wooden block


Note: Use a wooden block as a lining.


11. Clamp the steering knuckle again in a vice, install and secure the brake shield. Install the steering knuckle in place (see Section 4).


This article is available at russian, bulgarian, belarusian, ukrainian, serbian, croatian, romanian, polish, slovak, hungarian
Checking the article: Kornev Georgy

Share information:

Previous articles
Opel Corsa C: Wheel suspension
Next articles

Removal and installation the steering knuckle
Disassembly, removal and installation of the front shock absorber
Removal and installation the front shock absorber strut
General information about car suspension
Suspension and steering specifications
Removal and installation the front transverse arm
Removal and installation the front subframe
Removal, checking and installation rear suspension shock absorbers
Removal and installation rear suspension coil springs
Removal and installation the rear hub assembly and wheel bearing
Wheel alignment angles — general information


See similar ones from other Opel car manuals:
▶ Front Wheel Hub Bearing — Replacement Opel Astra F (1991-1998, petrol)
▶ Replacing the front wheel speed sensors Opel Insignia A (2008-2017)
▶ Front wheel drive Opel Kadett E (1984-1995)
▶ Front wheel alignment Opel Omega B (1993-1999)
▶ Disassembling the front wheel suspension Opel Vectra B (1995-2002, petrol)
Link to this page in different formats

Visitor comments


No comments yet


How much will 18 + 39 =


Corsa C (2000-2006) 
  • General information
  • Introduction to guide
  • Troubleshooting
  • Vehicle device
  • User manual
  • Maintenance
  • Power unit
  • Engine repair
  • Cooling system
  • Power and exhaust system
  • Control system
  • Engine electrical equipment
  • Transmission
  • Clutch
  • Mechanical gearbox
  • Automatic gearbox
  • Drive shafts
  • Chassis
  • Brake system
  • Wheel suspension
  • Steering
  • Body
  • Exterior
  • Interior
  • Doors and windows
  • Heating and air conditioning
  • Electrical equipment
  • Equipment and devices
  • Lamps and lighting
  • Electrical circuits
Corsa C (2000-2006, petrol) 
  • User manual
  • Car access
  • Governing bodies
  • Seat control
  • Heating and air conditioning
  • Driving and maintenance
  • Engines 1.0 and 1.2 l
  • Engine repair
  • Cooling and lubrication system
  • Injection system
  • Engines 1.4, 1.6 and 1.8 l
  • Engine repair
  • Cooling and lubrication system
  • Injection system
  • Transmission
  • Clutch
  • Mechanical gearbox
  • Automatic gearbox
  • Drive shafts
  • Chassis
  • Wheels and tires
  • Wheel suspension
  • Steering
  • Brake system
  • Body
  • Exterior
  • Doors and windows
  • Electrical equipment
  • Equipment and devices
  • Lighting system
  • Electrical circuits
Corsa B (1993-2000) 
  • General information
  • Introduction to guide
  • User manual
  • Maintenance
  • Power unit
  • SOHC gasoline engines
  • DOHC gasoline engines
  • Diesel engines
  • Engine repair
  • Cooling system
  • Supply system
  • Injection system (gasoline)
  • Injection system (diesel)
  • Exhaust systems
  • Control system (gasoline)
  • Preheat system (diesel)
  • Charge and launch system
  • Transmission
  • Mechanical gearbox
  • Automatic gearbox
  • Clutch and drive shafts
  • Chassis
  • Brake system
  • Front suspension
  • Rear suspension
  • Steering
  • Body
  • Ventilation and heating
  • Exterior
  • Interior
  • Doors and windows
  • Electrical equipment
  • Equipment and devices
  • Lamps and lighting
  • Electrical circuits
OpelBook.ru © 2017–2026 · Mobile version · · Sitemap: EN BG BY UA RS HR RO PL SK HU · Feedback · Site search
Astra F, petrol · Astra G, petrol · Astra G · Astra H · Astra J, petrol · Corsa B · Corsa C, petrol · Corsa C · Insignia A · Kadett D · Kadett E · Omega A · Omega B · Omega B2 · Vectra A, petrol · Vectra A · Vectra B, petrol · Vectra B · Vectra C · Zafira A, petrol · Frontera A, petrol · Frontera B · Ascona C · Vivaro A ·
We want your visit to be comfortable 🤝! We use cookies 🍪 to make that happen.