


Contents: Removal the front shock absorber…⬇ Removal the front shock absorber ⬇ Removal the front stabilizer ⬇ Removal the independent suspension…⬇ Dismantling the axle joint ⬇ Removal the steering knuckle ⬇ Removal the front wheel bearing ⬇
Removal the front shock absorber strut assembly
In the front wheel suspension units, some parts can be dismantled and installed by yourself. Although for certain types of work, tools from the workshop are needed. Damaged wheel suspension parts are not straightened or welded, they must always be replaced.
Remove the front wheel.
Using pliers, remove the brake hose retaining clip at the bottom of the shock absorber strut and remove the brake hose from the bracket.
Remove the stabilizer pendulum from the shock absorber strut. At the same time, use an open-end wrench to press the ball joint pin in the opposite direction.
Loosen the shock absorber strut screw connection and remove the bolts from the steering knuckle.
Fold back the steering knuckle and support the shock absorber strut to prevent it from falling after the upper mount is loosened.
Unscrew the fastening nut on the shock absorber strut dome in the engine compartment. At the same time, press the piston rod in the opposite direction.
Pull the shock absorber strut downwards.
If the shock absorber strut is only being removed and not repaired, before installation check the tightening torque of 55 Nm for the thrust bearing fastening on the shock absorber piston rod.
When installing, insert the shock absorber strut into the dome from below.
Tighten the shock absorber strut at the top (55 Nm).
Screw the shock absorber strut at the bottom. To do this, insert the old bolts from the front to the back (in the direction of travel) and tighten to 100 Nm.
Tighten the stabilizer pendulum to the shock absorber strut with a new self-locking nut to 65 Nm.
Secure the brake hose.
After installation, immediately check the wheel alignment. Replace the old camber bolts and nuts with new ones. Tightening torque: 50 Nm, then 90 Nm + from 45° to 60°.
Removal the front shock absorber
A spring tensioner is absolutely necessary for this job. You need at least two spring tensioners, preferably three. Without using a spring tensioner, you must not loosen the mounting nut at the top of the shock absorber piston rod, as the spring is under high pre-tension. The shock absorber parts could fly apart in different directions, as if in an explosion - risk of injury! In addition, the unloaded spring can no longer be installed. A spring tensioner is sold in auto parts stores.
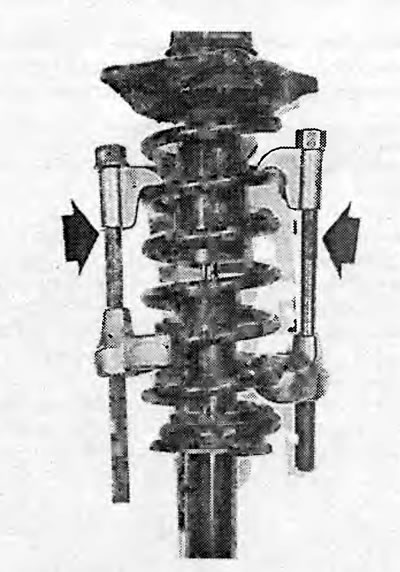
Spring clips (arrows) are used to disconnect the spring from the shock absorber when the shock absorber is removed.
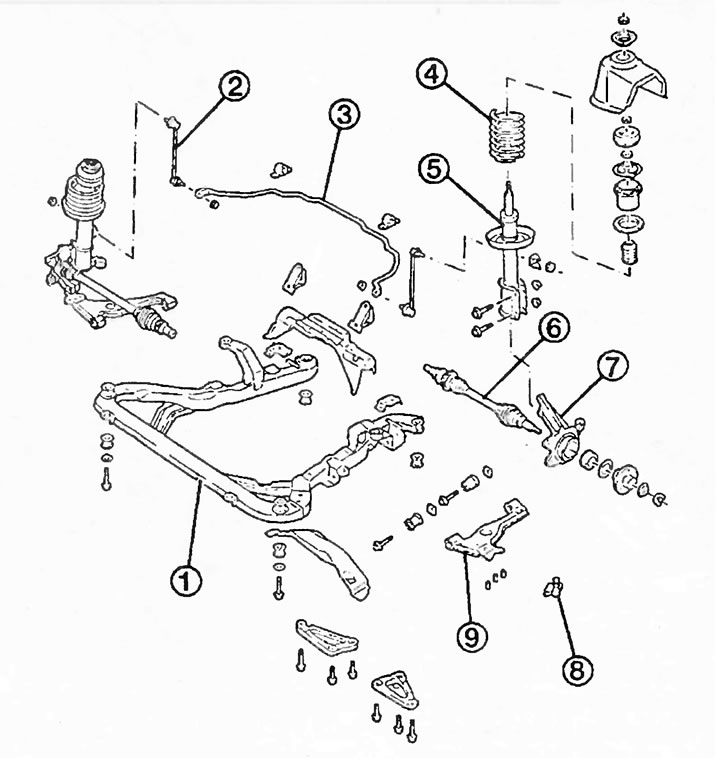
The image of the front wheel suspension being blown apart as if by an explosion shows us:
1 - front axle support;
2 - stabilizer connecting rod;
3 - stabilizer;
4 - spiral spring;
5 - shock absorber strut;
6 - left drive shaft;
7 - steering knuckle;
8 - axle hinge;
9 - transverse lever.
Remove the shock absorber strut (see previous section).
Clamp the shock absorber in a vice at the very bottom where the steering knuckle attaches.
Place the clamping device on the spring coils and compress the spring.
To prevent the clamp from slipping, cover the corresponding spring coils with adhesive tape.
Loosen the nut at the top of the shock absorber strut with a bent socket wrench. Press the shock absorber piston rod in the opposite direction.
Remove the upper shock absorber ring with thrust bearing from the piston rod.
Remove the upper spring seat and buffer.
Remove the spring together with the spring tensioners.
When installing, tighten the new self-locking nut for securing the thrust bearing to 50 Nm.
Loosen the spring and install the shock absorber strut.
After installation, immediately check the wheel alignment angles (in the workshop). To adjust the wheel alignment, replace the old mounting bolts and nuts with new ones.
Tip: Shock absorbers should always be stored in a vertical position. When stored horizontally, the shock absorber oil flows to the upper area, and the shock absorber may knock during operation. To allow the oil to drain back, the shock absorber should be placed in a vertical position for 24 hours at room temperature, with the piston rod fully extended.
Removal the front stabilizer
If you need to remove the Vectra stabilizer, you must first loosen the entire front axle support so that the stabilizer mounting bolts become accessible. This job requires special tools and professional knowledge - a typical workshop job!
Removal the independent suspension wishbone
Raise the vehicle and remove the front wheel.
Remove the shock absorber strut.
Unscrew the axle joint mounting nut and remove the bolt from the steering knuckle.
Press the axle joint out of the steering knuckle.
Loosen the wishbone mounting bolts.
Remove the transverse arm from the mount in the front axle body. To do this, press the transverse arm down slightly.
Use new bolts and nuts during installation.
Tightening of screw connections is carried out on a loaded vehicle, with each front seat carrying a load of 70 kg.
Tightening torques: wishbone on front axle support 90 Nm 4-75° to 90°, axle joint on steering knuckle 100 Nm. Insert the axle joint mounting bolt from rear to front when viewed in the direction of travel.
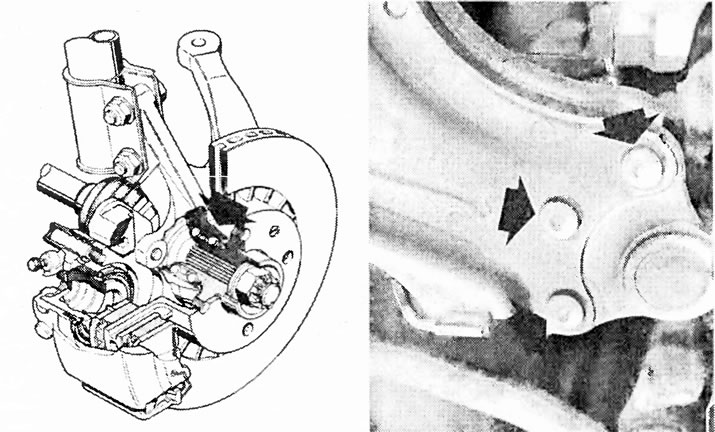
Left:the Vectra has double-row ball bearings on the front wheels. Adjustment of these bearings is not possible and is not required. If there is play in the wheel bearings, they must be replaced.
Right: the axle joint is firmly riveted to the wishbone. If the joint needs to be replaced, the rivet heads (arrows) must be drilled out. When installing a new axle joint, use only Opel-specific bolts and nuts.
Dismantling the axle joint
Remove the independent suspension wishbone.
The axle joint has a riveted connection to the wishbone. Drill the centered rivet heads with a 12mm drill bit
Knock out the remaining rivets with a punch.
(Material copied from this portal: «OPELBOOK.ru»)
Treat the holes with an anti-corrosion agent.
When installing a new axle joint, use special Opel bolts and nuts. Insert the bolts from the top of the wishbone and tighten the nuts from the bottom. Tightening torque: 35 Nm.
Mount the transverse arm.
Removal the steering knuckle
Remove the front wheel.
Press the dust cap off the wheel hub.
Remount the wheel.
With the vehicle on the ground, loosen the hex nut on the drive shaft. Note the high tightening torque!
Raise the vehicle and secure it.
Remove the front wheel.
Unscrew the brake caliper from the steering knuckle and hang it on some wire - the brake hose remains connected.
Unscrew the brake disc mounting bolt and remove the brake disc from the wheel hub.
Unscrew the brake shield and ABS speed sensor from the steering knuckle.
Unscrew the steering knuckle mounting nut and remove the bolt from it. Remove the axle joint from the steering knuckle.
Unscrew the tie rod joint nut and push the joint away from the steering knuckle.
Loosen the screw connection: shock absorber support pipe/steering knuckle.
Remove the steering knuckle from the drive shaft. If necessary, use a commercially available wheel hub puller to pry the steering knuckle off the drive shaft.
Hang the drive shaft on a wire and do not allow it to sag.
Use new bolts and nuts during installation.
Bolt the steering knuckle to the shock absorber strut support tube, see the top of this article "Removing the front shock absorber strut assembly" for details.
Slide the steering knuckle onto the drive shaft.
Bolt the steering knuckle to the axle joint, see section "Removing the wishbone".
Everything you need to pay attention to when tightening a hex nut is given in the chapter "Gearbox and final drive" in the section "Removal the drive shaft".
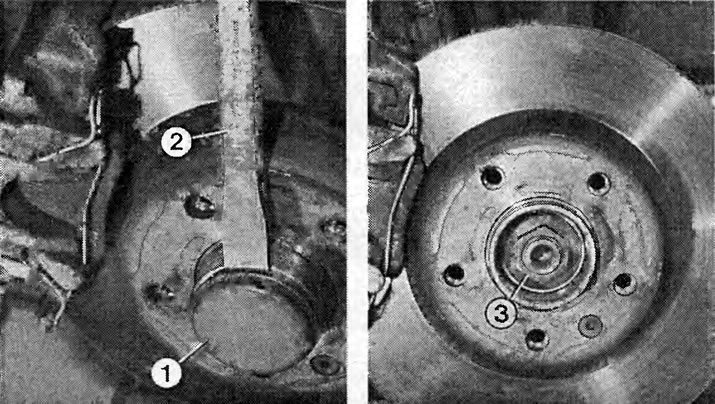
Left:knock the dust cap (1) as shown here with a flat chisel (2) from the wheel hub.
Right: then unscrew the hexagonal nut (3) securing the wheel bearing. Note that the nut is tightened with a high torque.
Removal the front wheel bearing
The wheel bearing is pressed with its outer ring into the housing, the wheel hub is pressed into the inner ring of the bearing. A new wheel bearing should never be hammered into the socket, otherwise the next damage is "mounted" at the same time. Therefore, it is better to change only the steering knuckle yourself.
You should entrust the actual pressing out and pressing in of the bearing to a workshop that has special punches and a repair press at its disposal.
Visitor comments