


Caution: Use only a properly functioning tool to disassemble the shock absorber. Never loosen the shock absorber nut unless the spring is securely compressed with a special device! To avoid accidents, do not use wire to hold the spring in a compressed position! Make sure that the shock absorber is securely fastened in a vice and that the device cannot slip out!
1. Remove the shock absorber strut (see Section 2).
2. Compression of coil springs should be carried out only with the help of special devices(for example, Hazet 4900-2A with clamping plates MKM-6068-10). Clamp the fixture in a vice and install the shock absorber assembly in it so that at least 3 turns of the coil spring are subject to compression (see accompanying illustration). Compress the coil spring, completely removing the load from the support bearing. Ensure that the fixture is securely seated on the spring.
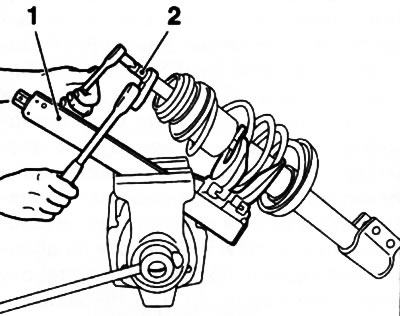
3.2. Devices for compressing the coil spring (1) and for releasing the support bearing fastening nut (2)
3. Holding the shock absorber rod with a wrench, unscrew the upper support bearing mounting nut (see illustration 3.2).
4. Remember the installation position of the shock absorber assembly elements, if necessary, mark their position with a marker (see illustration 2.1) and disassemble the rack into its elements.
5. Inspect the components for mechanical damage, check the smoothness of the shock absorber rod. Replace the failed components.
6. Inspect the shock absorber for signs of leaks. Make sure that there are no signs of corrosion or mechanical damage along the entire length of the rod. Holding the shock absorber vertically, check its proper functioning, both at full and short (50-100 mm) stroke of the rod. In both cases, the resistance should be soft, even and constant. If signs of malfunction are detected, both shock absorbers should be replaced.
7. Release the spring from the device and carefully inspect it for signs of deformation and mechanical damage. If necessary, replace both front suspension springs. Depending on the model, springs of different stiffness may be installed. They are designated by color marking on one of the coils - the same springs must be installed on both struts. Springs that have sagged or do not develop the required force must also be replaced.
Note: New springs have a protective varnish coating against corrosion - try not to damage it during installation.
8. Check the condition of other rack assembly components. Replace any faulty parts.
9. Installation is performed in the reverse order of removal. When installing the spring, make sure that it is correctly positioned on the lower support washer. Screw a new nut onto the shock absorber rod and, holding the rod from turning, tighten it with the required force.
Original source is on the website OpelBook.ru
Visitor comments