
Corsa C models
1. Open the tailgate and remove the luggage compartment shelf (see chapter «Controls and methods of operation», Section 17).
2. On 5-door models, fold the rear bench seat back (see chapter «Controls and methods of operation», Section 12), on 3-door models, completely remove the rear seat together with the backrest (see Section 55).
3. Remove the rear bench seat back support bracket (see Section 56), and remove the rubber seal of the tailgate opening (see Section 30).
4. On 3-door models, remove the rear side trim (see Section 45) and disconnect the lower anchor of the rear seat belt from the passenger compartment floor (see Section 52).
5. Remove the tailgate sill trim (see Section 48) and remove the trim of the C and D pillars (see Section 46).
6. Remove the luggage compartment lamp cover from the trim and disconnect the wiring connector (see chapter 12).
7. Remove the fixing screws (see resist. illustrations) and separate the trim from the side of the luggage compartment.
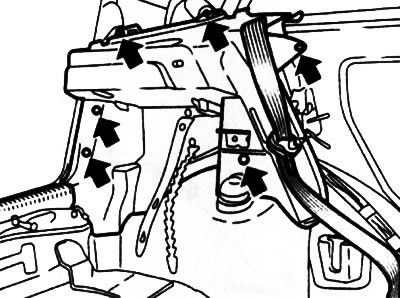
49.7a. screws (indicated by arrows) luggage compartment side trim fasteners (3 door hatchback) | 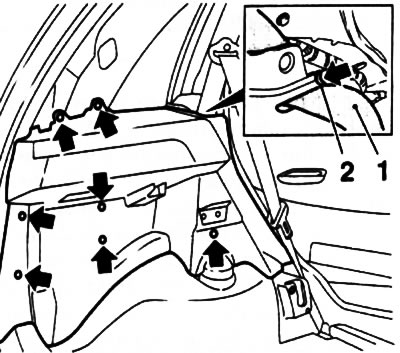
49.7b. screws (indicated by arrows) fastening trim (2) luggage compartment sides (5 door hatchback): 1. Safety belt |
8. Pull the seat belt out of the sidewall trim, disconnect the loudspeaker wiring connector and remove the trim from the luggage compartment.
9. Install in the reverse order of removal, making sure that the inner edge of the seal is on top of the trim. Check the proper functioning of the seat belt (see chapter «Controls and methods of operation»).
Meriva Models
10. Open the tailgate, loosen the fixing nuts and remove the luggage compartment floor panel.
11. Remove the tailgate sill trim (see Section 48) and finishing of pillars C and D (see Section 46).
12. Loosen the 2 nuts located below the level of the removed floor panel, fastening the trim of the sidewall of the luggage compartment, remove 5 or 6 screws along the contour of the sidewall trim.
13. Wring out 3 forward and 1 back clamps, remove furnish from a sidewall and take it from a luggage compartment.
14. Install in the reverse order of removal, making sure that the inner edge of the seal is on top of the trim.
Visitor comments