
Seat and headrest positions
The design of car seats guarantees maximum comfort for the person sitting in them, while at the same time providing conditions for the most effective performance of their functions by seat belts and airbags. The soft padding of the cushions and backrests provides additional protection for the driver and passengers in emergency situations.
Attention: It is not allowed to use any additional pillows and other items placed on the cushion or back of the seat!
The driver's seat must be in a position that provides the driver with maximum comfort when operating the pedals, shift lever/AT selector, steering wheel and instrument panel switches. In addition, adequate visibility through the windshield and side windows and the safety of fixing the driver's body with a seat belt must be ensured. The choice of seat position has a significant impact on the safety of the person sitting in it. For example, moving the front seat too far forward increases the risk of injury to the occupant when the airbag deploys, as well as the risk of being thrown through the windshield in a frontal collision. Moving the driver's seat back affects the ease of use of the controls while driving.
Lock the front seat as far as possible (convenient for driving) from the steering wheel/dashboard position. The compilers of this Guide recommend choosing the position of the driver's seat in such a way that the driver can hold the steering wheel by the rim slightly higher than the central spokes, while the arms at the elbow joints should be slightly bent.
Bring the seatback to the most comfortable position. At the same time, it should be remembered that an increase in the inclination of the seat back will worsen the fixation of the body with a seat belt - the more the back is tilted back, the higher the likelihood of slipping of the body sitting under the lap section of the belt during a strong frontal impact, and the more severe the injuries can be. It is recommended to set the backrest angle of 25-30°from the vertical position.
Head restraints are important elements of the security system. They prevent injury to the cervical spine and head in a rear impact. Head restraint adjustment should be checked before every ride (see below).
Seats must be adjusted before driving. After completing the adjustment, you should make sure that the backrest and the entire seat assembly are securely fixed.
Headrests
Attention: The head restraints are an additional means of ensuring safety in case of an accident, never take them off when making a trip! They are designed to work with seat belts - don't forget to fasten your seat belts!
Adjustment
Attention: Adjustment of the head restraints must be carried out without fail! Only correctly installed head restraints provide adequate protection against possible damage to the cervical vertebrae in a rear impact!
The head restraint must be adjusted in height so that its central part is at the same level as the eyes/top of the ears of the seated person (see illustration 12.1), - if this condition cannot be met, the head restraint should be set to the highest (for tall people) or to the lowest (for shorter people) position.
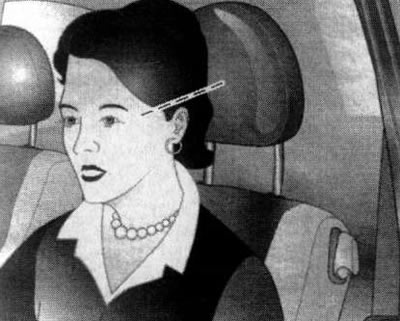
12.1. Correctly adjusted head restraint position
To adjust the height of the front seat head restraints, grasp the top of the head restraint with both hands and tilt it forward (see illustration 12.2). While holding the head restraint at an angle, move it to the desired position and release it. Do not attempt to adjust the head restraint with one hand, especially while the vehicle is moving!
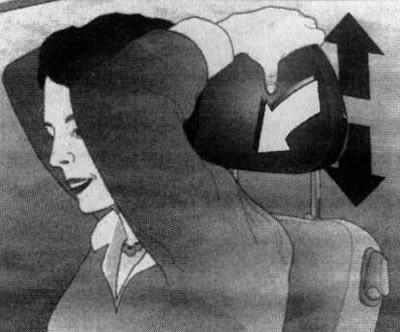
12.2. Front seat head restraint height adjustment
On the rear bench seat, to move the head restraint down, it is necessary to press the locks on the edge of the guide bushings of the corresponding head restraint (see illustration 12.3) and drop it. To move up, simply pull out the headrest. The center rear seat on Combo models is equipped with a built-in (not removable) headrest that can be set to 3 fixed positions: fully lowered, medium and fully raised.
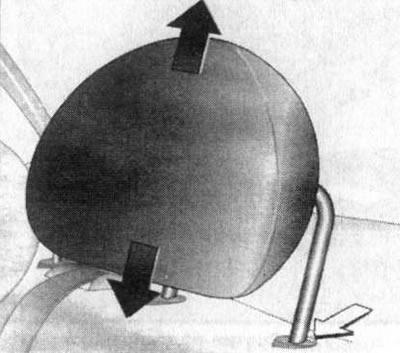
12.3. Rear bench seat head restraint adjustment (Corsa C models)
Removing
To remove it, hold the head restraint latches in the pressed position, pull the latter up and release it from the guide bushings (see illustration 12.4).

12.4. Removing the head restraint
Note: The rear bench seat head restraint latches are located on the rear side of the guide bushings (see illustration 12.3).
On Combo models, the central (built-in) the rear bench seat head restraint cannot be removed. When not in use, the head restraints must be moved to their lowest position.
Installation
To install, it is necessary to fill the headrest rods into the guide bushings on the seatback and, pressing them with a little effort, lower the headrest down.
Active head restraints
Attention: Correct adjustment significantly increases the effectiveness of the head restraints - be sure to adjust the active head restraints as indicated above! Never tie or hang anything on the head restraint rods!
Active head restraints (with appropriate equipment) reduce the likelihood and severity of neck injury in a rear-end collision. The inscription informs about the installation of active head restraints on the seats «ACTIVE» (see illustration 12.5) on seat guides. At the moment of impact, the active head restraint moves forward under the influence of the inertia force of the passenger's body on the seat back and helps to reduce the dynamic tilt of the head back, reducing the load on the cervical vertebrae. The headrest then returns to its original position.
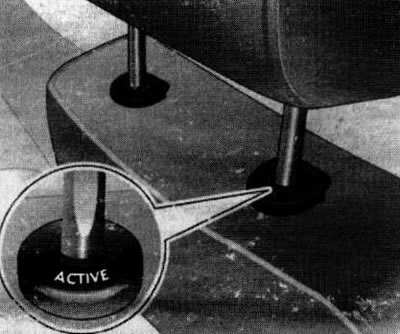
12.5. Designation of active head restraints
Active head restraints are particularly effective in low and medium speed collisions where (as the statistics show) account for most of the cases of injury to the neck of the driver and passenger.
Front seats
Attention: Seat adjustment must be carried out only when the vehicle is stationary!
Adjustment
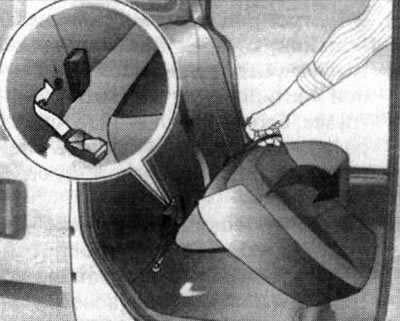
To move the front seat in the longitudinal direction, pull up the release lever located under the outer front edge of the cushion, then slide the seat assembly to the desired position and release the bracket (see illustration 12.6). Check the security of the seat in the new position by trying to move it back and forth - when the seat is fixed, a characteristic click is heard.
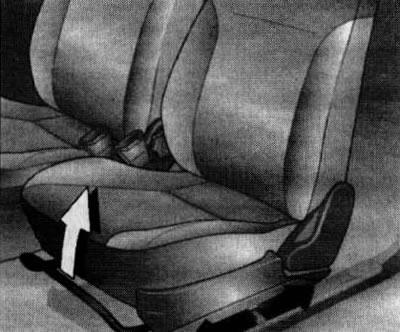
12.6. Adjustment of position of assembly of a forward seat in a longitudinal direction
Adjustment of the angle of inclination of the seatback is carried out using the rotary handle located on the inner side surface of the backrest (see illustration 12.7).
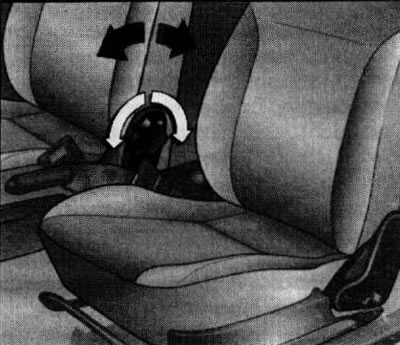
12.7. Adjustment of an inclination of a back of a forward seat
Note: When making the adjustment, the weight of the body must be removed from the seatback.
With the appropriate equipment, the position of the front seat cushion can be adjusted - the release handle is placed under the seat cushion on the right (see illustration 12.8). To adjust, pull the lever up and, by changing the weight of your body on the seat cushion, set it to the most comfortable position. Release the lever and check that the seat is secure.
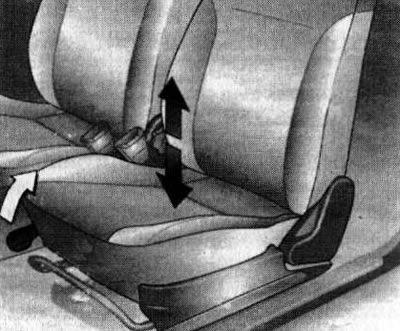
12.8. Front seat cushion height adjustment
Folding
For boarding and disembarking passengers on models of the corresponding configuration, the backs of the front seats can be tilted forward, for which it is necessary to pull up the lock lever located on the outer side surface of the back (see illustration 12.9). When returning to its original position, the backrest is automatically fixed - a characteristic click should be heard.
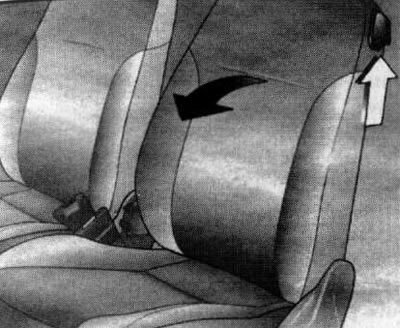
12.9. Reclining the front seat back
In addition, with the appropriate configuration, the back of the front passenger seat can be folded to the cushion, which will require first removing the head restraint from the back. Then pull up the lever (see above) and fold the seat forward. Unfolding is carried out in the reverse order, without fail it is necessary to check the reliability of fixing the backrest in the upper position.
Rear bench seat
On the vehicles covered in this manual, a two-section rear seat can be installed (with asymmetric division) structures or bench-type seat (no division into sections). On models equipped with bench-style rear bench seats, the seatback can have two sections (with asymmetric division).
Backrest/backrest adjustment
On Corsa C models, the backrest/backrest sections can be set to one of two fixed positions by depressing the corresponding lock located on the left/right in the upper part of the backrest (see illustration 12.10), and move the backrest/section to the desired position until the latch clicks.
Folding
If it is necessary to expand the volume of the luggage compartment for the transport of bulky goods, the rear seat or its backrest can be folded down (see illustration 12.10). With the appropriate configuration, the separate design of the rear bench seat allows you to fold any section independently of the other.
12.10. Folding the backrest/backrest sections of the rear bench seat
Folding the rear seatback
Before folding the backrests, remove the headrests, and on Combo models, lower the middle headrest down to the stop (see above). Insert the seat belt anchors of the rear seat side seats into the special holders in the upholstery (see illustration 12.11). If equipped, remove the ISOFIX child seat mounts from the rear seat - strictly follow the recommendations given in the separate operating instructions for this system.
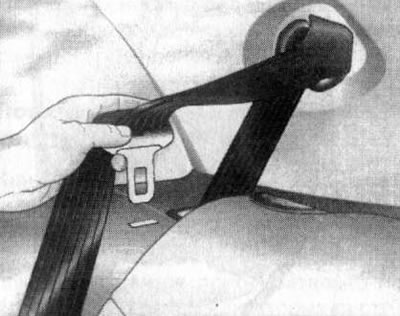
12.11. Insert the seat belt anchors of the rear seat side seats into the holders
The release buttons for the backrests are located on the outer sides of their upper edges (see illustration 12.10). To fold the backrests, press the button of the corresponding latch and fold the backrest sections one by one to the seat cushions.
Unfolding the backrest/backrest sections is done in reverse order. The backrest must be raised to the characteristic click of the latch - check the reliability of fixing the backrests in a vertical position. Note: On Corsa C models, the backrest can be locked in two positions. Make sure that the rear seat belts are in their original positions when the backrests are raised.
Note: The 3-hunker rear seat center seat belt will only pull out of the retractable retractor when the bench seat backrest is locked in the upright position.
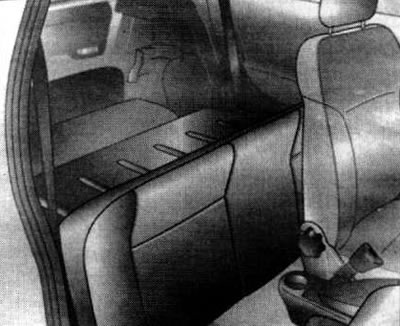
Folding the rear seat
In order to maximize the expansion of the luggage compartment of the car when transporting bulky or multi-seat cargo, it is possible to fold the rear bench seat.
To fold the seat, follow the same preparatory steps as when folding the backrest (see above).
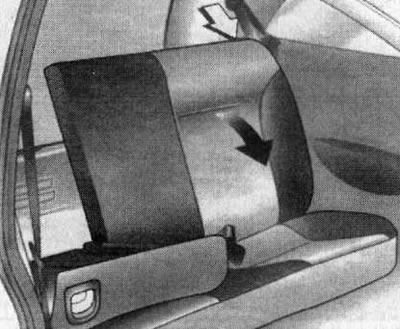
On models equipped with bench type rear seats, grasp the front edge of the rear bench seat cushion and pull it firmly up and out of the holders in the passenger compartment floor. Then pull the seat cushion forward, move it to an upright position and fold it against the backs of the front seats (see illustration 12.12). Then press the release buttons and fold the rear seatback/backrest sections forward to the lowest position (see above). On models equipped with two-section rear seats, when preparing the seat for folding, in addition to performing the above operations, it is necessary to place the seat belt buckles in their special slots (see illustration 12.13). To fold the seat, pull the tabs attached to the back of the cushions and move the cushions to a vertical position by pressing them against the backs of the front seats. Press the release buttons and fold the backrest sections forward to the lowest position (see illustration 12.14).
12.12. Rear bench bench seat in folded position
12.13. Folding the two-section rear bench seat cushions

12.14. The right section of the rear multi-seater seat in the folded position
Unfolding the seats is done in reverse order. The backrest must be raised to the characteristic click of the latch - check the reliability of fixing the backrests in a vertical position. Make sure the rear seat belts are in their original positions.
Visitor comments