


Contents: Manual drive ⬇ Electric drive ⬇ Lifting/Releasing ⬇ Closing the top hatch from the…⬇ Failures of the electric drive of…⬇ Emergency closing of the electric…⬇ Sun protection blind ⬇
Attention: To ensure that the sunroof drive functions properly, never place heavy objects on the sunroof, and before using the sunroof, remember to remove snow, ice, water and sand from its surface!
Caution: When using the roof rack, to avoid damage, make sure there is sufficient space to move the roof hatch!
The models covered by this Manual may be equipped with a manual or electrically operated tilt and slide roof.
Manual drive
Manual control of the sunroof is carried out using a folding handle built into the overhead console (see illustration 17.13). Before starting any manipulations, it must be removed from the recess and moved to the working position.
(Original source is on the website: www.opelbook.ru)
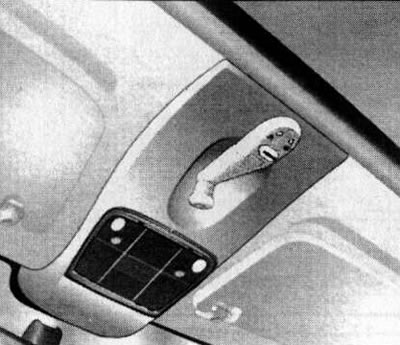
17.13. Upper hatch manual control handle
Shifting
The hatch cover is moved by turning the handle to the left (counterclockwise). Press the push-button lock and rotate the handle until it locks - this position is recommended to reduce wind noise. If you need to open the hatch to a greater extent, press the push-button lock again and continue to rotate the handle counterclockwise until it locks again.
The hatch is closed by turning the handle clockwise. When the lock is triggered in the intermediate position, press it down and continue turning the handle until the hatch is completely closed - the handle should be fixed in the final position.
Raising/lowering
To lift the lid, with the top hatch closed, press the push-button lock and turn the handle to the right (clockwise) until the lid reaches the desired position. Lowering the lid is done by turning the handle counterclockwise. When the hatch is completely closed, the handle should lock.
Electric drive
On models with the corresponding configuration, the electric drive of the upper hatch functions only when the ignition is on. The upper hatch is controlled by push-button switches (see illustration 17.14), built into the overhead console next to the front seat lamp. Depending on the configuration, the models described in this Manual may be equipped with a sunroof with a lift-and-slide mechanism, or only with a lift/lower function for the sunroof. Control of the sunroof while the vehicle is moving is permitted at a speed of no more than 120 km/h.
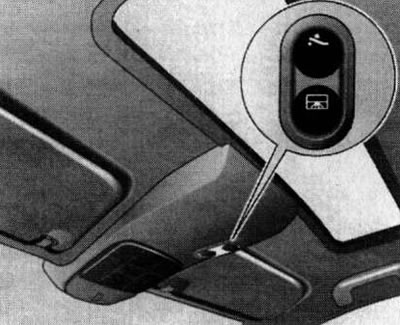
17.14. Push-button switches for controlling the electric drive of the upper hatch (with appropriate equipment)
Shifting
On models with a dual-function sunroof, to move the sunroof, simply press the button on the electric drive control switch - after the first press of the button, the sunroof will stop in the most comfortable position, in which wind noise is minimal. To fully open the sunroof, you must press the same button again. If necessary, you can stop the sunroof in an intermediate position by pressing the button on the same switch while moving the sunroof.
To close the top hatch, you must press and hold the switch button in this position until the lid is completely closed.
Lifting/Releasing
To raise the sunroof, press and hold the switch button until the sunroof rises to the desired height.
Caution: On models equipped with a dual-function sunroof, before lifting the sunroof cover, you must first ensure that it is completely closed!
To close the top hatch, press and hold the switch button until the lid is completely lowered.
Closing the top hatch from the outside
If necessary, the electric top hatch can be closed from the outside using a key (see section 8).
Failures of the electric drive of the upper hatch
In case of overload in the electric drive circuits due to too frequent repeated action on the switch or for other reasons, the circuits are protected by fuses. If the electric drive does not activate, check the corresponding fuses (see Chapter 12).
Emergency closing of the electric top hatch
Attention: Before performing work, make sure that the ignition is off! If the electric drive fails, the upper hatch can be closed manually.
On models equipped with a dual-function sunroof (with lift and slide mechanism), slide the decorative cover located at the rear of the ceiling panel back (see illustration 17.15), use a screwdriver to press the middle spring-loaded part of the drive shaft inward and rotate the drive shaft until the sliding roof closes.
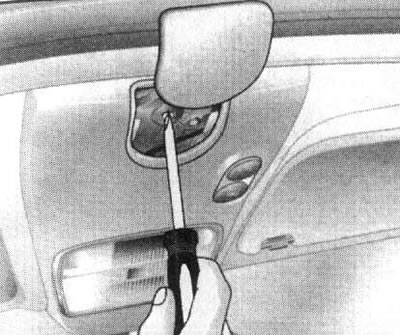
17.15. Closing the dual-function hatch in emergency mode
On hatchback models equipped with a lifting sunroof, use a screwdriver to remove the front seat lamp shade (see Chapter 12), then press the latches and remove the lamp assembly from the mounting socket. Unscrew the 2 fastening screws, slide the upper hatch drive cover back and remove it (see illustration 17.16). Insert the special key into the hole of the electric drive (see illustration 17.17) and rotate it until the hatch is completely closed.
Note: The special key must be kept in the main glove compartment.
On Combo models equipped with a tilt-up sunroof, press the front release tab on the power sunroof trim cover and remove it from the overhead console (see illustration 17.18), then use a screwdriver to unscrew the coupling screw. Using the emergency key, which is stored on the back of the electric drive cover, pull the coupling out of the socket (see illustration 17.19). Insert the emergency key with the hex end into the hole in the coupling (see illustration 17.20) and, rotating it in the appropriate direction, close the top hatch cover. At the first opportunity, contact a service station to check the hatch drive and eliminate the malfunction.
Sun protection blind
Both in the closed and open position, the upper hatch can be covered with a sunshade. The movement of the sunshade is done manually. When the upper hatch is moved, the sunshade is retracted automatically - after closing the hatch, it can only be returned to its original position manually.
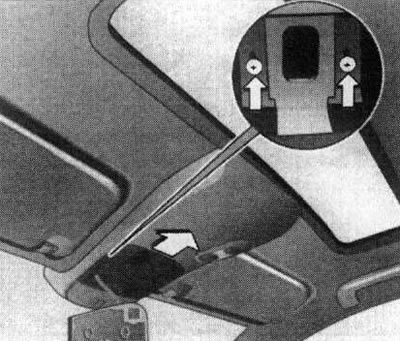
17.16. Remove 2 screws, slide the top hatch drive cover back and remove it (hatchback models) |
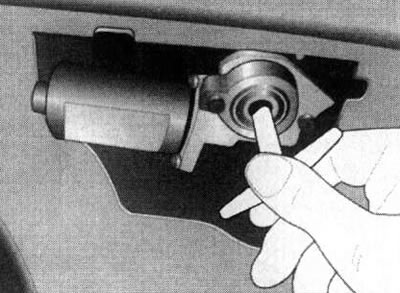
17.17. Emergency lowering of the lifting top hatch cover using a special key (hatchback models) |
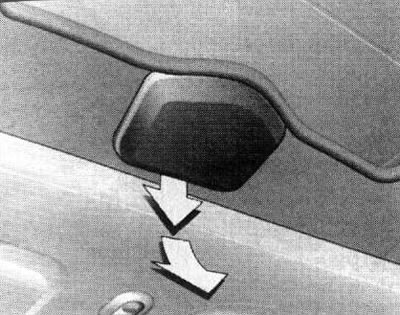
17.18. Removing the electric drive cover of the upper hatch (combo models) |
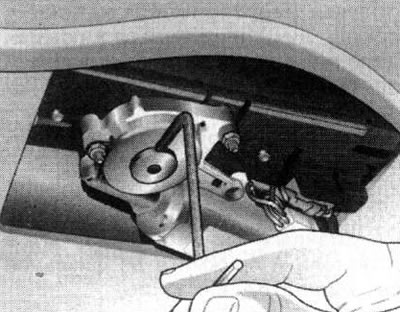
17.19. Using the emergency key, pull the coupling out of the seat (combo models) |
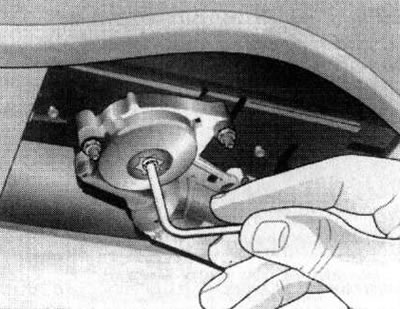
17.20 Emergency lowering of the lifting top hatch cover using the emergency key (combo models)
Visitor comments