
OpelBook.ru
Cars AvtoVAZ Cars Mitsubishi Cars BMW Cars Mercedes Cars Nissan Cars Toyota Cars Chevrolet
English Русский
Български
Беларускі
Український
Српски
Hrvatski
Română
Polski
Slovenský
Magyar
 |  Sitemap  |  Contacts  |    


Main Astra Corsa Insignia Kadett Omega Vectra Zafira Others Articles
Frontera A (1991-1998, petrol) Frontera B (1998-2004) Ascona C (1981-1988) Vivaro A (2001-2014)
  • Main
  • Opel
  • Frontera A
  • General information
  • User manual
  • Upper hatch drive

Upper hatch drive (Opel Frontera A)

            0

Contents: 3-door models ⬇ 5-door models ⬇

3-door models
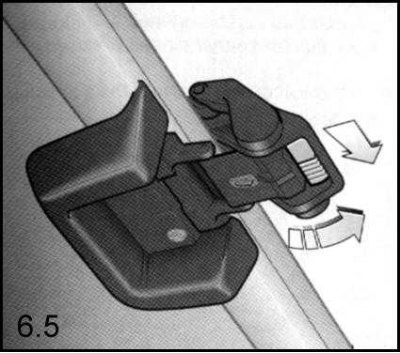


1. To move the sunroof lid to the tilt position, move the green locking lever in the rear lock…


1. To move the sunroof lid to the tilt position, move the green locking lever in the rear lock handle to the right.

2. Turn the handle to remove it from its socket and push it upwards. When you release the green lever, the handle will lock in the set position.

3. To close the lid, push the lever again and turn the locking handle down and back into its seat.

For additional ventilation of the interior in hot weather, the sunroof panel can be completely removed from the roof of the car.

Attention! The cover must only be removed when the vehicle is stationary!
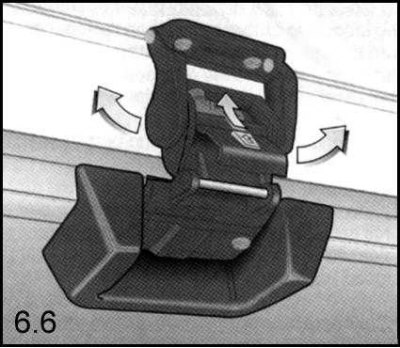

1. To remove the cover, lift it to an inclined position and remove the lock from the hinge pin by…


[Original article on the web portal www.opelbook.ru]

1. To remove the cover, lift it to an inclined position and remove the lock from the hinge pin by sliding the red locking button up and lifting the cover.


2. Remove the panel from the roof of the car by turning it backwards.

Installing the hatch cover
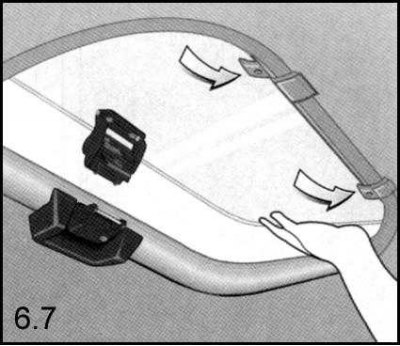


1. To install the cover, insert its hinges into the receiving grooves located along the front edge…


1. To install the cover, insert its hinges into the receiving grooves located along the front edge of the hatch opening.

2. Snap the lock onto the pivot pin of its hinge, locking it in this position by lowering the red button until it stops.

5-door models


Manual drive


1. Remove the control handle from its socket.
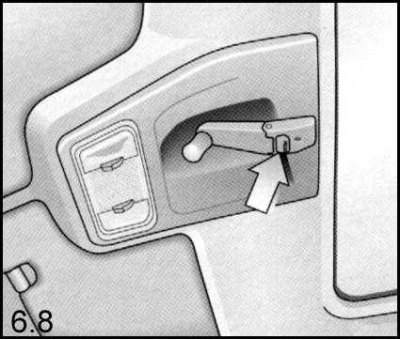
2. To open the hatch, press the lock button and begin to rotate the handle counterclockwise until…


2. To open the hatch, press the lock button and begin to rotate the handle counterclockwise until the hatch cover locks in an intermediate position.

3. To open the lid even further, press the lock button again and continue turning the handle counterclockwise.

4. To lower the lid from the fully open position, rotate the drive handle clockwise until the lid stops at an intermediate point in its travel.


5. To close the hatch completely, press the lock button and continue to turn the handle clockwise until the button automatically clicks out.

The lid is lowered by turning the handle counterclockwise until the locking button automatically clicks out.

Note: Don't forget to return the handle to its seat, thereby moving it to the transport position.


The hatch is usually also equipped with a sunblind, which can be opened both with the hatch cover closed and with the hatch cover raised. The hatch is opened together with the curtain.

Electric drive


Initiation of the electric drive of the sunroof cover is possible only when the ignition is on.
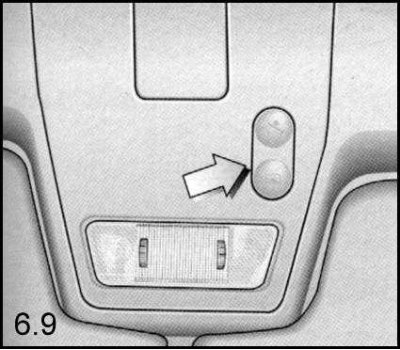
1. To open the cover, press the front cover of the rocker switch on the vehicle's overhead console.


1. To open the cover, press the front cover of the rocker switch on the vehicle's overhead console.

2. When the lid reaches the desired position, release the button.

3. The hatch cover is closed by pressing the rear cover of the switch.

4. To raise the sunroof, press the rear cover of the rocker switch.

5. Release the switch when the hatch cover reaches the desired position.

The cover is lowered by pressing the front cover of the switch.

Attention! When closing/lowering the lid, make sure that no object gets caught in the hatch opening!


Warning! Before leaving the vehicle, remove the key from the ignition, thereby preventing passengers remaining in the vehicle from operating the sunroof - unqualified use of the drive may result in injury!


The electrical circuit of the top hatch cover drive motor is protected by a separate fuse installed in the mounting block.

In case of electric drive failure, the hatch cover can be controlled manually.
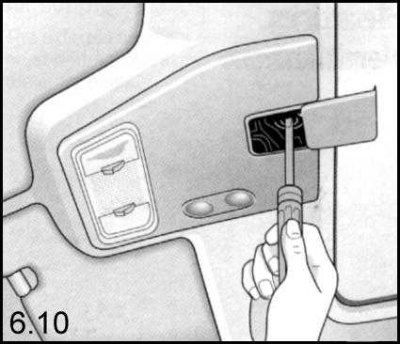
1. Slide the drive cover in the vehicle's overhead console back, press the spring-loaded center…


1. Slide the drive cover in the vehicle's overhead console back, press the spring-loaded center section of the drive shaft with a screwdriver and begin to rotate the shaft.

The hatch is usually also equipped with a sunblind, which can be opened both with the hatch cover closed and with the hatch cover raised. The hatch is opened together with the curtain.


This article is available at russian, bulgarian, belarusian, ukrainian, serbian, croatian, romanian, polish, slovak, hungarian
Checking the article: Meshcheryakov Damir

Share information:

Previous articles
Opel Frontera A: User manual
Next articles

Door window lift drive
Rear view mirror adjustment drive
Control of windshield wipers and washers
Lighting and signaling device control switches
Engine Starting Information
Ignition, engine start and steering column lock switch
Control of air flow for heating and ventilation of the passenger compartment
Driving a car
Refueling a car


See similar ones from other Opel car manuals:
▶ Upper hatch Opel Astra H (2004-2009)
▶ Upper hatch Opel Corsa C (2000-2006)
▶ Upper hatch elements Opel Omega B (1993-1999)
▶ Upper roof hatch Opel Vectra C (2002-2008)
▶ Checking the tension of the accessory drive belt Opel Insignia A (2008-2017)
Link to this page in different formats

Visitor comments


No comments yet


How much will 34 + 23 =


Vivaro A (2001-2014) 
  • General information
  • User manual
  • Power unit
  • Petrol engine F4R
  • Diesel engine F9Q
  • Diesel engine G9U
  • Transmission
  • Clutch and drive shafts
  • Manual gearbox
  • Chassis
  • Front suspension
  • Rear suspension
  • Brake system
  • Body
  • Exterior
  • Interior
  • Electrical equipment
  • Heating and ventilation
  • Air conditioner
  • Equipment and devices
  • Electrical diagrams
Ascona C (1981-1988) 
  • General information
  • Maintenance
  • Power unit
  • Gasoline engines
  • Diesel engines
  • Cooling system
  • Fuel and exhaust system
  • Contact ignition system
  • Contactless ignition system
  • Transmission
  • Clutch
  • Mechanical gearbox
  • Automatic gearbox
  • Drive shafts
  • Chassis
  • Steering
  • Brake system
  • Car suspension
  • Body
  • Exterior
  • Interior
  • Doors and windows
  • Electrical equipment
  • Equipment and devices
  • Power devices
  • Electrical circuits
Frontera B (1998-2004) 
  • General information
  • User manual
  • Maintenance
  • Power unit
  • Petrol engines 2.2 l
  • Petrol engines 3.2 l
  • Diesel engines 2.2 l
  • Cooling system
  • Fuel system (petrol)
  • Fuel system (diesel)
  • Ignition system
  • Transmission
  • Clutch
  • Manual gearbox MUA5C
  • Automatic gearbox 4L30E
  • Chassis
  • Suspension and axles
  • Steering
  • Brake system
  • Body
  • Exterior
  • Interior
  • Doors, locks and windows
  • Heating and air conditioning
  • Electrical equipment
  • Power devices
  • Equipment and devices
  • Lighting and signaling
  • Electrical diagrams
Frontera A (1991-1998, petrol) 
  • General information
  • Introduction to guide
  • User manual
  • Maintenance
  • Power unit
  • Engine repair
  • Lubrication system
  • Cooling system
  • Power and exhaust system
  • Engine electrics
  • Transmission
  • Clutch
  • Mechanical gearbox
  • Cardan shafts
  • Chassis
  • Brake system
  • Front suspension
  • Rear suspension
  • Steering
  • Body
  • Repair and care
  • Electrical equipment
  • Equipment and devices
  • Electrical circuits
OpelBook.ru © 2017–2026 · Mobile version · · Sitemap: EN BG BY UA RS HR RO PL SK HU · Feedback · Site search
Astra F, petrol · Astra G, petrol · Astra G · Astra H · Astra J, petrol · Corsa B · Corsa C, petrol · Corsa C · Insignia A · Kadett D · Kadett E · Omega A · Omega B · Omega B2 · Vectra A, petrol · Vectra A · Vectra B, petrol · Vectra B · Vectra C · Zafira A, petrol · Frontera A, petrol · Frontera B · Ascona C · Vivaro A ·
We want your visit to be comfortable 🤝! We use cookies 🍪 to make that happen.