
OpelBook.ru
Cars AvtoVAZ Cars Mitsubishi Cars BMW Cars Mercedes Cars Nissan Cars Toyota Cars Chevrolet
English Русский
Български
Беларускі
Український
Српски
Hrvatski
Română
Polski
Slovenský
Magyar
 |  Sitemap  |  Contacts  |    


Main Astra Corsa Insignia Kadett Omega Vectra Zafira Others Articles
Frontera A (1991-1998, petrol) Frontera B (1998-2004) Ascona C (1981-1988) Vivaro A (2001-2014)
  • Main
  • Opel
  • Frontera A
  • General information
  • User manual
  • Lighting and signaling device control switches

Lighting and signaling device control switches (Opel Frontera A)

            0

Contents: External lighting fixtures ⬇ Driving lights (for daytime driving) ⬇ Interior lighting fixtures ⬇

External lighting fixtures


Main switch
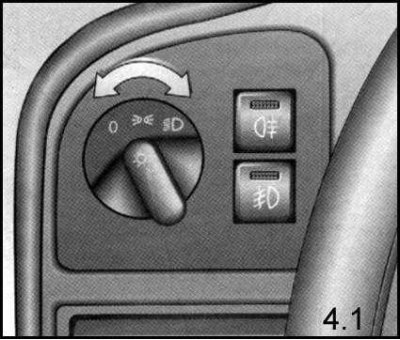


The switch has three positions:


The switch has three positions:
  • (1) = Off
  • (2) = Parking light
  • (3) = Low/high beam

In switch positions (2) and (3), the rear side lights and license plate lights are also switched on

Adjusting the direction of the headlight beams


In order not to blind oncoming drivers, the adjustment of the low beam direction of the headlights is performed asymmetrically, with the directrix shifted towards the side of the road (for Russia - turned to the right). When leaving Russia for countries with left-hand traffic, special shields should be placed on the headlights, covering the right sector of the lens within a range of 15°.

Some Opel Frontera models have the ability to adjust the direction of the headlight beams to compensate for distortions caused by uneven vehicle loading.
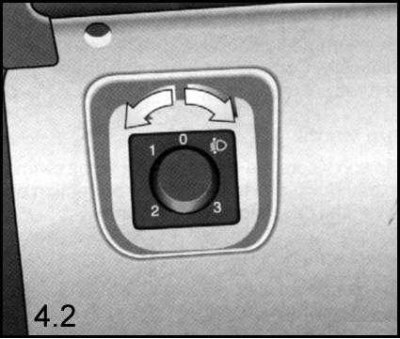
The adjustment is made using a special switch.


The adjustment is made using a special switch.


The switch must be set to the "0" position when there is only one driver in the vehicle. Position "1" corresponds to the situation when all seats in the cabin are occupied; position "2" - all seats are occupied and cargo is placed in the luggage compartment; Position "3" (5-door models) - driver and cargo in the luggage compartment.

Correct adjustment of the beam direction of the headlights ensures protection of oncoming drivers from dazzlement.

Front fog light control
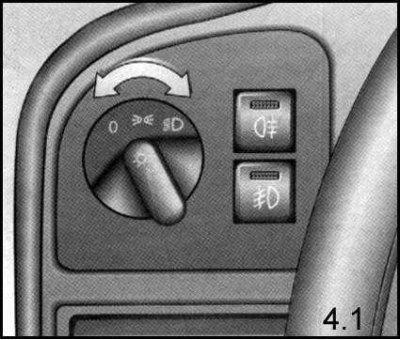


1. Press the button (5) on the main switch panel - the green indicator inside it should light up.


1. Press the button (5) on the main switch panel - the green indicator inside it should light up.

The front fog lights come on when the parking lights are turned on.

2. To turn off the fog lights, press button (5) again.

Rear fog light control
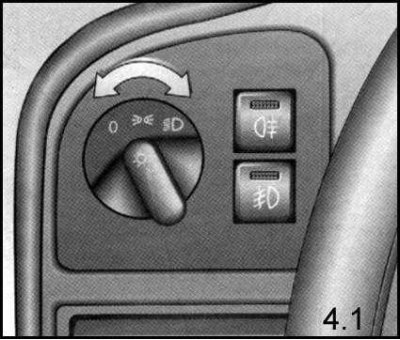


1. Press the button (4) on the main switch panel - a yellow indicator should light up inside it.


1. Press the button (4) on the main switch panel - a yellow indicator should light up inside it.


The rear fog lights come on when the headlights or front fog lights are turned on.

2. To turn off the fog lights, press button (4) again.

Switching headlights (near/far)
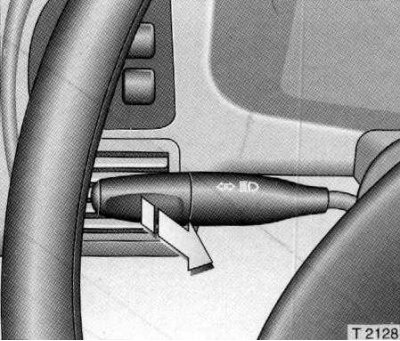


1. To change the headlights, pull the left steering column stalk switch towards you.


1. To change the headlights, pull the left steering column stalk switch towards you.

2. After the click, release the switch lever.

3. Pulling the switch towards you to the first stop (without a click) allows you to flash the headlights (see next subsection).

Flashing headlights


1. To turn on the headlight flashing mode, gently pull the left steering column stalk switch towards you.

Direction indicator control
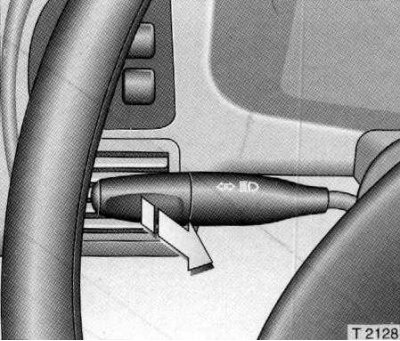


1. To turn on the direction indicators, move the left steering column switch lever from the middle…


1. To turn on the direction indicators, move the left steering column switch lever from the middle (in the vertical plane) positions up (right turn) or down (left turn).


2. When you turn the steering wheel back after completing a turn, the switch will automatically return to the center position. Remember that the return device does not operate when making smooth turns with a large radius - in this case, you need to pull the lever up or down only to the first stop, then it will return to its original position after releasing.

Hazard warning switch
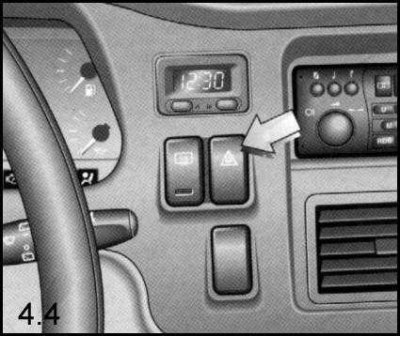


The hazard warning light switch is located on the instrument panel below the clock, to the right of…


The hazard warning light switch is located on the instrument panel below the clock, to the right of the instrument cluster.

When the switch button is pressed, all four direction indicators are simultaneously activated and begin to flash in unison with the switch indicator lamp.

Driving lights (for daytime driving)


Driving lights, if provided by the vehicle, are switched on simultaneously with the high beam headlights.

Reversing lights


They are switched on automatically when the transmission is shifted into reverse gear with the ignition on.

Interior lighting fixtures


Reading light control
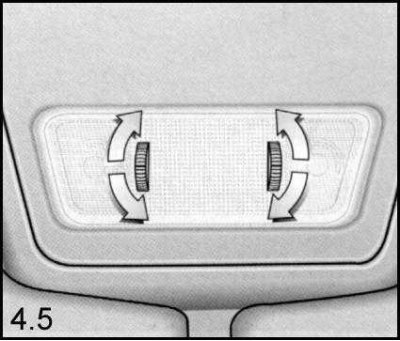


Turning on the lamp and adjusting the brightness of its glow are produced by rotating the ring…


Turning on the lamp and adjusting the brightness of its glow are produced by rotating the ring handles of the potentiometers mounted directly into the lens of the lampshade.


Interior lighting control


Front light


The interior lighting turns on automatically when any of the car doors is opened. After closing the doors, the lighting also turns off automatically with a short delay.
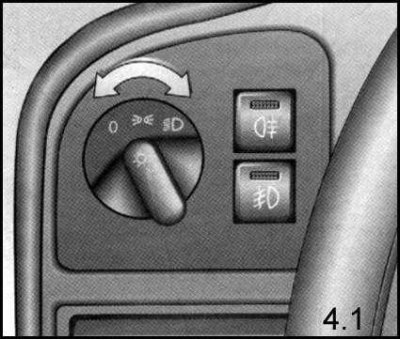
1. To turn on the lighting with the doors closed, pull the handle (6) of the main lighting switch…


1. To turn on the lighting with the doors closed, pull the handle (6) of the main lighting switch towards you.

Back light
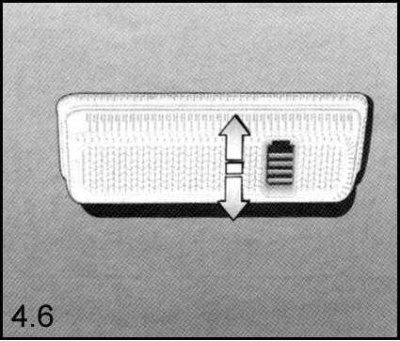


1. To turn on the light permanently, slide the slide switch forward.


1. To turn on the light permanently, slide the slide switch forward.

2. To turn on the light when the doors are opened, the switch slider should be moved back.

3. Setting the switch to the middle position turns off the light.

Luggage compartment lighting


The luggage compartment is illuminated by a separate light equipped with a slide switch.

1. To turn on the light permanently, slide the slide switch forward.


2. To turn on the light when the tailgate is opened, the switch slider should be moved back.

3. Setting the switch to the middle position turns off the light.

Instrument panel lighting


The instrument panel illumination is activated when the external lighting devices are turned on (see above subsection Main switch).

Cigarette lighter and ashtray illumination


This illumination, if provided by the vehicle, is activated when the parking lights are turned on.

Turn on the sound signal
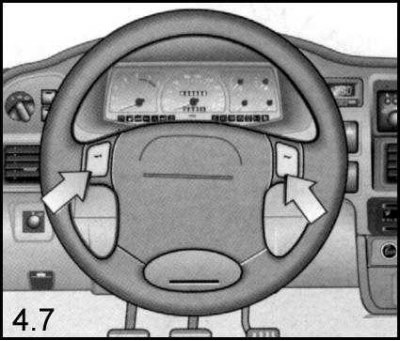


The horn is activated by pressing either of the two push-button switches mounted in the steering…


The horn is activated by pressing either of the two push-button switches mounted in the steering wheel's cross spoke.


This article is available at russian, bulgarian, belarusian, ukrainian, serbian, croatian, romanian, polish, slovak, hungarian
Checking the article: Meshcheryakov Damir

Share information:

Previous articles
Opel Frontera A: User manual
Next articles

Engine Starting Information
Ignition, engine start and steering column lock switch
Adjusting the position of the seats and steering column
Devices for traffic safety and passenger comfort
Seat headrests
Devices for safe transportation of children in a car
Control of windshield wipers and washers
Rear view mirror adjustment drive
Door window lift drive
Upper hatch drive
Control of air flow for heating and ventilation of the passenger compartment
Driving a car


See similar ones from other Opel car manuals:
▶ Receiver Remote Control Switches — Removal and Installation Opel Astra G (1998-2004, petrol)
▶ Interior lighting, interior mirror, door switches,… Opel Corsa C (2000-2006)
▶ Automatic lighting control Opel Insignia A (2008-2017)
▶ Automatic transmission control mechanism device Opel Kadett E (1984-1995)
▶ Manual speed control device Opel Omega A (1986-1993)
Link to this page in different formats

Visitor comments


No comments yet


How much will 10 + 39 =


Vivaro A (2001-2014) 
  • General information
  • User manual
  • Power unit
  • Petrol engine F4R
  • Diesel engine F9Q
  • Diesel engine G9U
  • Transmission
  • Clutch and drive shafts
  • Manual gearbox
  • Chassis
  • Front suspension
  • Rear suspension
  • Brake system
  • Body
  • Exterior
  • Interior
  • Electrical equipment
  • Heating and ventilation
  • Air conditioner
  • Equipment and devices
  • Electrical diagrams
Ascona C (1981-1988) 
  • General information
  • Maintenance
  • Power unit
  • Gasoline engines
  • Diesel engines
  • Cooling system
  • Fuel and exhaust system
  • Contact ignition system
  • Contactless ignition system
  • Transmission
  • Clutch
  • Mechanical gearbox
  • Automatic gearbox
  • Drive shafts
  • Chassis
  • Steering
  • Brake system
  • Car suspension
  • Body
  • Exterior
  • Interior
  • Doors and windows
  • Electrical equipment
  • Equipment and devices
  • Power devices
  • Electrical circuits
Frontera B (1998-2004) 
  • General information
  • User manual
  • Maintenance
  • Power unit
  • Petrol engines 2.2 l
  • Petrol engines 3.2 l
  • Diesel engines 2.2 l
  • Cooling system
  • Fuel system (petrol)
  • Fuel system (diesel)
  • Ignition system
  • Transmission
  • Clutch
  • Manual gearbox MUA5C
  • Automatic gearbox 4L30E
  • Chassis
  • Suspension and axles
  • Steering
  • Brake system
  • Body
  • Exterior
  • Interior
  • Doors, locks and windows
  • Heating and air conditioning
  • Electrical equipment
  • Power devices
  • Equipment and devices
  • Lighting and signaling
  • Electrical diagrams
Frontera A (1991-1998, petrol) 
  • General information
  • Introduction to guide
  • User manual
  • Maintenance
  • Power unit
  • Engine repair
  • Lubrication system
  • Cooling system
  • Power and exhaust system
  • Engine electrics
  • Transmission
  • Clutch
  • Mechanical gearbox
  • Cardan shafts
  • Chassis
  • Brake system
  • Front suspension
  • Rear suspension
  • Steering
  • Body
  • Repair and care
  • Electrical equipment
  • Equipment and devices
  • Electrical circuits
OpelBook.ru © 2017–2026 · Mobile version · · Sitemap: EN BG BY UA RS HR RO PL SK HU · Feedback · Site search
Astra F, petrol · Astra G, petrol · Astra G · Astra H · Astra J, petrol · Corsa B · Corsa C, petrol · Corsa C · Insignia A · Kadett D · Kadett E · Omega A · Omega B · Omega B2 · Vectra A, petrol · Vectra A · Vectra B, petrol · Vectra B · Vectra C · Zafira A, petrol · Frontera A, petrol · Frontera B · Ascona C · Vivaro A ·
We want your visit to be comfortable 🤝! We use cookies 🍪 to make that happen.