
OpelBook.ru
Cars AvtoVAZ Cars Mitsubishi Cars BMW Cars Mercedes Cars Nissan Cars Toyota Cars Chevrolet
English Русский
Български
Беларускі
Український
Српски
Hrvatski
Română
Polski
Slovenský
Magyar
 |  Sitemap  |  Contacts  |    


Main Astra Corsa Insignia Kadett Omega Vectra Zafira Others Articles
Corsa B (1993-2000) Corsa C (2000-2006, petrol) Corsa C (2000-2006)
  • Main
  • Corsa
  • Corsa C
  • Body
  • Interior
  • Removal and installation the rear seat

Removal and installation the rear seat (Opel Corsa C)

            0

Contents: Corsa C models ⬇ Meriva Models ⬇
See also Chapter "Controls and operating techniques", Section 12.

Corsa C models


Note: The following describes the removal/installation procedure for the two-piece rear bench seat. The removal procedure for the bench seat is almost identical to the following.


Removal and installation the rear bench seat cushion


1. Lift the rear seat cushion by the front edge, pull it forward, then lift it from the rear and fold it forward (see accompanying illustration).
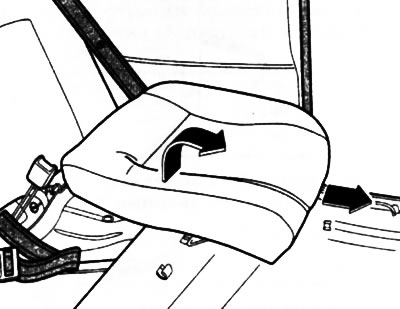
55.1. Folding the rear bench seat section cushion

55.1. Folding the rear bench seat section cushion


2. Press the pillow fastening brackets inward and remove them from the loops (see accompanying illustration).
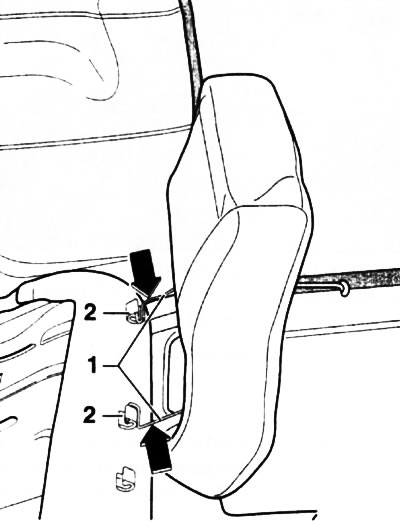
55.2. Press the fastening brackets (1) in the direction indicated by the arrows and remove them…

55.2. Press the fastening brackets (1) in the direction indicated by the arrows and remove them from the loops (2) on the floor of the passenger compartment


3. Remove the seat cushion from the vehicle interior.

4. Installation is carried out in reverse order.

Removal and installation the backrest of the rear bench seat


5. Open the tailgate.

6. Remove the luggage compartment shelf (see Chapter "Controls and operating techniques", Section 17).

7. Separate the carpet strip from the tailgate sill (see Section 48) and pull the carpet out of the luggage compartment.

8. Remove the head restraints from the back of the rear bench seat (see Chapter "Controls and operating techniques", Section 12) and fold the seat cushion forward.

9. Remove the rear seat belt buckles (see Section 53).

10. Remove the screws securing the rear seat back center support from the bottom of the vehicle (see accompanying illustration).
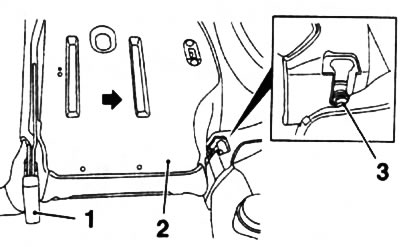
55.10. Central support (1) and guide pin (3) of the backrest (2) of the rear bench seat

55.10. Central support (1) and guide pin (3) of the backrest (2) of the rear bench seat


11. By pressing the clamps, release the upper side edges of the backrest from the support brackets (see Section 56) and fold it forward.

12. Press the rear seat back in the direction indicated by the arrow (see illustration 55.10) and remove the backrest guide pin from the support upwards.


13. Similarly, remove the guide pin from the opposite side of the seat back and pull the seat back out of the passenger compartment.

14. Installation is carried out in reverse order.

Meriva Models


Side seats


15. Remove the right head restraint from the back of the corresponding outboard rear seat. Release the back of the center seat and fold it forward until it locks into place.

16. Pull the seat belt out of the upper guide on the back of the side seat, remove the decorative plug, and unscrew the screw located underneath it (see accompanying illustration) and separate the lower belt anchor from the seat.
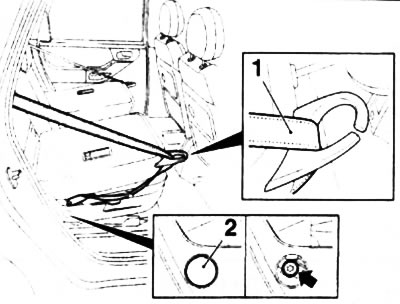
55.16. Release the side seat belt (1) from the upper guide (meriva models) - the arrow indicates…

55.16. Release the side seat belt (1) from the upper guide (meriva models) - the arrow indicates the screw for fastening the lower belt anchor: 2. Decorative plug


17. Use a screwdriver to pry off the decorative plugs of the screws securing the side seat runner covers (see accompanying illustration) and remove the screws. Pull the skid covers forward and remove them.
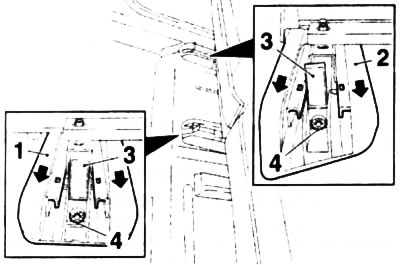
55.17. Screws (4) for fastening covers (1 and 2) of the rear bench seat runners (meriva models) -…

55.17. Screws (4) for fastening covers (1 and 2) of the rear bench seat runners (meriva models) - arrows indicate the direction of removing the covers: 3. Decorative plugs


18. Move the side seat back and inward, unscrew the 2 front screws securing the runners (see accompanying illustration) and move the seat outward and forward.

55.18. Front screws (indicated by arrows) rear bench seat runner mounts (meriva models)

55.18. Front screws (indicated by arrows) rear bench seat runner mounts (meriva models)


19. Fold the side seat back forward. Remove the 2 rear screws securing the rear seat rails (see accompanying illustration) and pull the seat out of the car.
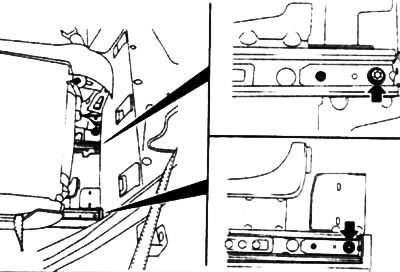
55.19. Rear screws (indicated by arrows) rear side seat runner mounts (meriva models)

55.19. Rear screws (indicated by arrows) rear side seat runner mounts (meriva models)


20. Installation is performed in the reverse order of removal. Run the threads of the side seat mounting screws and the seat belt mounting screw, clean it and lubricate it with a fixing compound (for example, Loctite 243). Check that the seat belt is functioning properly (see Chapter "Controls and operating techniques").


Center seat


21. Pry up the decorative plugs of the front covers of the seat guides and unscrew the screws located underneath them (see accompanying illustration).

[Material copied from this resource: OpelBook.ru]
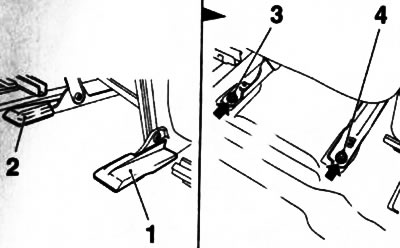
55.21. Screws (3 and 4) for fastening: 1, 2. Decorative plugs

55.21. Screws (3 and 4) for fastening: 1, 2. Decorative plugs


22. Fold all rear bench seat backrests forward until they lock into place.

23. Loosen the seat belt buckle fastening nuts and separate the seat belt straps from the seat (see accompanying illustration).
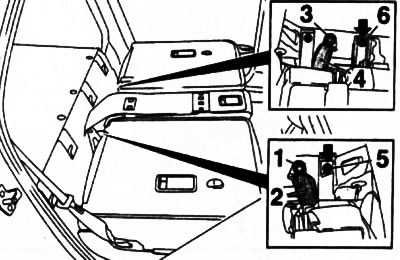
55.23. Rear screws (5 and 6) for fastening the center rear seat (meriva models): 1, 3. Rear seat…

55.23. Rear screws (5 and 6) for fastening the center rear seat (meriva models): 1, 3. Rear seat belt buckle mounting nuts; 2, 4. Belt straps for fastening locks


24. Remove the rear mounting screws (see illustration 55.23) and carefully remove the center seat.

25. Installation is carried out in the reverse order of removal, however the rear mounting screws should be tightened last.


This article is available at russian, bulgarian, belarusian, ukrainian, serbian, croatian, romanian, polish, slovak, hungarian
Checking the article: Kornev Georgy

Share information:

Previous articles
Opel Corsa C: Interior
Next articles

Removal and installation the front seat
Removal and installation rear seat belt buckles (Corsa C)
Removal and installation the rear seat belt (Corsa C)
Upper seat belt anchor height adjuster (Corsa C)
Removal and installation the front seat belt (Corsa C)
Removal and installation luggage compartment side trim
Rear bench seat backrest support bracket (Corsa C)


See similar ones from other Opel car manuals:
▶ Removal and installation the rear seat Opel Astra H (2004-2009)
▶ Rear seat cushion — removal and installation Opel Vectra B (1995-2002)
▶ Rear seat — removal and installation Opel Ascona C (1981-1988)
▶ Rear window wiper/washer Opel Insignia A (2008-2017)
▶ Rear suspension Opel Kadett E (1984-1995)
Link to this page in different formats

Visitor comments


No comments yet


How much will 47 + 25 =


Corsa C (2000-2006) 
  • General information
  • Introduction to guide
  • Troubleshooting
  • Vehicle device
  • User manual
  • Maintenance
  • Power unit
  • Engine repair
  • Cooling system
  • Power and exhaust system
  • Control system
  • Engine electrical equipment
  • Transmission
  • Clutch
  • Mechanical gearbox
  • Automatic gearbox
  • Drive shafts
  • Chassis
  • Brake system
  • Wheel suspension
  • Steering
  • Body
  • Exterior
  • Interior
  • Doors and windows
  • Heating and air conditioning
  • Electrical equipment
  • Equipment and devices
  • Lamps and lighting
  • Electrical circuits
Corsa C (2000-2006, petrol) 
  • User manual
  • Car access
  • Governing bodies
  • Seat control
  • Heating and air conditioning
  • Driving and maintenance
  • Engines 1.0 and 1.2 l
  • Engine repair
  • Cooling and lubrication system
  • Injection system
  • Engines 1.4, 1.6 and 1.8 l
  • Engine repair
  • Cooling and lubrication system
  • Injection system
  • Transmission
  • Clutch
  • Mechanical gearbox
  • Automatic gearbox
  • Drive shafts
  • Chassis
  • Wheels and tires
  • Wheel suspension
  • Steering
  • Brake system
  • Body
  • Exterior
  • Doors and windows
  • Electrical equipment
  • Equipment and devices
  • Lighting system
  • Electrical circuits
Corsa B (1993-2000) 
  • General information
  • Introduction to guide
  • User manual
  • Maintenance
  • Power unit
  • SOHC gasoline engines
  • DOHC gasoline engines
  • Diesel engines
  • Engine repair
  • Cooling system
  • Supply system
  • Injection system (gasoline)
  • Injection system (diesel)
  • Exhaust systems
  • Control system (gasoline)
  • Preheat system (diesel)
  • Charge and launch system
  • Transmission
  • Mechanical gearbox
  • Automatic gearbox
  • Clutch and drive shafts
  • Chassis
  • Brake system
  • Front suspension
  • Rear suspension
  • Steering
  • Body
  • Ventilation and heating
  • Exterior
  • Interior
  • Doors and windows
  • Electrical equipment
  • Equipment and devices
  • Lamps and lighting
  • Electrical circuits
OpelBook.ru © 2017–2026 · Mobile version · · Sitemap: EN BG BY UA RS HR RO PL SK HU · Feedback · Site search
Astra F, petrol · Astra G, petrol · Astra G · Astra H · Astra J, petrol · Corsa B · Corsa C, petrol · Corsa C · Insignia A · Kadett D · Kadett E · Omega A · Omega B · Omega B2 · Vectra A, petrol · Vectra A · Vectra B, petrol · Vectra B · Vectra C · Zafira A, petrol · Frontera A, petrol · Frontera B · Ascona C · Vivaro A ·
We want your visit to be comfortable 🤝! We use cookies 🍪 to make that happen.