
OpelBook.ru
Cars AvtoVAZ Cars Mitsubishi Cars BMW Cars Mercedes Cars Nissan Cars Toyota Cars Chevrolet
English Русский
Български
Беларускі
Український
Српски
Hrvatski
Română
Polski
Slovenský
Magyar
 |  Sitemap  |  Contacts  |    


Main Astra Corsa Insignia Kadett Omega Vectra Zafira Others Articles
Astra F (1991-1998, petrol) Astra G (1998-2004, petrol) Astra G (1998-2004) Astra H (2004-2009) Astra J (2009-2015, petrol)
  • Main
  • Astra
  • Astra G
  • Power unit
  • SOHC gasoline engines
  • Removal, condition check and installation of the camshaft with the timing mechanism housing

Removal, condition check and installation of the camshaft with the timing mechanism housing (Opel Astra G)

            0

Contents: Removal ⬇ Examination ⬇ Installation ⬇

Removal


Removal using Opel tool No. MKM-891


With the special Opel tool #MKM-891, the camshaft can be removed from the engine without first dismantling the timing case. The tool is installed on the case with the cover removed (see Fig. Removal and installation the timing cover) and allows you to press out the hydraulic valve clearance compensators. Next, the shaft gear is dismantled (see Removal and installation the timing belt tensioner and timing drive gears), end cap and thrust plate (see next paragraph). Now the shaft can be removed from the housing through the hole in its left end.

Before installing the device, rotate the crankshaft 90° from the TDC position (see Checking the compression pressure in the cylinders), which will prevent the risk of engine damage due to the valves coming into contact with the piston crowns.


Removal without using a special tool


Without using a special device, the camshaft can only be removed from the engine together with the valve train housing. Since the housing is bolted with the same bolts as the cylinder head, the latter also has to be removed (see Removal and installation the cylinder head).

Theoretically, it is possible to remove the shaft with the housing while leaving the head on the block, but this is associated with the risk of damaging the sealing gasket. When deciding to perform work using this option, refer to the materials Removing and installing the oil pan, taking into account the fact that there is no need to remove the intake manifold and exhaust manifold. Remember that after installing the camshaft assembly with the timing case, it may be necessary to replace the head sealing gasket, which will negate all efforts to (by the way, quite insignificant) saving time.


1. After removing the timing case with the camshaft installed in it, unscrew the mounting bolts and remove the ignition module.

2. Unscrew the mounting bolts and remove the end cover installed on the left side of the timing case. Remove the sealing ring from the case - you can throw it away, since the ring must be replaced during assembly.
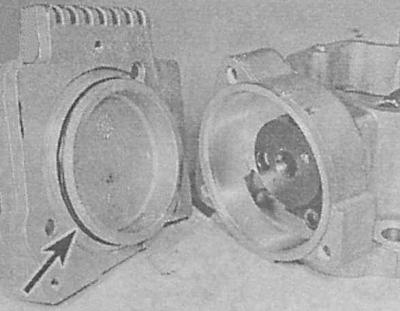
2. Unscrew the mounting bolts and remove the end cover installed on the left side of the timing…


3. Measure the axial clearance of the camshaft by inserting the blades of the measuring gauge between the thrust plate (1) and the shaft. If the measurement result is outside the permissible range (see Specifications), the thrust plate must be replaced. Unscrew the two fixing bolts and remove the thrust plate from the housing - try to remember the installation position of the components.
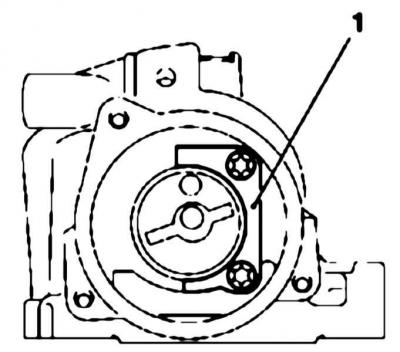
3. Measure the axial clearance of the camshaft by inserting the blades of the measuring gauge…


4. Carefully remove the shaft from the housing, being careful not to damage the bearing journals and the working surfaces of the cams.
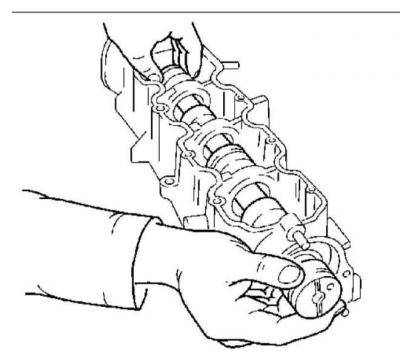


4. Carefully remove the shaft from the housing, being careful not to damage the bearing journals…


Examination


1. Measure the height (I) of the timing case from mating surface to mating surface. If the measurement result is less than 65 mm, replace the case.
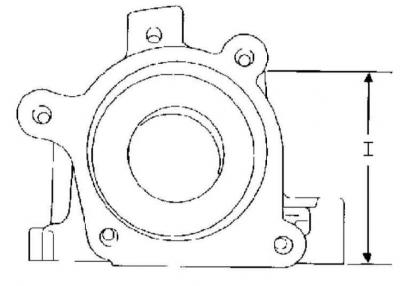
1. Measure the height (I) of the timing case from mating surface to mating surface. If the…


2. After removing the shaft, examine the condition of the working surfaces of the plain bearings in the housing beds. If signs of obvious wear or scoring are detected, the housing must be replaced - also check the condition of the corresponding shaft journals.

Also check the patency of the oil drains provided in the housing.


3. The shaft itself should not have any traces of scratches on the journals and working surfaces of the cams. If such defects are present, the shaft should also be replaced. If scoring is detected on the working surfaces of the cams, examine the condition of the drive levers of the corresponding valves (see Removal, inspection and installation of valve drive components).


4. Check that there are no signs of wear or wear on the camshaft thrust plate; replace the plate if necessary.

Installation


1. Using a screwdriver, carefully remove the old oil seal from its seat in the timing case. Check the cleanliness of the seat walls, then press the new oil seal into it (with sealing lips inward) flush with the outer surface of the housing.

2. Generously lubricate the camshaft, housing support bearings and seal lips with clean engine oil, then carefully insert the shaft into the housing - try not to damage the cams, journals and seal lips.

3. Insert the thrust plate into its regular place — make sure it is correctly aligned with the groove in the shaft journal. Tighten the mounting bolts with the required force. Check the amount of axial play of the shaft (see above).

4. Install a new sealing ring on the clean, dry-wiped rear surface of the housing. Install the end cover and tighten the bolts securing it to the required torque.

5. Install the ignition module onto the housing.

6. If removal was carried out using the Vauxhall tool, remove it and refit the camshaft sprocket. Return the crankshaft to TDC and refit the timing belt (see Removal and installation the timing belt and Removal and installation the timing belt tensioner and timing drive gears).

7. If the device was not used, install the timing case with the shaft inserted into it in its place and secure it with the cylinder head bolts (see Removal and installation the cylinder head).


This article is available at russian, bulgarian, belarusian, ukrainian, serbian, croatian, romanian, polish, slovak, hungarian
Checking the article: Pavlovsky Nikolay

Share information:

Previous articles
Opel Astra G: SOHC gasoline engines
Next articles

Replacing the camshaft seal
Removal and installation the timing belt tensioner and timing drive gears
Removal and installation the timing belt
Removal and installation the timing belt cover
Removal and installation the crankshaft pulley
Removal and installation the timing cover
Removal, inspection and installation of valve drive components
Removal and installation the cylinder head
Removal and installation the oil pan
Removal, maintenance and installation of the oil pump
Removal, checking condition and installing flywheel/drive disk
Replacing crankshaft seals


See similar ones from other Opel car manuals:
▶ Removal, condition check and installation of the camshaft… Opel Corsa B (1993-2000)
▶ Timing belt of the gas distribution mechanism-check Opel Omega B2 (1999-2003)
▶ Checking the timing belt of the gas distribution mechanism Opel Insignia A (2008-2017)
▶ Technical characteristics of the valve timing mechanism Opel Kadett E (1984-1995)
▶ Camshaft housing and camshaft — general description Opel Vectra A (1988-1995, petrol)
Link to this page in different formats

Visitor comments


No comments yet


How much will 13 + 18 =


Astra J (2009-2015, petrol) 
  • General information
  • Vehicle device
  • User manual
  • Faults en route
  • Maintenance
  • Power unit
  • Engine repair
  • Cooling and lubrication system
  • Engine power system
  • Exhaust system
  • Transmission
  • Clutch
  • Car gearbox
  • Drive shafts
  • Chassis
  • Front suspension
  • Rear suspension
  • Steering
  • Brake system
  • Wheels and tires
  • Body
  • Exterior
  • Interior
  • Doors and windows
  • Body Care
  • Heating and air conditioning
  • Security systems
  • Electrical equipment
  • Equipment and devices
  • Lighting and signaling
  • Power devices
  • Electrical circuits
Astra H (2004-2009) 
  • General information
  • Introduction to the guide
  • Troubleshooting
  • User manual
  • Maintenance
  • Power unit
  • Engine repair
  • Cooling and heating
  • Power and exhaust system
  • Ignition system
  • Launch and charge system
  • Transmission
  • Mechanical gearbox
  • Automatic gearbox
  • Drive shafts
  • Chassis
  • Brake system
  • Car suspension
  • Steering
  • Body
  • Interior
  • Exterior
  • Electrical equipment
  • Equipment and devices
  • Electrical circuits
Astra G (1998-2004) 
  • General information
  • Introduction to manual
  • User manual
  • Maintenance
  • Power unit
  • SOHC gasoline engines
  • DOHC gasoline engines
  • Diesel engines 1.7 and 2.0
  • Engine repair
  • Cooling system
  • Supply system
  • Injection system (gasoline)
  • Injection system (diesel)
  • Exhaust system
  • Charge and launch system
  • Ignition system (gasoline)
  • Preheat system (diesel)
  • Transmission
  • Manual gearbox
  • Automatic gearbox
  • Clutch
  • Drive shafts
  • Chassis
  • Brake system
  • Wheel suspension
  • Steering
  • Body
  • Exterior
  • Interior
  • Doors and windows
  • Ventilation and heating
  • Electrical equipment
  • Equipment and devices
  • Electrical circuits
Astra G (1998-2004, petrol) 
  • General information
  • User manual
  • Car care
  • Maintenance
  • Power unit
  • Single shaft engines
  • Twin shaft engines
  • Engine repair
  • Cooling and heating
  • Fuel and exhaust systems
  • Starting and charging system
  • Ignition system
  • Transmission
  • Clutch
  • Mechanical gearbox
  • Automatic gearbox
  • Drive shafts
  • Chassis
  • Brake system
  • Car suspension
  • Steering
  • Body
  • Interior
  • Exterior
  • Electrical equipment
  • Equipment and devices
  • Wiring diagrams Opel Astra
  • Wiring diagrams Opel Zafira
Astra F (1991-1998, petrol) 
  • General information
  • Maintenance
  • Power unit
  • Engine in car
  • Engine removed
  • Cooling system
  • Heating and ventilation
  • Fuel supply (carburetor)
  • Fuel supply (injector)
  • Emission control
  • Ignition system
  • Transmission
  • Clutch
  • Mechanical gearbox
  • Automatic gearbox
  • Drive shafts
  • Chassis
  • Brake system
  • Car suspension
  • Steering
  • Body
  • Exterior
  • Interior
  • Electrical equipment
  • Equipment and devices
  • Electrical circuits
OpelBook.ru © 2017–2026 · Mobile version · · Sitemap: EN BG BY UA RS HR RO PL SK HU · Feedback · Site search
Astra F, petrol · Astra G, petrol · Astra G · Astra H · Astra J, petrol · Corsa B · Corsa C, petrol · Corsa C · Insignia A · Kadett D · Kadett E · Omega A · Omega B · Omega B2 · Vectra A, petrol · Vectra A · Vectra B, petrol · Vectra B · Vectra C · Zafira A, petrol · Frontera A, petrol · Frontera B · Ascona C · Vivaro A ·
We want your visit to be comfortable 🤝! We use cookies 🍪 to make that happen.