
Removing
Models with manual transmission
1. Remove the transmission (see chapter Manual transmission or automatic transmission) and grip (see chapter Clutch and drive shafts).
2. Using a suitable tool, block the flywheel from turning. Use paint or marker to mark the position of the flywheel relative to the crankshaft.
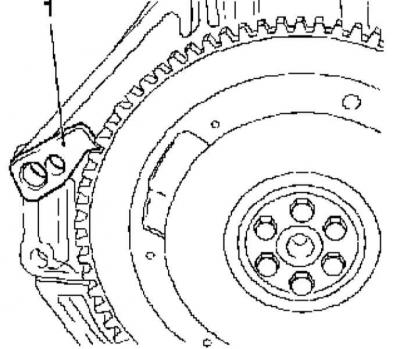
1 - The flywheel is blocked by the ring gear using a special-shaped device
3. Turn out fixing bolts and remove a flywheel, if necessary use the help of the assistant as the flywheel is heavy enough.
Models with AT
1. Remove the transmission (see chapter Manual transmission or automatic transmission).
2. Use a suitable tool to block the drive disk (see above).
3. Turn out fixing bolts and remove a fixing plate and a drive disk from a flange of a cranked shaft, - try to remember an adjusting position of components.
Examination
1. Inspect the flywheel/drive plate for signs of wear or chipping of the crown teeth. On models with a manual transmission, the crown can be replaced if necessary - to fit on the flywheel, it will have to be heated to a temperature of about 180-230°C.
2. Examine the condition of the working surface of the flywheel in contact with the clutch disc. In case of revealing deep grooves or scuffs, the flywheel can be given to the groove, but it would be wiser to replace it.
3. In the absence of confidence in assessing the condition of the flywheel, seek advice from car service specialists, or better, replace the flywheel.
Installation
Models with manual transmission
You will need new flywheel mounting bolts.
1. Clean the mating surfaces of the flywheel and crankshaft - make sure that the threaded holes in the shaft flange are completely free of traces of old sealant.
2. Lubricate the threaded part of the mounting bolts with fixative sealant, install the flywheel and fasten it with bolts. When installing a used flywheel, make sure that the landing marks applied during dismantling are correctly aligned.
3. Block the flywheel using the same method used for removal. Tighten all bolts evenly in diagonal order in several steps to the first stage torque.
4. Tighten the fasteners to the corners of the 2nd, then, where required, the 3rd stage of tightening (see Specifications), - use a goniometer nozzle, or pre-apply paint reference marks.
5. Install the clutch (see chapter Clutch and drive shafts). Remove the flywheel blocking tool and install the transmission (see chapter Manual transmission or automatic transmission).
Models with AT
1. Clean the mating surfaces of the drive disk and the crankshaft, - make sure that the threaded holes in the shaft flange are completely free of traces of the old sealant.
2. Lubricate the threaded part of the mounting bolts with locking compound, install the drive disc with the locking plate, and bolt the components. When installing a used drive disk, make sure that the landing marks applied during dismantling are aligned correctly.
3. Block the drive disk using the method used in removal. Tighten all bolts evenly in diagonal order in several steps to the first stage torque.
4. Tighten the fasteners to the corners of the 2nd, then - 3rd stages of tightening (see Specifications), - use a goniometer nozzle, or pre-apply reference marks with paint.
5. Install the clutch (see chapter Clutch and drive shafts). Remove drive disc blocking tool and install transmission (see chapter Manual transmission or automatic transmission).
Visitor comments