
OpelBook.ru
Cars AvtoVAZ Cars Mitsubishi Cars BMW Cars Mercedes Cars Nissan Cars Toyota Cars Chevrolet
English Русский
Български
Беларускі
Український
Српски
Hrvatski
Română
Polski
Slovenský
Magyar
 |  Sitemap  |  Contacts  |    


Main Astra Corsa Insignia Kadett Omega Vectra Zafira Others Articles
Astra F (1991-1998, petrol) Astra G (1998-2004, petrol) Astra G (1998-2004) Astra H (2004-2009) Astra J (2009-2015, petrol)
  • Main
  • Astra
  • Astra F
  • Chassis
  • Car suspension
  • Front Suspension Subframe — Removal and Installation

Front Suspension Subframe — Removal and Installation (Opel Astra F)

            0

Contents: Removal ⬇ Installation ⬇

Removal


The subframe is removed completely with the lower arms and stabilizer bar as a unit.

Before removing the subframe, the engine must be secured to the left side of the lifting bracket in such a way that the engine, secured to the vehicle raised from the ground, leaves sufficient clearance for removing the subframe.

Apply the handbrake, then raise the front of the car and secure it on stands under the axle.

On DOHC models, remove the lower splash shield as directed in chapter 11.

Text copied from an internet website: OpelBook.ru

Remove the front section of the exhaust system (see chapter 4). On models with twin camshaft engines, where required, remove the oil cooler hose bracket mounting bolt from the right side of the subframe.

Working on one side of the vehicle, remove the cotter pin from the castle nut securing the ball joint of the suspension strut to the lower arm, and unscrew the nut itself.

Using a separation tool, separate the ball joint between the suspension strut and the lower arm.

Repeat the operations in the previous two steps with the other lower arm.

Check that the engine is securely fastened, then loosen and remove the two nuts and washers securing the rear engine/transmission mount to the subframe.

Place a mobile jack under the subframe and place wooden blocks underneath to prevent the subframe from tipping over.

Loosen and remove the six bolts securing the subframe to the bottom of the car body (please note that some early models used a short front subframe, secured with four bolts instead of six). Note that the rear bolts also hold the lower control arms to the subframe. The bolts are very tight and will require a lot of force to loosen (fig. 10.13.).
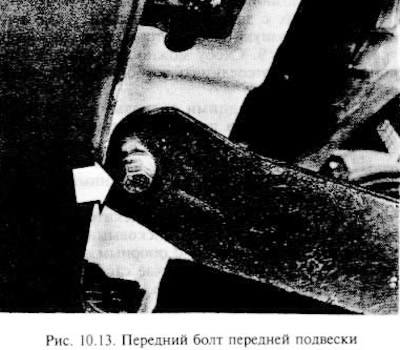


Loosen and remove the six bolts securing the subframe to the bottom of the car body (please note…


Lower the jack supporting the subframe and remove the assembly from under the front of the vehicle.

Installation


Installation is carried out in the reverse order of removal, taking into account the following.

If the stabilizer bar and/or lower arms are removed from the subframe, install them.

Install new subframe mounting bolts and tighten them to specification. The rear subframe and lower control arm mounting bolts must be tightened in three stages.

Insert new cotter pins into the nuts of the ball joint of the suspension strut with the lower arm.

Install the front section of the exhaust system as shown in chapter 4, and where required on twin cam models, install the oil cooler pipe bracket to the subframe and then the lower engine splash guard.


This article is available at russian, bulgarian, belarusian, ukrainian, serbian, croatian, romanian, polish, slovak, hungarian
Checking the article: Trifonova Emilia

Share information:

Previous articles
Opel Astra F: Car suspension
Next articles

Front Anti-Roll Bar Bushings — Removal
Anti-roll bar rod — removal and installation
Front Lower Arm Ball Joint — Replacement
Front Lower Arm Bushings — Replacement
Lower control arm front suspension — removal and installation
Front Wheel Hub Bearing — Replacement
Rear hub — removal and installation
Rear shock absorber — removal, inspection and installation
Rear shock absorber rubber bushings — replacement
Rear Suspension Coil Spring — Removal and Installation
Rear Anti-Roll Bar — Removal and Installation
Rear suspension torsion beam / trailing arms — removal and installation


See similar ones from other Opel car manuals:
▶ Front Suspension Subframe — Removal and Installation Opel Zafira A (1999-2005, petrol)
▶ Removal and installation the front control arm of the… Opel Corsa C (2000-2006, petrol)
▶ Front suspension Opel Insignia A (2008-2017)
▶ Front suspension Opel Kadett E (1984-1995)
▶ Front suspension strut — removal and installation Opel Omega A (1986-1993)
Link to this page in different formats

Visitor comments


No comments yet


How much will 33 + 50 =


Astra J (2009-2015, petrol) 
  • General information
  • Vehicle device
  • User manual
  • Faults en route
  • Maintenance
  • Power unit
  • Engine repair
  • Cooling and lubrication system
  • Engine power system
  • Exhaust system
  • Transmission
  • Clutch
  • Car gearbox
  • Drive shafts
  • Chassis
  • Front suspension
  • Rear suspension
  • Steering
  • Brake system
  • Wheels and tires
  • Body
  • Exterior
  • Interior
  • Doors and windows
  • Body Care
  • Heating and air conditioning
  • Security systems
  • Electrical equipment
  • Equipment and devices
  • Lighting and signaling
  • Power devices
  • Electrical circuits
Astra H (2004-2009) 
  • General information
  • Introduction to the guide
  • Troubleshooting
  • User manual
  • Maintenance
  • Power unit
  • Engine repair
  • Cooling and heating
  • Power and exhaust system
  • Ignition system
  • Launch and charge system
  • Transmission
  • Mechanical gearbox
  • Automatic gearbox
  • Drive shafts
  • Chassis
  • Brake system
  • Car suspension
  • Steering
  • Body
  • Interior
  • Exterior
  • Electrical equipment
  • Equipment and devices
  • Electrical circuits
Astra G (1998-2004) 
  • General information
  • Introduction to manual
  • User manual
  • Maintenance
  • Power unit
  • SOHC gasoline engines
  • DOHC gasoline engines
  • Diesel engines 1.7 and 2.0
  • Engine repair
  • Cooling system
  • Supply system
  • Injection system (gasoline)
  • Injection system (diesel)
  • Exhaust system
  • Charge and launch system
  • Ignition system (gasoline)
  • Preheat system (diesel)
  • Transmission
  • Manual gearbox
  • Automatic gearbox
  • Clutch
  • Drive shafts
  • Chassis
  • Brake system
  • Wheel suspension
  • Steering
  • Body
  • Exterior
  • Interior
  • Doors and windows
  • Ventilation and heating
  • Electrical equipment
  • Equipment and devices
  • Electrical circuits
Astra G (1998-2004, petrol) 
  • General information
  • User manual
  • Car care
  • Maintenance
  • Power unit
  • Single shaft engines
  • Twin shaft engines
  • Engine repair
  • Cooling and heating
  • Fuel and exhaust systems
  • Starting and charging system
  • Ignition system
  • Transmission
  • Clutch
  • Mechanical gearbox
  • Automatic gearbox
  • Drive shafts
  • Chassis
  • Brake system
  • Car suspension
  • Steering
  • Body
  • Interior
  • Exterior
  • Electrical equipment
  • Equipment and devices
  • Wiring diagrams Opel Astra
  • Wiring diagrams Opel Zafira
Astra F (1991-1998, petrol) 
  • General information
  • Maintenance
  • Power unit
  • Engine in car
  • Engine removed
  • Cooling system
  • Heating and ventilation
  • Fuel supply (carburetor)
  • Fuel supply (injector)
  • Emission control
  • Ignition system
  • Transmission
  • Clutch
  • Mechanical gearbox
  • Automatic gearbox
  • Drive shafts
  • Chassis
  • Brake system
  • Car suspension
  • Steering
  • Body
  • Exterior
  • Interior
  • Electrical equipment
  • Equipment and devices
  • Electrical circuits
OpelBook.ru © 2017–2026 · Mobile version · · Sitemap: EN BG BY UA RS HR RO PL SK HU · Feedback · Site search
Astra F, petrol · Astra G, petrol · Astra G · Astra H · Astra J, petrol · Corsa B · Corsa C, petrol · Corsa C · Insignia A · Kadett D · Kadett E · Omega A · Omega B · Omega B2 · Vectra A, petrol · Vectra A · Vectra B, petrol · Vectra B · Vectra C · Zafira A, petrol · Frontera A, petrol · Frontera B · Ascona C · Vivaro A ·
We want your visit to be comfortable 🤝! We use cookies 🍪 to make that happen.