
Removing
Place wedges under the front wheels, then jack up the rear of the vehicle and securely support it on stands under the axle. Remove rear running wheels.
On models with manual rear suspension leveling, depressurize the system by releasing the air through the valve in the luggage compartment.
On models with a catalytic converter, unscrew the bolts and remove the heat shield of the center section of the exhaust system.
Note the length of the threaded portion of the handbrake cable adjuster, then move the adjuster nut. so that you can disconnect the cable bracket from the handbrake actuator.
Disconnect the handbrake cables from the brackets. located on the underside of the body.
In the engine compartment, remove the cap from the brake fluid reservoir, then attach a piece of plastic wrap to the filler neck and install the cap. This will minimize fluid loss.
Disconnect the flexible hoses from the rigid brake lines at the front of each trailing arm. Fluid may leak, so close the ends of the pipes and hoses.
Where required, disconnect the connectors from the ABS sensors and remove the wire from the brackets on the trailing arms.
On station wagon and van models, disconnect the brake pressure control valve spring from the bracket on the torsion beam.
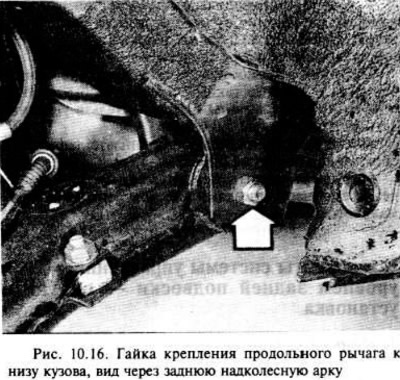
Loosen, but do not remove, the nuts and bolts securing the front ends of the trailing arms to the bottom of the vehicle body (pic. 10.16).
With the wood blocks in place, place the jack under the center of the torsion beam.
On sedan and hatchback models, unscrew and remove the bolts securing the lower ends of the shock absorbers to the trailing arms.
On station wagon and van models, having secured the shock absorber rods, unscrew the nuts securing the lower ends of the shock absorbers to the trailing arms.
Carefully lower the jack holding the torsion beam so that the coil springs can be removed. Remove coil springs.
Ensure that the torsion beam is properly secured, then remove the nuts and bolts securing the front ends of the trailing arms to the bottom of the vehicle body.
Remove the torsion beam/trailing arm assembly from under the rear of the vehicle.
If desired, you can remove the parts of the brakes from the trailing arms (see related section chapter 9). The hub assemblies can also be removed and, where required, the anti-roll bar.
If necessary, the trailing arm bushings can be removed as described in the next section.
Installation
Begin assembly by installing any removed parts that were removed from the torsion beam/trailing arms assembly.
Attach the torsion beam/trailing arms assembly to the wheel jack and position it under the rear of the vehicle.
Raise the jack and install the bolts and nuts that secure the front ends of the trailing arms to the bottom of the body. Do not fully tighten the fastener.
Install coil springs.
Raise the rear copies of the trailing arms and install the bolts and nuts, where required, securing the lower ends of the shock absorbers to the trailing arms. Tighten the fasteners to specification by tightening the damper rod on station wagon and van models. Pull the jack out from under the rear of the car.
Where required, connect the ABS wheel sensor wire and install the wire to the trailing arm brackets.
Remove plugs from brake pipes and hoses and connect fittings.
Install the handbrake cables to the underbody brackets, then connect the handbrake cable bracket to the handbrake actuator.
Install the handbrake cable adjusting screw and tighten the nut on the stem, observing the position marked before removal. Check handbrake adjustment as indicated in chapter 9.
On models with a catalytic converter, install a heat shield in the center section of the exhaust system.
On station wagon and van models, connect the brake pressure control valve spring to the torsion beam bracket.
Install the wheels and lower the vehicle to the ground.
On models with manual rear suspension level control, bring the pressure in the system to 0.8 bar.
Remove the wedges from under the front wheels.
Make sure the vehicle is on a level surface, then with approximately 70 kg of weight on each front seat, rock the vehicle to install the suspension.
Without changing the position of the vehicle, place wedges in front of and behind the front wheels to secure the vehicle.
Working under the rear of the vehicle, tighten the front ends of the trailing arms to the underbody as required.
Finally, recheck the handbrake cable adjustment, then remove the plastic sheet from under the brake fluid reservoir cap and bleed all brake hydraulic circuits as directed in chapter 9.
On station wagon and van models, check the setting of the brake pressure control valve.
Visitor comments