
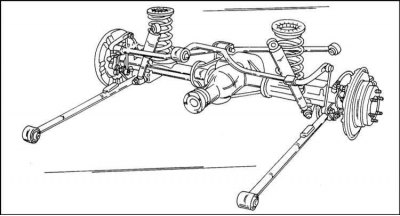
Removal and installation of leaf springs
Removing
1. Bring the lift under the rear axle, raise the axle so that the shock absorbers are compressed and unscrew the nuts of their fastening from below.
2. Remove shock absorbers from mounts.
3. Loosen the nuts, remove the washers and stepladder.
4. Remove the stepladder pad and raise the bridge so that the stand can be placed under the bridge outside of the spring.
5. Turn away in a back part of a spring a bolted connection of a cheek of a spring and a suspension bracket and release springs.
6. Have an assistant hold the spring, unscrew the nut and remove the support pin at the front of the spring.
7. Now you can knock out the spring.
The rubber-metal bushing of the front spring lug can be replaced if necessary. To do this, the old bushing is pressed out, and the new one is pressed in. Other rubber spring mounting elements can also be replaced.
Installation
Installing the spring is as follows:
1. Put the spring in front of the bridge and insert the pin.
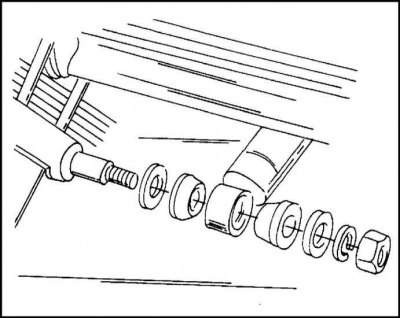
2. Install the rear spring mount with new rubber bushings. Details of the assembly are shown in the illustration.
3. Lubricate bushings and cheek with rubber grease.
4. Tighten the front and rear spring mounts by hand. The final tightening is done after the vehicle is lowered onto the wheels.
5. Lower the bridge onto the spring and insert the center bolt.
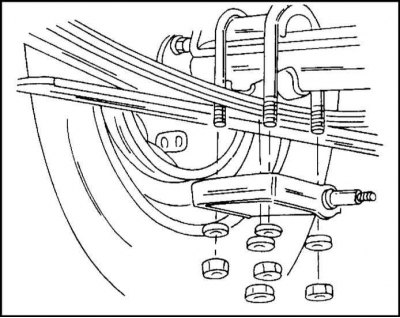
6. Place a ladder and install all the parts shown in the illustration.
7. Tighten the nuts after lowering the vehicle onto the wheels.
8. Install the shock absorber on the stepladder pad.
9. Tighten the nut by hand.
10. Lower the car on wheels and tighten all connections the moments specified below.
11. Finally, tighten the wheel nuts to the specified torque.
Removal and installation of the shock absorber
Removing and installing the shock absorber with leaf springs is not difficult. To do this, it is necessary to raise the axle with a lift so that the shock absorbers are slightly compressed. After that, disconnect the shock absorbers at the top and bottom and remove it.
To check the shock absorber, clamp it vertically by the lower lug in a vise. Extend and push in the upper part of the shock absorber. There should be resistance to this. If resistance is not felt in any places, the shock absorber must be replaced. If there is damage to the bushing of the lower eye of the shock absorber, the latter can be replaced.
The shock absorber is installed in the reverse order of its removal. Tighten the fastening nuts to a torque of 40 Nm.
The assembly of the lower shock absorber mount is shown in the illustration.
Visitor comments