
OpelBook.ru
Cars AvtoVAZ Cars Mitsubishi Cars BMW Cars Mercedes Cars Nissan Cars Toyota Cars Chevrolet
English Русский
Български
Беларускі
Український
Српски
Hrvatski
Română
Polski
Slovenský
Magyar
 |  Sitemap  |  Contacts  |    


Main Astra Corsa Insignia Kadett Omega Vectra Zafira Others Articles
Frontera A (1991-1998, petrol) Frontera B (1998-2004) Ascona C (1981-1988) Vivaro A (2001-2014)
  • Main
  • Opel
  • Frontera A
  • Power unit
  • Lubrication system
  • Oil pump repair (2.0L engine)

Oil pump repair (2.0L engine) (Opel Frontera A)

            0

The oil pump is gear-type, with internal gears. The pump has a pressure reducing valve. To remove the valve, unscrew the plug.

Caution! The plug is under spring pressure and may pop out. Please exercise caution. The sealing ring needs to be replaced. Knock the piston out of the valve hole.
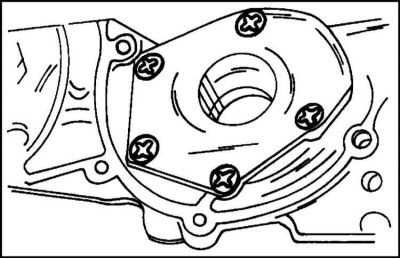

1. Remove the bolts and pump cover (illustrated). Remove both gears from the pump.


1. Remove the bolts and pump cover (illustrated). Remove both gears from the pump.

Note: The pressure reducing valve can be replaced without removing the pump. It is located on the right side of the pump looking towards the engine, next to the pulley.


The lubrication system has a bypass valve. It is located in the cylinder head. To replace it, you need to remove the cylinder head, which requires a special tool. If you have any difficulties replacing it, you should contact a car repair shop. To do this, the cylinder head is removed.

2. Carefully knock out the crankshaft oil seal using a drift.

3. Clean all parts thoroughly and visually inspect them for wear. Signs of wear on the pump cover in most cases indicate pump failure. If the parts look satisfactory, further control is carried out as follows:
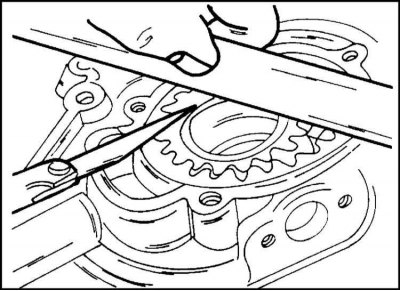
4. Insert the gears into the pump body and place a steel ruler on top as shown in the illustration.…


4. Insert the gears into the pump body and place a steel ruler on top as shown in the illustration. Use a feeler gauge to measure the gap between the ruler and the gears. It should be 0.03-0.10 mm. If the gap is beyond the specified limits, the gears or the entire pump are replaced.
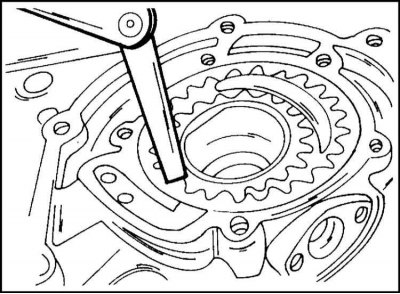


5. Measure the gap between any two gear teeth with a feeler gauge as shown in the illustration. It…


5. Measure the gap between any two gear teeth with a feeler gauge as shown in the illustration. It should be 0.175-0.225 mm. If the gap is beyond the specified limits, the gears or the entire pump are replaced as a set.

6. The spool of the pressure reducing valve must not show any signs of wear. The spring must be in good condition.

The pump is assembled in the reverse order of disassembly. Lubricate the gears generously before installation. Lubricate the cover mounting bolts with sealant. Pressure reducing valve (assembly sequence: valve, spring and plug) install on a new gasket. Tighten the plug to a torque of 30 Nm.

Install the O-ring now or when installing the pump.

Bypass valve in the cylinder head


The valve, which functions as a safety valve, is located under the threaded plug and consists of a steel ball with a spring. It is possible to dismantle the specified plug (drill a hole, screw in a screw and remove the plug with pliers). However, it is possible to replace the valve seat. It can only be removed with a puller. Installing a threaded plug requires skill. Therefore, it is recommended to perform this work in a car repair shop.

Source is on the website www.OpelBook.ru


This article is available at russian, bulgarian, belarusian, ukrainian, serbian, croatian, romanian, polish, slovak, hungarian
Checking the article: Meshcheryakov Damir

Share information:

Previous articles
Opel Frontera A: Lubrication system
Next articles

Oil pump — removal and installation (2.0L engine, before 1997)
Oil pan — removal and installation (2.0L engine, before 1997)
Engine lubrication system — general information
Oil pan — removal and installation (2.0L engine, since 1997)
Oil pump — removal and installation (2.0L engine, since 1997)
Oil pan — removal and installation (2.4L engine)
Oil pump — removal and installation (2.4L engine)
Oil pump repair (2.4L engine)
Oil filter — removal and installation


See similar ones from other Opel car manuals:
▶ Engine Repair — Assembly Sequence Opel Astra F (1991-1998, petrol)
▶ Alternative options for engine repair schemes Opel Corsa B (1993-2000)
▶ Removal, installation and repair of rear wheel hubs on… Opel Kadett E (1984-1995)
▶ Engine — preparation for first start after major repair Opel Omega A (1986-1993)
▶ Power steering pump (1.7L diesel engine) Opel Vectra B (1995-2002)
Link to this page in different formats

Visitor comments


No comments yet


How much will 28 + 35 =


Vivaro A (2001-2014) 
  • General information
  • User manual
  • Power unit
  • Petrol engine F4R
  • Diesel engine F9Q
  • Diesel engine G9U
  • Transmission
  • Clutch and drive shafts
  • Manual gearbox
  • Chassis
  • Front suspension
  • Rear suspension
  • Brake system
  • Body
  • Exterior
  • Interior
  • Electrical equipment
  • Heating and ventilation
  • Air conditioner
  • Equipment and devices
  • Electrical diagrams
Ascona C (1981-1988) 
  • General information
  • Maintenance
  • Power unit
  • Gasoline engines
  • Diesel engines
  • Cooling system
  • Fuel and exhaust system
  • Contact ignition system
  • Contactless ignition system
  • Transmission
  • Clutch
  • Mechanical gearbox
  • Automatic gearbox
  • Drive shafts
  • Chassis
  • Steering
  • Brake system
  • Car suspension
  • Body
  • Exterior
  • Interior
  • Doors and windows
  • Electrical equipment
  • Equipment and devices
  • Power devices
  • Electrical circuits
Frontera B (1998-2004) 
  • General information
  • User manual
  • Maintenance
  • Power unit
  • Petrol engines 2.2 l
  • Petrol engines 3.2 l
  • Diesel engines 2.2 l
  • Cooling system
  • Fuel system (petrol)
  • Fuel system (diesel)
  • Ignition system
  • Transmission
  • Clutch
  • Manual gearbox MUA5C
  • Automatic gearbox 4L30E
  • Chassis
  • Suspension and axles
  • Steering
  • Brake system
  • Body
  • Exterior
  • Interior
  • Doors, locks and windows
  • Heating and air conditioning
  • Electrical equipment
  • Power devices
  • Equipment and devices
  • Lighting and signaling
  • Electrical diagrams
Frontera A (1991-1998, petrol) 
  • General information
  • Introduction to guide
  • User manual
  • Maintenance
  • Power unit
  • Engine repair
  • Lubrication system
  • Cooling system
  • Power and exhaust system
  • Engine electrics
  • Transmission
  • Clutch
  • Mechanical gearbox
  • Cardan shafts
  • Chassis
  • Brake system
  • Front suspension
  • Rear suspension
  • Steering
  • Body
  • Repair and care
  • Electrical equipment
  • Equipment and devices
  • Electrical circuits
OpelBook.ru © 2017–2026 · Mobile version · · Sitemap: EN BG BY UA RS HR RO PL SK HU · Feedback · Site search
Astra F, petrol · Astra G, petrol · Astra G · Astra H · Astra J, petrol · Corsa B · Corsa C, petrol · Corsa C · Insignia A · Kadett D · Kadett E · Omega A · Omega B · Omega B2 · Vectra A, petrol · Vectra A · Vectra B, petrol · Vectra B · Vectra C · Zafira A, petrol · Frontera A, petrol · Frontera B · Ascona C · Vivaro A ·
We want your visit to be comfortable 🤝! We use cookies 🍪 to make that happen.