
Removing
The oil pan can be removed without removing the engine if, for example, the crankcase gasket needs to be replaced. The work is quite laborious, since it is necessary to lower the entire front axle beam in order to remove the oil pan. Relevant work is described in Chapter Suspension and steering. In addition, the engine must be lifted with a lifting device to disengage the mounts.
1. Remove the bottom protective sheet (sump guard) under the front of the car.
2. Place a container under the oil pan and remove the drain plug from the oil pan. Engine oil should be warm, but not hot.
3. Remove the suspension cross member under the oil pan.
4. Lower the front axle as described in the relevant section.
5. Loosen the bolts and remove the clutch slave cylinder (see chapter Clutch).
6. Turn away bolts of fastening of arms and remove them from a transmission and the block of cylinders. The engine must be attached to the lifting gear (e.g. on a hoist or on a hand crane). For a DOHC engine, remove the engine mounts between the transmission and cylinder block.
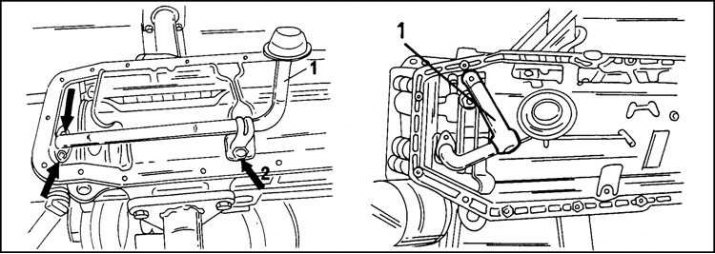
7. In accordance with illus. remove the oil line (1), by detaching the holder (2). Also remove the oil damping sheet. For a DOHC engine, the fastening of the parts in question corresponds to the right side of the illustrations. On the left - for a 2.0 liter engine.
Installation
Installation of the oil pan is carried out in the reverse order of its removal:
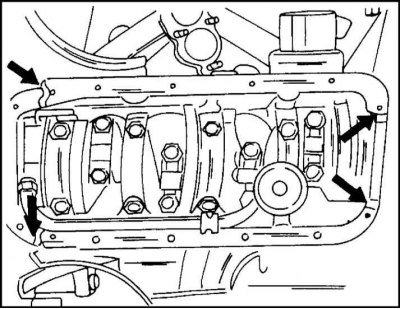
1. Thoroughly clean the mating surface of the cylinder block and apply some sealant to the corners of the block. Left in illustration. sealant application shown for oil pump, right side for bearing cap (until the end of 1996 release).
2. Install the oil damping sheet on the new gasket. If the oil damping sheet is replaced, it must be borne in mind that it is installed with a new vulcanized gasket.
3. Attach the oil line to the oil pump and secure it with a clamp. Lubricate the bolts with thread locking agent "Loctite". The threaded holes can be passed with a tap to remove the remnants of the old "Loctite". Tighten the inlet pipe fastening bolts to a torque of 8 Nm, clamp fastening screw to a torque of 6 Nm.
4. Install the oil pan with a new gasket on the cylinder block. Bolts of fastening screw on sealant. Find out which sealant is used for this in Opel workshops. Installation must be completed within 10 minutes. The threaded holes in the cylinder block can be pierced with a tap to remove old sealant residue. Tighten the bolts to 15 Nm.
5. Install the engine mounts, clutch slave cylinder, cross member and sump guard in the reverse order of removal. Tightening torques are equal.
6. At the end of the assembly, screw into the oil pan and tighten the drain plug (55 Nm). Fill the engine with oil.
7. Start the engine and check the tightness of the oil pan connection.
Visitor comments