
OpelBook.ru
Cars AvtoVAZ Cars Mitsubishi Cars BMW Cars Mercedes Cars Nissan Cars Toyota Cars Chevrolet
English Русский
Български
Беларускі
Український
Српски
Hrvatski
Română
Polski
Slovenský
Magyar
 |  Sitemap  |  Contacts  |    


Main Astra Corsa Insignia Kadett Omega Vectra Zafira Others Articles
Frontera A (1991-1998, petrol) Frontera B (1998-2004) Ascona C (1981-1988) Vivaro A (2001-2014)
  • Main
  • Opel
  • Ascona C
  • Transmission
  • Automatic gearbox
  • Automatic transmission — routine maintenance

Automatic transmission — routine maintenance (Opel Ascona C)

            0

Contents: Checking the transmission fluid…⬇ Transmission fluid replacement ⬇

Checking the transmission fluid level and adding fluid to the box


1. It is extremely important to maintain the correct transmission fluid level in the box.

2. The fluid level can be checked on a cold or hot box.

3. To check the fluid level on a cold gearbox, place the car on a level surface with the engine running and the gearshift lever set to the "P" position. Pull out the dipstick, wipe it with a lint-free cloth, put it back in place and pull it out again. Check the fluid level on the side of the dipstick that has the number "+20°C". The level should be at the MAX mark (see figure 6.39).
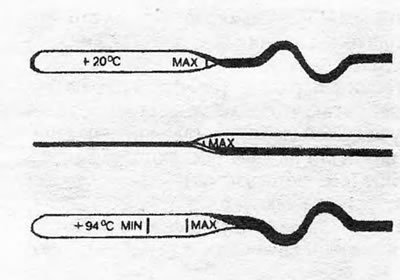
Figure 6.39. Marks on the automatic transmission dipstick

Figure 6.39. Marks on the automatic transmission dipstick


4. To check the fluid level on a hot box, you should first drive about 15 km. Check the fluid level as described above, but use the side of the dipstick that has the number "+94°C". The level should be between the MIN and MAX marks.

5. The above checks should be performed with the engine idling for approximately 1 minute, but not longer than 3 minutes, otherwise you may get incorrect readings.


6. If necessary, add fluid to the box through the dipstick tube. Check that the liquid is absolutely clean. Make sure not to overfill the liquid beyond the MAX mark (see figure 6.40).
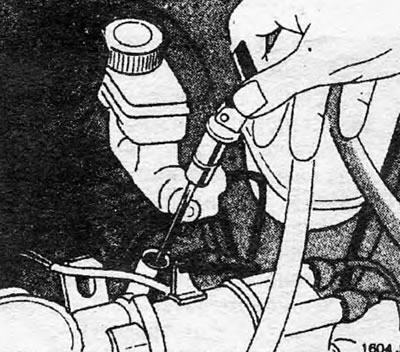
Figure 6.40. Automatic transmission fluid dipstick tube

Figure 6.40. Automatic transmission fluid dipstick tube


7. When the gearbox is cold, a drop in the fluid level by 5.0 mm below the MAX mark indicates the need to add 0.25 l of fluid.

Material copied from this website: OPELBOOK

Transmission fluid replacement


8. The transmission fluid should be changed at the intervals specified in the Routine Maintenance section at the beginning of this manual. When operating the machine in dusty conditions or when frequently towing a trailer, the fluid should be replaced more frequently.

9. Before draining the transmission fluid, let the gearbox cool down to avoid getting burned.

10. Remove all the screws on the transmission pan except for one, which must be loosened by several turns.

11. Disconnect the pan from its gasket and, when its edge drops down, drain the liquid into a suitable container.

12. Unscrew the remaining screw and remove the pan. Remove any traces of old gasket or sealant from the flange.


13. Remove the mesh filter from the mounting clamps, clean it in gasoline and let it dry.

14. Replace the sealing ring that was exposed after removing the filter and reinstall the filter.

15. Install the pan with a new gasket and secure it with bolts. Some boxes use silicone sealant instead of a gasket. In this case, it is necessary to apply a strip of sealant approximately 5.0 mm wide to the cleaned contact surfaces. A tray that must be installed with a gasket can be identified by the stiffening ribs on the tray flanges. The tray, which is installed on the sealant, has flat flanges.

16. Pour the required amount of transmission fluid into the box and check its level, as described earlier for a cold box.

17. If, when draining the old fluid, you find that it has lost its color, then the reason for this may be overheating of the box.

18. Between the MIN and MAX marks on the dipstick there is 0.5 l of liquid.


This article is available at russian, bulgarian, belarusian, ukrainian, serbian, croatian, romanian, polish, slovak, hungarian
Checking the article: Kornev Georgy

Share information:

Previous articles
Opel Ascona C: Automatic gearbox
Next articles

Automatic transmission — general description
Automatic transmission — specifications
Downshift Cable — Replacement and Adjustment
Gear Shift Lever Cable — Removal, Installation and Adjustment
Automatic transmission — removal and installation
Automatic transmission — fault diagnosis


See similar ones from other Opel car manuals:
▶ Automatic transmission maintenance Opel Omega A (1986-1993)
▶ Automatic transmission repair — general information Opel Astra F (1991-1998, petrol)
▶ Automatic Transmission Fluid Replacement (ATF) Opel Corsa B (1993-2000)
▶ Automatic transmission Opel Kadett E (1984-1995)
▶ Automatic transmission Opel Vectra A (1988-1995, petrol)
Link to this page in different formats

Visitor comments


No comments yet


How much will 23 + 39 =


Vivaro A (2001-2014) 
  • General information
  • User manual
  • Power unit
  • Petrol engine F4R
  • Diesel engine F9Q
  • Diesel engine G9U
  • Transmission
  • Clutch and drive shafts
  • Manual gearbox
  • Chassis
  • Front suspension
  • Rear suspension
  • Brake system
  • Body
  • Exterior
  • Interior
  • Electrical equipment
  • Heating and ventilation
  • Air conditioner
  • Equipment and devices
  • Electrical diagrams
Ascona C (1981-1988) 
  • General information
  • Maintenance
  • Power unit
  • Gasoline engines
  • Diesel engines
  • Cooling system
  • Fuel and exhaust system
  • Contact ignition system
  • Contactless ignition system
  • Transmission
  • Clutch
  • Mechanical gearbox
  • Automatic gearbox
  • Drive shafts
  • Chassis
  • Steering
  • Brake system
  • Car suspension
  • Body
  • Exterior
  • Interior
  • Doors and windows
  • Electrical equipment
  • Equipment and devices
  • Power devices
  • Electrical circuits
Frontera B (1998-2004) 
  • General information
  • User manual
  • Maintenance
  • Power unit
  • Petrol engines 2.2 l
  • Petrol engines 3.2 l
  • Diesel engines 2.2 l
  • Cooling system
  • Fuel system (petrol)
  • Fuel system (diesel)
  • Ignition system
  • Transmission
  • Clutch
  • Manual gearbox MUA5C
  • Automatic gearbox 4L30E
  • Chassis
  • Suspension and axles
  • Steering
  • Brake system
  • Body
  • Exterior
  • Interior
  • Doors, locks and windows
  • Heating and air conditioning
  • Electrical equipment
  • Power devices
  • Equipment and devices
  • Lighting and signaling
  • Electrical diagrams
Frontera A (1991-1998, petrol) 
  • General information
  • Introduction to guide
  • User manual
  • Maintenance
  • Power unit
  • Engine repair
  • Lubrication system
  • Cooling system
  • Power and exhaust system
  • Engine electrics
  • Transmission
  • Clutch
  • Mechanical gearbox
  • Cardan shafts
  • Chassis
  • Brake system
  • Front suspension
  • Rear suspension
  • Steering
  • Body
  • Repair and care
  • Electrical equipment
  • Equipment and devices
  • Electrical circuits
OpelBook.ru © 2017–2026 · Mobile version · · Sitemap: EN BG BY UA RS HR RO PL SK HU · Feedback · Site search
Astra F, petrol · Astra G, petrol · Astra G · Astra H · Astra J, petrol · Corsa B · Corsa C, petrol · Corsa C · Insignia A · Kadett D · Kadett E · Omega A · Omega B · Omega B2 · Vectra A, petrol · Vectra A · Vectra B, petrol · Vectra B · Vectra C · Zafira A, petrol · Frontera A, petrol · Frontera B · Ascona C · Vivaro A ·
We want your visit to be comfortable 🤝! We use cookies 🍪 to make that happen.