
OpelBook.ru
Cars AvtoVAZ Cars Mitsubishi Cars BMW Cars Mercedes Cars Nissan Cars Toyota Cars Chevrolet
English Русский
Български
Беларускі
Український
Српски
Hrvatski
Română
Polski
Slovenský
Magyar
 |  Sitemap  |  Contacts  |    


Main Astra Corsa Insignia Kadett Omega Vectra Zafira Others Articles
Frontera A (1991-1998, petrol) Frontera B (1998-2004) Ascona C (1981-1988) Vivaro A (2001-2014)
  • Main
  • Opel
  • Ascona C
  • Electrical equipment
  • Equipment and devices
  • Instrument panel — removal and installation

Instrument panel — removal and installation (Opel Ascona C)

            0

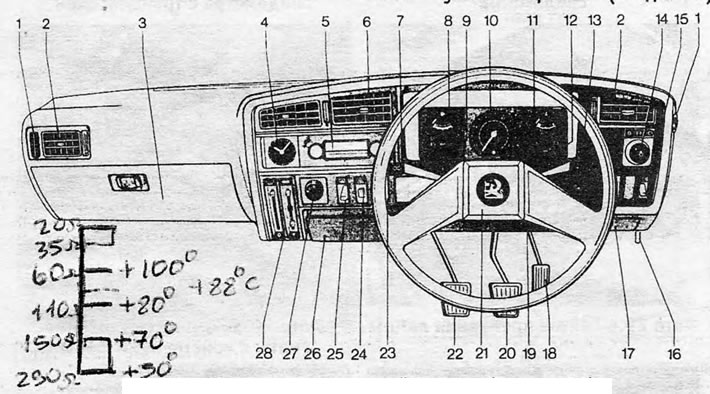
Figure 12.20. Front panel diagram: 1. Windshield defroster; 2. Air blower holes; 3. Glove…

Figure 12.20. Front panel diagram: 1. Windshield defroster; 2. Air blower holes; 3. Glove compartment ("glove box"); 4.* Electric clock; 5.* Radio receiver; 6. Central air outlets; 7. Direction indicator, low beam and flasher; 8. Fuel level sensor; 9. Indicator lights; 10. Speedometer; 11. Coolant temperature sensor; 12. Indicators; 13. Windscreen wiper/washer switch; 14. Light switch; 15. Rear fog light switch; 16. Hood release handle; 17. Fuse box; 18. Accelerator pedal; 19. Ignition/steering column switch; 20. Brake pedal; 21. Sound signal button; 22. Clutch pedal; 23. * Radio speaker balance control; 24. Hazard warning switch; 25. Rear window heating switch; 26. Ashtray (* with cigarette lighter); 27. Heater fan switch; 28. Heater control handles.
* - equipment not installed on all models


1. Disconnect the battery cables.

2. Remove the cover panel from under the front panel.

3. Disconnect the speedometer cable located behind the instrument panel by pressing the spring latch (see also Section 28).

4. Remove the two screws from underneath the instrument panel (see photo 26.4).
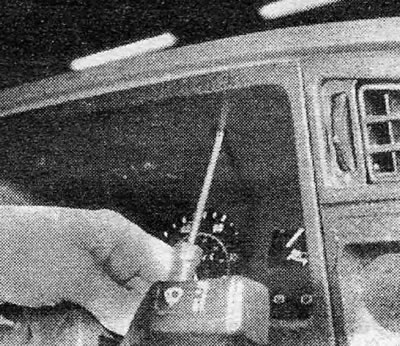
Photo 26.4 Screw of the instrument body

Photo 26.4 Screw of the instrument body


5. Disconnect and remove the instrument cover.

[Article published on the website: OpelBook]

6. Loosen and remove the instrument panel fixing screws (see photo 26.6).
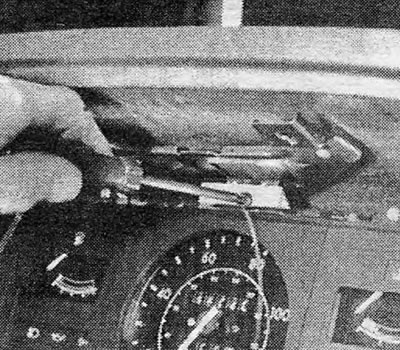
Photo 26.6 Instrument panel fixing screw

Photo 26.6 Instrument panel fixing screw


7. Rotate the top of the panel towards you until you can disconnect the multi-plugs located at the back.

8. Continue to rotate the instrument panel until the tabs at the bottom of the panel are released and the panel can then be removed completely, (see photo 26.8).
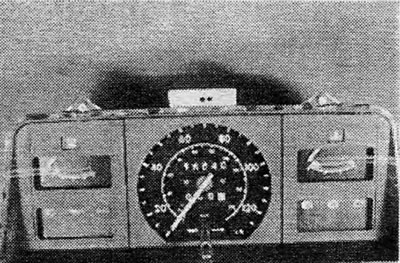
Photo 26.8 Removed instrument panel

Photo 26.8 Removed instrument panel


9. Installation is carried out by performing the above steps in reverse order.
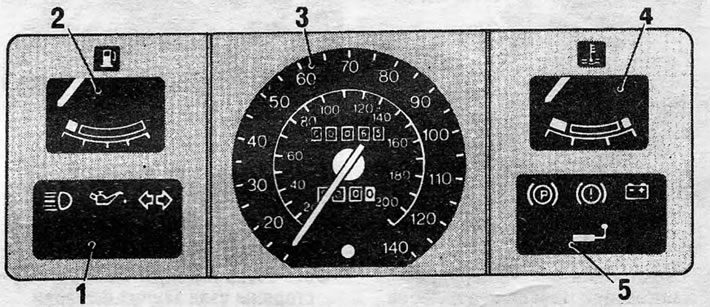
Figure 12.21. Toolbar layout - basic models (typical case) 1. Indicator lights (high beam…

Figure 12.21. Toolbar layout - basic models (typical case) 1. Indicator lights (high beam headlights, oil pressure, direction indicator); 2. Fuel level sensor; 3. Speedometer/odometer; 4. Coolant temperature sensor; 5. Indicator lights (handbrake "ON", brake fluid level, ignition/charging, * turn signal on trailer).
* - equipment not installed on all models
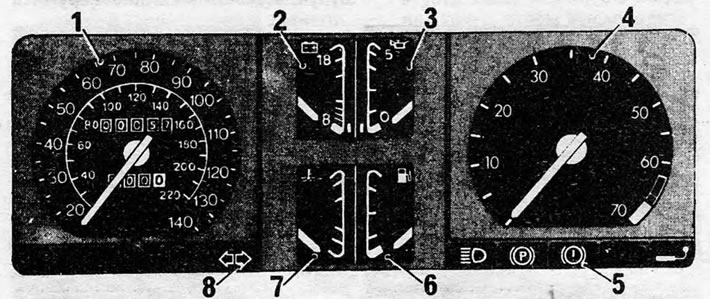


Figure 12.22. Toolbar Layout - Other Models (typical case). 1. Speedometer/odometer; 2. Voltmeter…

Figure 12.22. Toolbar Layout - Other Models (typical case). 1. Speedometer/odometer; 2. Voltmeter (battery status); 3. Oil pressure sensor; 4. Tachometer; 5. Indicator lights (high beam headlights, handbrake on "0N", brake fluid level, * direction indicator on trailer); 6. Fuel level sensor; 7. Coolant temperature sensor; 8. Direction indicator.
* - equipment installed only on some models


This article is available at russian, bulgarian, belarusian, ukrainian, serbian, croatian, romanian, polish, slovak, hungarian
Checking the article: Kornev Georgy

Share information:

Previous articles
Opel Ascona C: Equipment and devices
Next articles

Cigarette lighter — removal and installation
Watch — removal and installation
Sound signal(s) and switch
Starter Delay Switch (Automatic Transmission) — Adjustment
Switches — removal and installation
Relay — location, installation
Instruments — removal and installation
Speedometer Cable — Replacement
Light bulbs — replacement
Headlights — removal, installation, modifications
Headlight beams — adjustment
Front fog lights — adjustment


See similar ones from other Opel car manuals:
▶ Instrument panel — removal and installation Opel Astra F (1991-1998, petrol)
▶ Description of the instrument panel Opel Corsa B (1993-2000)
▶ Side direction indicators and instrument panel lighting Opel Insignia A (2008-2017)
▶ Removal and installation the instrument panel Opel Kadett D (1979-1984)
▶ Instruments (pointer instrument panel) Opel Omega A (1986-1993)
Link to this page in different formats

Visitor comments


No comments yet


How much will 22 + 25 =


Vivaro A (2001-2014) 
  • General information
  • User manual
  • Power unit
  • Petrol engine F4R
  • Diesel engine F9Q
  • Diesel engine G9U
  • Transmission
  • Clutch and drive shafts
  • Manual gearbox
  • Chassis
  • Front suspension
  • Rear suspension
  • Brake system
  • Body
  • Exterior
  • Interior
  • Electrical equipment
  • Heating and ventilation
  • Air conditioner
  • Equipment and devices
  • Electrical diagrams
Ascona C (1981-1988) 
  • General information
  • Maintenance
  • Power unit
  • Gasoline engines
  • Diesel engines
  • Cooling system
  • Fuel and exhaust system
  • Contact ignition system
  • Contactless ignition system
  • Transmission
  • Clutch
  • Mechanical gearbox
  • Automatic gearbox
  • Drive shafts
  • Chassis
  • Steering
  • Brake system
  • Car suspension
  • Body
  • Exterior
  • Interior
  • Doors and windows
  • Electrical equipment
  • Equipment and devices
  • Power devices
  • Electrical circuits
Frontera B (1998-2004) 
  • General information
  • User manual
  • Maintenance
  • Power unit
  • Petrol engines 2.2 l
  • Petrol engines 3.2 l
  • Diesel engines 2.2 l
  • Cooling system
  • Fuel system (petrol)
  • Fuel system (diesel)
  • Ignition system
  • Transmission
  • Clutch
  • Manual gearbox MUA5C
  • Automatic gearbox 4L30E
  • Chassis
  • Suspension and axles
  • Steering
  • Brake system
  • Body
  • Exterior
  • Interior
  • Doors, locks and windows
  • Heating and air conditioning
  • Electrical equipment
  • Power devices
  • Equipment and devices
  • Lighting and signaling
  • Electrical diagrams
Frontera A (1991-1998, petrol) 
  • General information
  • Introduction to guide
  • User manual
  • Maintenance
  • Power unit
  • Engine repair
  • Lubrication system
  • Cooling system
  • Power and exhaust system
  • Engine electrics
  • Transmission
  • Clutch
  • Mechanical gearbox
  • Cardan shafts
  • Chassis
  • Brake system
  • Front suspension
  • Rear suspension
  • Steering
  • Body
  • Repair and care
  • Electrical equipment
  • Equipment and devices
  • Electrical circuits
OpelBook.ru © 2017–2026 · Mobile version · · Sitemap: EN BG BY UA RS HR RO PL SK HU · Feedback · Site search
Astra F, petrol · Astra G, petrol · Astra G · Astra H · Astra J, petrol · Corsa B · Corsa C, petrol · Corsa C · Insignia A · Kadett D · Kadett E · Omega A · Omega B · Omega B2 · Vectra A, petrol · Vectra A · Vectra B, petrol · Vectra B · Vectra C · Zafira A, petrol · Frontera A, petrol · Frontera B · Ascona C · Vivaro A ·
We want your visit to be comfortable 🤝! We use cookies 🍪 to make that happen.