
General information
1. When using the recommended types of coolant and proper operation, the cooling system of modern engines does not require additional maintenance.
2. If, due to circumstances, it is necessary to fill the system with water instead of antifreeze, short-term operation of the system on water (within a few days) will not lead to significant changes in its functioning. At the first opportunity, fill the system with fresh antifreeze - it will dissolve small residues of sediment and light scale, make the next replacement of antifreeze after a shorter period than usual.
3. During long-term operation of the cooling system on water, especially hard water, a layer of scale will inevitably form on the walls of the cooling jacket and the internal channels of the radiator, which will prevent the circulation of the liquid and worsen the heat transfer properties of the radiator. To remove it, you must use strong chemical solvents, while there is a significant risk of damage to the radiator and cylinder head, and flushing does not provide a 100% result. In order to save your money, use only recommended fluids in the cooling system (see specs).
4. It makes sense to flush in some cases after prolonged use of the coolant without replacement, when it has significantly changed its color and accumulation of dirt particles is noticeable in it, or after using and finishing the running-in of special sealants that were added to the cooling system to localize a minor leak in the radiator.
Attention: Be sure to consult with Opel service stations about the possibility of using specific sealants on this engine! When adding sealant, strictly follow the instructions attached to it!
Flushing
5. The radiator is flushed separately from the system in order to prevent the risk of blocking its thin internal channels as a result of clogging them with deposits washed out from the engine water jacket.
Note: It would also be wise to flush the heater heat exchanger separately.
6. Disconnect the upper and lower hoses from the radiator and insert a garden hose into the first pipe. Turn on the water supply and continue rinsing until a clean, clear stream comes out of the lower nozzle.
7. In cases of severe contamination or obstruction of the radiator, remove the last (see Section 7) and back-flush it by running a garden hose into the bottom outlet - if that doesn't work, take the radiator to a car service shop for the necessary refurbishment.
8. Chemical treatments can be used to remove corrosion products and hard deposits from the radiator and cooling system. This should be done with extreme caution - follow the instructions of the manufacturers of the cleaning agent you purchased.
9. To flush the engine water jacket, remove the thermostat and disconnect the lower hose from the radiator.
10. Insert a garden hose into the thermostat hole in the cylinder head, turn on the water supply and continue flushing until a clear stream comes out of the lower hose.
11. Remove the expansion tank and wash it with clean water (if necessary - with soap). Clean the level marks on the sides of the tank.
12. After flushing is complete, reinstall all removed components.
Leak test
13. Checking the system for tightness is carried out using the Hazet 4800-1/2/7 device.
14. Warm up the engine to operating temperature. Check coolant level, top up if necessary (see chapter 1).
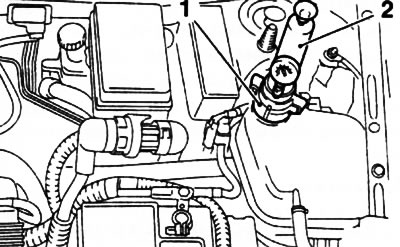
5.15. Installing the Hazet 4800-1/2/7 (2) on the neck (1) expansion tank
15. Open the cover of the expansion tank. Install a control device on the filler neck of the expansion tank (see resist. illustration). Using the instrument's hand pump, pressurize the system to 1.0 bar. A drop in pressure indicates the presence of leaks - identify and repair leaks that, after a similar inspection procedure, are easily detected by the leakage of coolant. If, despite the pressure drop, no leaks can be found, the cause may be an internal fluid leak in the engine, for example, through a damaged cylinder head gasket or a crack in the block - immediately seek help from specialists.
Visitor comments