
OpelBook.ru
Cars AvtoVAZ Cars Mitsubishi Cars BMW Cars Mercedes Cars Nissan Cars Toyota Cars Chevrolet
English Русский
Български
Беларускі
Український
Српски
Hrvatski
Română
Polski
Slovenský
Magyar
 |  Sitemap  |  Contacts  |    


Main Astra Corsa Insignia Kadett Omega Vectra Zafira Others Articles
Corsa B (1993-2000) Corsa C (2000-2006, petrol) Corsa C (2000-2006)
  • Main
  • Corsa
  • Corsa C
  • Power unit
  • Cooling system
  • Removal and installation the cooling system fan

Removal and installation the cooling system fan (Opel Corsa C)

            0

Contents: Engines Z10XE(P)/Z14XE (without air…⬇ Features of models with air…⬇ Features of…⬇ Features of Meriva models ⬇ Features of the Z13DT engine ⬇
Attention: Any maintenance or repair work on the cooling system must be carried out on a cold engine!


1. This Section describes in detail the operation of removing the cooling system fan for Z10XE(P)/Z14XE engines without air conditioning; for the rest, only additional operations and features are provided.

Engines Z10XE(P)/Z14XE (without air conditioning)


2. Disconnect the cable from the negative terminal of the battery (see Chapter 5).

3. Remove the engine oil dipstick. Loosen the mounting bolts and remove the air intake manifold (see accompanying illustration).
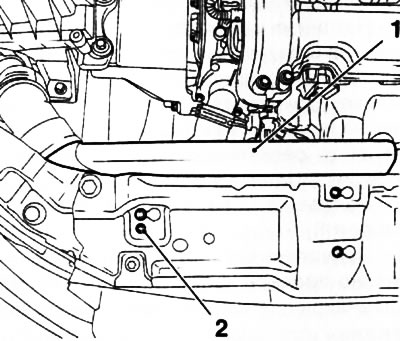
6.3. Bolts (2) for fastening the air intake (1) of the air supply system (Z10XE(P)/Z14XE engines)

6.3. Bolts (2) for fastening the air intake (1) of the air supply system (Z10XE(P)/Z14XE engines)


4. Remove the 2 bolts securing the fan housing to the radiator (see accompanying illustration), disconnect the coolant hose from the holder, disconnect the wiring from the fan motor and carefully pull the fan assembly upward. Remember or mark the wiring harness route.


6.4. Bolts (1) for fastening the fan housing to the cooling system radiator (Z10XE(P)/Z14XE)

6.4. Bolts (1) for fastening the fan housing to the cooling system radiator (Z10XE(P)/Z14XE)


5. Mark the installation position of the fan motor in relation to the fan impeller with a marker. Remove the 3 screws (see accompanying illustration) and remove the electric motor.
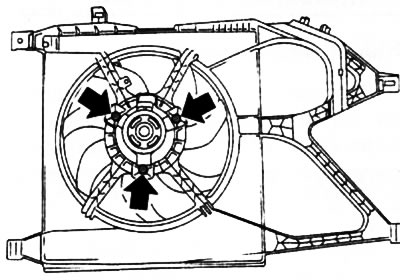
6.5. Screws (indicated by arrows) fan Motor Mounts (Z10XE(P)/Z14XE)

6.5. Screws (indicated by arrows) fan Motor Mounts (Z10XE(P)/Z14XE)


6. Installation is carried out in reverse order.

Features of models with air conditioning


7. On these models, to remove the fan, you will need to additionally remove the front bumper (see Chapter 11), then remove the fan housing mounting bracket from below.

Note: On the Z17DTH engine, to remove the fan, you will need to open the coolant circuit of the A/C system - contact a service station that has equipment specially designed for this purpose and trained personnel.


Features of Z12XE/Z14XEP/Z16SE/Z18XE/Z17DTH engines


8. On these models it is necessary to additionally remove the 2 lower radiator holders.

Features of Meriva models


9. On these models, you must first unscrew 3 bolts and remove the radiator cap.

10. Remove the front bumper (see Chapter 11).

11. Pull the fan assembly out of the holders and, with the help of an assistant, carefully remove it downwards from the engine compartment.

Features of the Z13DT engine


12. Loosen the clamp, disconnect the quick-release coupling and remove the air hose between the turbocharger and the air duct.

[Material copied from the portal opelbook.ru]

13. Remove the upper mounting bolt and disconnect the air duct from the fan assembly (see accompanying illustration). Unscrew the 2 upper bolts securing the fan housing.
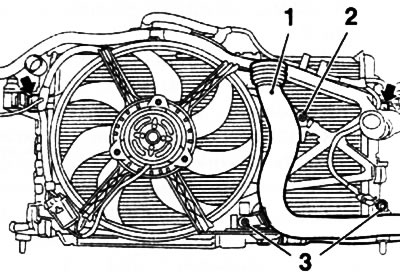
6.13. Cooling system fan housing fasteners (z13DT engine) - the arrows indicate the upper mounting…

6.13. Cooling system fan housing fasteners (z13DT engine) - the arrows indicate the upper mounting bolts: 1. Air duct; 2. Upper bolt for fastening the branch pipe; 3. Lower bolt for fastening the branch pipe


14. Remove the lower bolt (see illustration 6.13) air duct mounts and disconnect it.

15. Remove the 2 lower radiator holders, disconnect the additional resistance resistor from the fan housing.


This article is available at russian, bulgarian, belarusian, ukrainian, serbian, croatian, romanian, polish, slovak, hungarian
Checking the article: Kornev Georgy

Share information:

Previous articles
Opel Corsa C: Cooling system
Next articles

Cooling system maintenance, flushing and leak testing
Disconnecting and replacing cooling system hoses
Draining and filling the system with coolant
Antifreeze — General Information and Precautions
Engine cooling system — design description
Cooling and Heating System Specifications
Removal and installation the cooling system radiator
Removal and installation the water pump
Removal, installation and checking the thermostat


See similar ones from other Opel car manuals:
▶ Cooling system fan — checking, removal and installation Opel Astra F (1991-1998, petrol)
▶ Draining the cooling system Opel Insignia A (2008-2017)
▶ Carburetor engine cooling system Opel Kadett E (1984-1995)
▶ Cooling system specifications Opel Omega A (1986-1993)
▶ Cooling and ventilation system specifications Opel Vectra A (1988-1995, petrol)
Link to this page in different formats

Visitor comments


No comments yet


How much will 40 + 13 =


Corsa C (2000-2006) 
  • General information
  • Introduction to guide
  • Troubleshooting
  • Vehicle device
  • User manual
  • Maintenance
  • Power unit
  • Engine repair
  • Cooling system
  • Power and exhaust system
  • Control system
  • Engine electrical equipment
  • Transmission
  • Clutch
  • Mechanical gearbox
  • Automatic gearbox
  • Drive shafts
  • Chassis
  • Brake system
  • Wheel suspension
  • Steering
  • Body
  • Exterior
  • Interior
  • Doors and windows
  • Heating and air conditioning
  • Electrical equipment
  • Equipment and devices
  • Lamps and lighting
  • Electrical circuits
Corsa C (2000-2006, petrol) 
  • User manual
  • Car access
  • Governing bodies
  • Seat control
  • Heating and air conditioning
  • Driving and maintenance
  • Engines 1.0 and 1.2 l
  • Engine repair
  • Cooling and lubrication system
  • Injection system
  • Engines 1.4, 1.6 and 1.8 l
  • Engine repair
  • Cooling and lubrication system
  • Injection system
  • Transmission
  • Clutch
  • Mechanical gearbox
  • Automatic gearbox
  • Drive shafts
  • Chassis
  • Wheels and tires
  • Wheel suspension
  • Steering
  • Brake system
  • Body
  • Exterior
  • Doors and windows
  • Electrical equipment
  • Equipment and devices
  • Lighting system
  • Electrical circuits
Corsa B (1993-2000) 
  • General information
  • Introduction to guide
  • User manual
  • Maintenance
  • Power unit
  • SOHC gasoline engines
  • DOHC gasoline engines
  • Diesel engines
  • Engine repair
  • Cooling system
  • Supply system
  • Injection system (gasoline)
  • Injection system (diesel)
  • Exhaust systems
  • Control system (gasoline)
  • Preheat system (diesel)
  • Charge and launch system
  • Transmission
  • Mechanical gearbox
  • Automatic gearbox
  • Clutch and drive shafts
  • Chassis
  • Brake system
  • Front suspension
  • Rear suspension
  • Steering
  • Body
  • Ventilation and heating
  • Exterior
  • Interior
  • Doors and windows
  • Electrical equipment
  • Equipment and devices
  • Lamps and lighting
  • Electrical circuits
OpelBook.ru © 2017–2026 · Mobile version · · Sitemap: EN BG BY UA RS HR RO PL SK HU · Feedback · Site search
Astra F, petrol · Astra G, petrol · Astra G · Astra H · Astra J, petrol · Corsa B · Corsa C, petrol · Corsa C · Insignia A · Kadett D · Kadett E · Omega A · Omega B · Omega B2 · Vectra A, petrol · Vectra A · Vectra B, petrol · Vectra B · Vectra C · Zafira A, petrol · Frontera A, petrol · Frontera B · Ascona C · Vivaro A ·
We want your visit to be comfortable 🤝! We use cookies 🍪 to make that happen.