


Contents: Engine Z10XE(P)/Z14XE (without air…⬇ Features of models with air…⬇ Features of Z12XE/Z14XEP engines ⬇ Features of the Z18XE engine ⬇ Features of Meriva models ⬇
Caution: Any maintenance or repair work on the cooling system must be carried out on a cold engine! See also safety precautions in Section 2.
The basis is the operation of removing the radiator on models with Z10XE(P)/Z14XE engines without air conditioning. For other engines, only additional operations or features of this procedure.
Engine Z10XE(P)/Z14XE (without air conditioning)
Removal
1. Disconnect the battery (see Chapter 5).
2. Drain the coolant (see Section 3), on Corsa-Eco models, remove the engine sump guard (see Chapter 2).
3. Remove the front bumper (see Chapter 11).
4. Remove the air intake of the air supply system (see illustration 6.3)
5. Loosen the clamps and disconnect the lower coolant hose from the radiator.
6. After unscrewing the mounting bolts, remove the 2 upper radiator holders (see accompanying illustration).
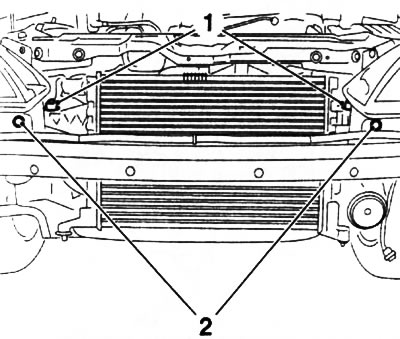
7.6. Bolts (2) for fastening the upper holders (1) of the cooling system radiator (Z10XE(P)/Z14XE engines)
7. Loosen the mounting clamps, disconnect the overflow hose from the radiator and disconnect the wiring connector of the cooling system fan electric motor.
8. Carefully remove the radiator from the engine compartment downwards, unscrew the mounting bolts (see accompanying illustration) and remove the fan assembly from the radiator.
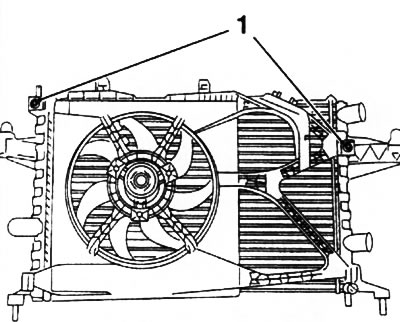
7.8. Bolts (1) for fastening the fan assembly to the cooling system radiator (Z10XE(P)/Z14XE engines)
Examination
9. After removal from the vehicle, the radiator can be checked for signs of leaks, damage and violations of the internal permeability of the heat exchanger.
10. Insect and vegetation debris can be removed from the space between the heat exchanger plates by blowing them out with compressed air (don't forget to wear safety glasses!), or cleaning with a soft brush. Try not to bend the thin heat exchanger plates or cut your fingers on them. If necessary, the radiator can be flushed before installation by spraying water from a garden hose (see Section 5).
11. Check the condition of the radiator supports and holders; if necessary, replace any faulty components.
12. Small leaks can be sealed with a suitable sealant (follow the product manufacturer's instructions).
Attention: Before using the sealant, consult with Opel representatives about the possibility of using it for the cooling system of a specific model! Any more complex repairs should be carried out only in a specialized workshop using the necessary equipment.
Installation
13. If replacing the radiator, reinstall all the attachments from the old radiator onto the new radiator and install the fan assembly.
14. Installation is carried out in the reverse order of dismantling the components. Upon completion of the work, fill the cooling system (see Section 3), remove air and make sure the system is tight (see Section 5).
Features of models with air conditioning
Note: On the Z17DTH engine, to remove the fan, you will need to open the coolant circuit of the A/C system - contact a service station that has equipment specially designed for this purpose and trained personnel.
15. Remove the fan housing mounting bracket from below.
16. Unscrew the 2 mounting bolts (see accompanying illustration) and remove the capacitor from the holder. Secure the capacitor to the engine with wire.
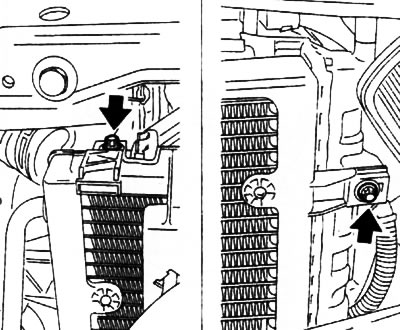
7.16. Bolts (indicated by arrows) fastening the condenser of the air conditioning system to the radiator
Note: The refrigerant circuit is not opened in this process!
17. Have an assistant hold the radiator. Remove the 4 bolts and 2 lower radiator holders. With the help of an assistant, carefully pull the radiator downwards out of the engine bay (see accompanying illustration).
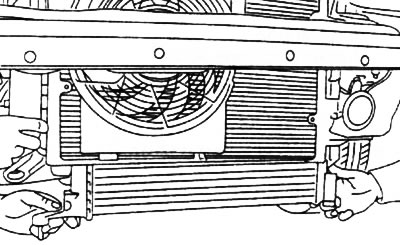
7.17. Removing the radiator on models equipped with air conditioning
Features of Z12XE/Z14XEP engines
Note: On models not equipped with the A/C system, the front bumper does not need to be removed.
18. Remove the cooling system fan (see Section 6).
19. Carefully lift the radiator out of the rubber supports.
Features of the Z18XE engine
20. Remove the horn (see Chapter 12).
Features of Meriva models
21. Remove the front bumper (see Chapter 11).
22. Unscrew the mounting bolts and remove the upper and lower radiator holders.
23. With the help of an assistant, carefully remove the radiator and fan assembly downwards from the engine compartment.
Visitor comments