


Contents: Engines Z10XE(P)/Z12XE/Z14XEP ⬇ Features of Z14XE/Z16XE/Z18XE engines ⬇ Features of diesel engines ⬇
1. This Section describes in detail the water pump removal operation for Z10XE(P)/Z12XE/Z14XEP engines only, for others only additional operations and features are provided.
Engines Z10XE(P)/Z12XE/Z14XEP
Removal
Note: On these models, the water pump is driven by a multi-rib belt.
2. Disconnect the cable from the negative terminal of the battery (see Chapter 5) and drain the coolant (see Section 3). On Corsa-Eco models, remove the engine sump guard (see Chapter 2).
3. Remove the air cleaner (see Chapter 4).
4. Loosen the mounting clamp and disconnect the crankcase ventilation system (PCV) hose from the throttle intake assembly (see accompanying illustration). Unscrew 2 nuts and remove the intake unit together with the air duct.
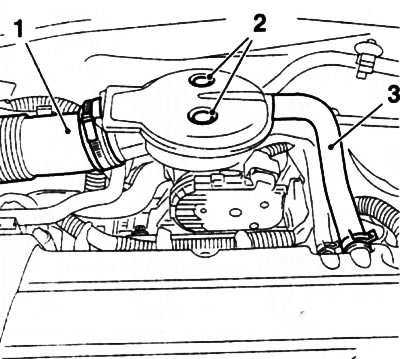
8.4. Bolts (2) for fastening the intake throttle valve unit (Z10XE(P)/Z12XE/Z14XEP engines): 1. Air duct; 3. PCV system hose
5. Loosen the water pump drive pulley mounting bolts, then remove the multi-rib belt (see Chapter 2).
6. Loosen the clamps and disconnect first the throttle body assembly preheating hose, then the heater hose (see accompanying illustration). Disconnect the coolant temperature sensor wiring connector.
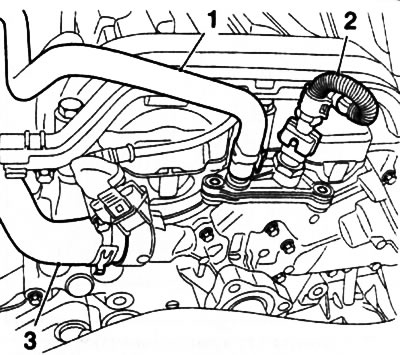
8.6. Disconnect the throttle valve assembly heating hose (1), the heater hose (3) and disconnect the coolant temperature sensor wiring connector (2) (Z10XE(P)/Z12XE/Z14XEP engines)
7. Loosen the clamps and separate the upper and lower radiator hoses from the water pump (see accompanying illustration).
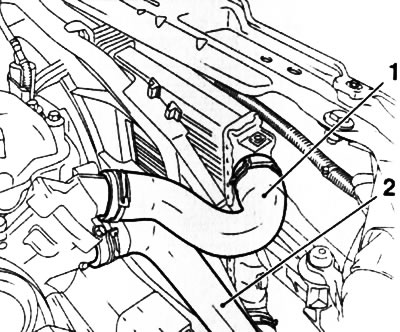
8.7. Fastening the upper (1) and lower (2) radiator hoses (Z10XE(P)/Z12XE/Z14XEP engines)
8. Remove 9 bolts (see accompanying illustration) and carefully remove the water pump from the timing cover.
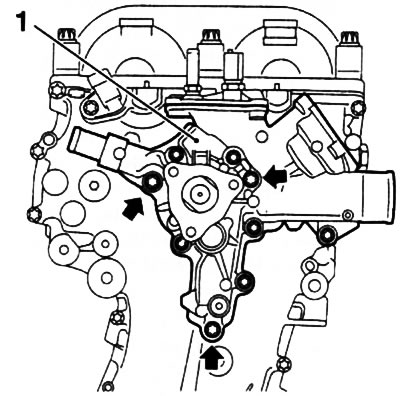
8.8. Water pump housing (1) fastening bolts (Z10XE(P)/Z12XE/Z14XEP engines) - arrows indicate the installation locations of the short bolts
Note: The water pump is secured with bolts of varying lengths, it is recommended to mark their installation position with a marker.
The water pump housing is installed using two guide bushings; when removing the pump, remember their installation position.
Installation
9. If the water pump is being replaced, reinstall all additional components from the old pump onto the new pump body (see accompanying illustration), do not forget to install new sealing gaskets.
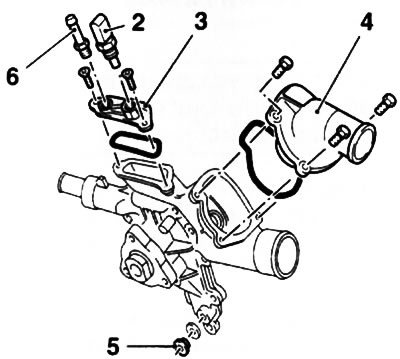
8.9. Components installed on the water pump housing (Z10XE(P)/Z12XE/Z14XEP engines): 2. Coolant temperature sensor; 3. Upper pump cover; 4. Thermostat housing; 5. Cork; 6. Fitting
10. Thoroughly clean the mating covers of the timing belt and pump. Install a new sealing gasket on the timing belt housing (see accompanying illustration) Install the water pump housing onto the guide bushings. Further installation is performed in the reverse order of removal.
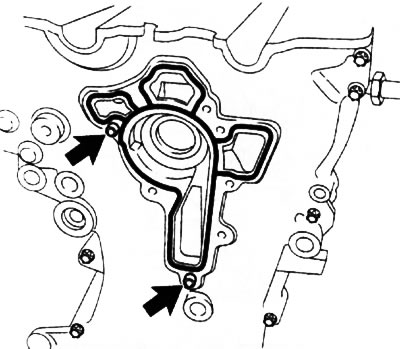
8.10. Install a new sealing gasket into the grooves on the timing case (Z10XE(P)/Z12XE/Z14XEP engines) - the arrows indicate the installation locations of the water pump case guide bushings
Features of Z14XE/Z16XE/Z18XE engines
Note: On these engine models, the water pump is driven by a toothed belt.
11. Remove the engine cover (see Chapter 2), drain the coolant (see section 3).
12. Remove the timing belt, tensioner and timing belt guide roller (see Chapter 2).
13. Remove the drive gear from the crankshaft and unscrew the 2 bolts securing the rear timing belt cover.
14. Remove the 3 mounting bolts and remove the water pump (see accompanying illustration).
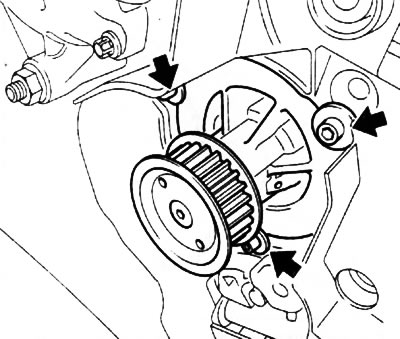
8.14. Bolts (indicated by arrows) water pump mounts (engines Z14XE/Z16XE/Z18XE)
15. Before installation, thoroughly clean the mating surfaces of the cylinder block and pump, lightly lubricate the mating surface on the cylinder block and the sealing ring of the pump body with silicone grease (for example, OPEL 19 70206 - white).
Note: The sealing ring must be replaced without fail (see accompanying illustration).
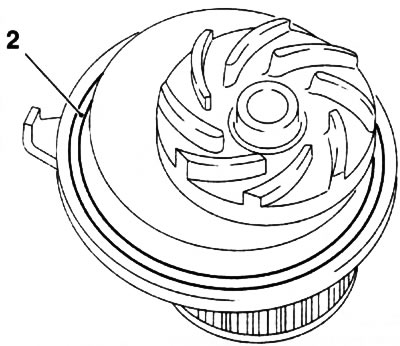
8.15 Sealing ring (2) of water pump (engines Z14XE/Z16XE/Z18XE)
16. When installing, make sure that on Z14XE/Z16XE engines the marks on the pump housing and engine block match, and on the Z18XE engine the oil pump lug fits into the water groove (see accompanying illustration) and tighten the pump mounting bolts to the required torque.
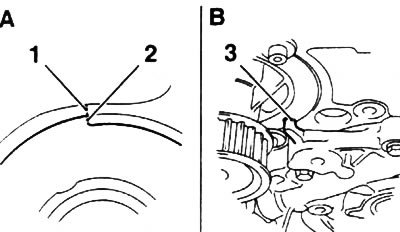
8.16. Position of the water pump during installation:
A. Marks on the water pump housing (2) and cylinder block (1) (engines Z14XE/Z16XE)
B. Oil pump tide (3) (z18XE engine)
Material was taken from a resource [www.OpelBook.ru]
17. Further installation is carried out in the reverse order of removal.
Features of diesel engines
18. Disconnect the cable from the negative terminal of the battery (see Chapter 5), and drain the coolant (see section 3).
19. On Y17DT(L) engines, remove the air cleaner (see Chapter 4).
20. On Y17DT(L)/Z17DTH engines, loosen the water pump pulley mounting bolts. The bolts are completely unscrewed after removing the multi-ribbed belt.
21. Remove the multi-rib belt (see Chapter 2).
22. On Y17DT(L) engines, remove the crankshaft pulley (see Chapter 2).
23. On the Z13DT engine, loosen the 4 nuts (see accompanying illustration) and remove the water pump from the cylinder block.
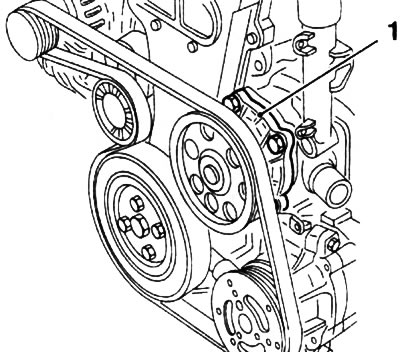
8.23. Water pump mounting (1) (z13DT engine)
Note: The appearance of the multi-rib belt differs from that shown in the accompanying illustration.
24. On Y17DT(L)/Z17DTH engines, remove 5 bolts (see accompanying illustration) and remove the pump from the cylinder block.
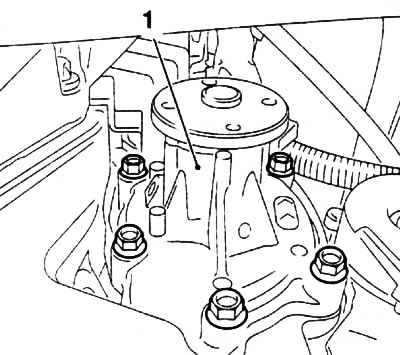
8.24. Water pump mounting (1) (Y17DT(L)/Z17DTH engines)
25. Installation is carried out in the reverse order of removal. Clean all mating surfaces. Do not forget to replace the sealing gaskets.
Visitor comments