
Corsa models
1. Briefly turn the wipers on and off again - they should be in their lowest position.
2. Disconnect the wire from the negative terminal of the battery (see chapter 5).
3. Remove wiper arms (see Section 8).
4. Remove the fairing grille (see chapter 11).
5. Turn out 2 fixing bolts (see resist. illustration), disconnect the motor wiring connector.
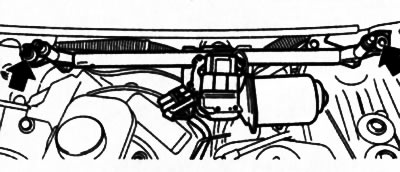
9.5. bolts (indicated by arrows) fastenings of the assembly of the electric motor with drive rods (Corsa models)
6. Separate the drive rods from the crank using a large screwdriver (see resist. illustration). With a marker, mark the installation position of the motor crank on the mounting bracket, loosen the nut and remove the crank from the motor assembly.
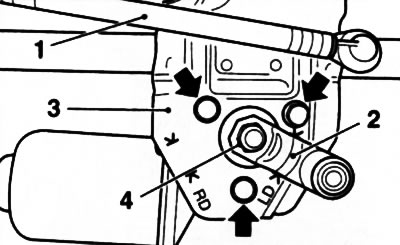
9.6. bolts (indicated by arrows) attaching the windshield wiper motor assembly to the mounting bracket (3) (Corsa models): 1. Drive rod; 2. Crank; 4. Fixing nut
7. Remove 3 bolts (see illustration 9.6) and remove the motor from the mounting bracket.
8. Installation is made in an order, the return to an order of removal. Check that the motor drive is in the correct position, if necessary, connect the motor to the connector (connect the battery) and set the required position. When installing, the crank must be between the LD markings (on left-hand drive models), on mounting bracket (see illustration 9.6). Upon completion of work, check the adjustment of the windshield wiper levers.
Meriva Models
7. Briefly turn the wipers on and off again - they should be in their lowest position.
8. Disconnect the wire from the negative terminal of the battery (see chapter 5).
9. Remove wiper arms (see Section 8).
10. Remove the fairing grille (see chapter 11).
11. Turn out 6 screws and remove a cover of a bulkhead of an impellent compartment (see chapter 11).
12. Press the lock plate forward and pull the brake fluid reservoir out of the holder and take it to the side.
13. Turn out 6 fixing bolts (see resist. illustration), disconnect the electric motor wiring connector and remove the wiper drive assembly together with the hose from the engine compartment.
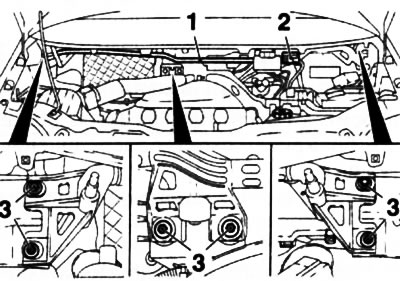
9.13. bolts (3) windshield wiper drive assembly mountings (Meriva models): 1. Hose; 2. Wiring connector
14. Mark the position of the motor crank on the mounting bracket with a marker. Loosen the nut and remove the crank.
15. Turn out 3 bolts and remove the electric motor from an adjusting bracket.
16. Installation is made in an order, the return to an order of removal. Check that the motor drive is in the correct position, if necessary, connect the motor to the connector (connect the battery) turn on the drive briefly and set the required position. Follow the correct installation of the crank on the assembly. In the extreme position of the wipers, the drive rods must lie in line with the crank arm. Upon completion of work, check the adjustment of the windshield wiper levers.
Visitor comments