


Contents: Removal injectors ⬇ Removal the throttle valve pipe ⬇ Removal the throttle potentiometer ⬇ Removal the idle speed control valve ⬇ Removal the pressure regulator ⬇ Replacing the lambda probe ⬇
Removal injectors
General Provisions
Release the pressure in the hoses through the test connection on the fuel distribution line. Place a container under the spilled fuel.
With the valves removed, cover the openings in the intake manifold to prevent dirt from entering.
Check the rubber sealing ring on the injector. Replace any damaged or worn out ring.
To install the injectors easier and without damage, lubricate the sealing rings with Vaseline or ATF. Do not use other means!
The injectors must be inserted into the distribution pipe in a certain position. Possible twisting along the longitudinal axis leads to deterioration of the exhaust gas parameters. In order to bring the injectors into the correct position, metal tabs are placed on the distribution pipe at the height of each injector, which allow only one possible installation position.
When installing, do not forget to connect to ground.
After installation, check the fuel system for leaks.
Multec-S
Disconnect the battery ground cable.
Release the pressure in the hoses through the test connection on the fuel distribution line. Place a container under the spilled fuel.
Remove the upper part of the intake manifold, see the engine chapter in the section "Removal the cylinder head cover of the 16V engine".
Remove the camshaft position sensor and pulse sensor wire connectors from the bracket clamps and disconnect them.
Disconnect the wire connectors on the injectors and remove the wire harness from the distribution pipe.
Unscrew the fuel distribution line from the bottom of the intake manifold.
Remove the fuel distribution line with injectors from the lower part of the intake manifold.
Cover the openings in the intake manifold to prevent dirt from entering.
Using a small screwdriver, pry the retaining clip between the injector and the fuel rail and remove the valve from the fuel rail.
Simtec
Remove the crankcase ventilation hoses from the cylinder head cover.
Remove the air intake hose.
Remove the cable from the throttle body.
Disconnect the wire connector on the idle air control valve
Use a small screwdriver to push back the safety clips on both outer injectors and remove the cable channel.
Remove the vacuum hose on the fuel pressure regulator. Also unscrew the ground wire on the pressure regulator
Unscrew the mounting bolts on the fuel distribution line and remove the fuel distribution line together with the injectors upwards.
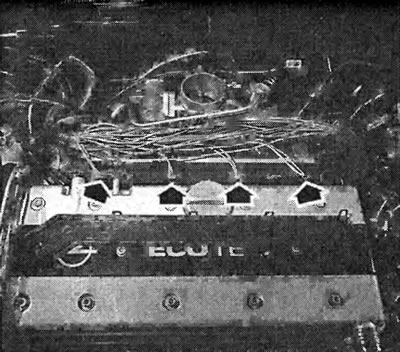
The photo shows a 16V 1.8/2.0L engine. After opening the cable channel, the connectors of the injection valve wires are visible. To check the voltage as described on page 92, insert two thin needles into the connecting wires of the valve being checked. Connect the LED voltage indicator. Start the engine: the LED voltage indicator should flash.
Using a small screwdriver, press the safety clip between the injection valves and the fuel rail and remove the valves from the fuel rail.
When installing, align all safety clamps so that perfect contact between the connector block and the injectors is ensured.
Removal the throttle valve pipe
Multec-S
Drain the coolant into a container.
Remove the engine trim on the cylinder head cover.
Remove the upper part of the intake manifold, see the engine chapter in the section "Removal the cylinder head cover of the 16V engine".
Remove the cable channel from the clamps and set it aside.
Remove the DIS ignition module, see chapter on ignition.
Remove the fuel tank vent valve from the bracket and set aside.
Disconnect the vacuum hose from the fuel tank vent valve to the bottom of the intake manifold.
Loosen or remove the vacuum hoses or lines to the intake manifold pressure sensor, secondary air injection changeover valve and to the brake booster from the top of the intake manifold.
Remove the air duct from the bottom of the intake manifold and from the throttle body and set it aside.
Unscrew the throttle cable control bracket from the throttle cable connection and disconnect the cable.
If necessary, loosen both hose clamps on the connecting hose and twist them to improve accessibility.
Remove the four throttle body mounting bolts and gasket.
Release the pressure in the hoses through the test connection on the fuel distribution line. Place a container under the spilled fuel.
Remove the injection fuel line from the distribution fuel line. To do this, press the distribution fuel line in the opposite direction.
Unscrew the return fuel line on the pressure regulator. To do this, press the pressure regulator in the opposite direction.
Twist the throttle body slightly and remove the coolant hoses. Mark the installation position.
Disconnect the wire connectors at the throttle potentiometer and the idle air control valve.
Remove the throttle body pipe and close the hole in the intake manifold.
Clean the sealing surfaces and remove any remaining gasket material.
After installation, fill with coolant and bleed the cooling system.
Simtec
Drain the coolant into a container.
Remove the air intake hose.
Disconnect the crankcase ventilation hose at the cylinder head cover.
Disconnect the wire connector at the idle air control valve.
Unhook the throttle cable and remove it from the bracket.
Remove the vacuum hose to the pressure regulator on the throttle body.
Remove the coolant hoses and crankcase vent hose from the throttle body
Disconnect the wire connectors at the throttle potentiometer.
Remove the four throttle body mounting nuts.
Remove the throttle body pipe from the intake manifold and plug the hole.
Clean the sealing surfaces and remove any remaining gasket material.
After installation, fill with coolant and bleed the cooling system.
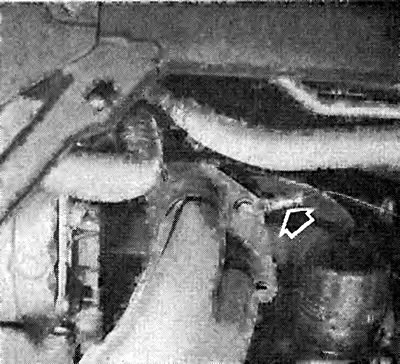
The lambda probe (arrow) is screwed directly into the exhaust manifold. Everything that needs to be taken into account when installing the lambda probe is given in the text below.
Removal the throttle potentiometer
In Simtec equipped vehicles, the throttle potentiometer is easily accessible and is secured with only two screws on the throttle body. However, in Multec-S equipped vehicles, the throttle body must first be removed.
Disconnect the wire connector and unscrew the potentiometer.
When installing, lubricate the bolts with protective compound.
Removal the idle speed control valve
Simtec: Disconnect the wire connectors on the intake air temperature sensor and the air mass meter.
Disconnect the crankcase ventilation hose at the cylinder head cover.
Multec-S: Remove the throttle body pipe.
For all models: Disconnect the wire connectors at the idle air control valve.
Unscrew the idle speed control valve from the throttle body. Close the hole.
Clean the sealing surfaces and remove any remaining gasket material.
With Multec-S, please note the installation position of the idle speed control valve. The electrical connection on the valve must be facing downwards.
Removal the pressure regulator
Relieve the fuel pressure in the fuel lines through the test connection.
Multec-S: Remove the cylinder head cover.
Disconnect the wire connector in the pressure regulator area.
Remove the cable channel from the clamp and set aside.
Unscrew the return fuel line from the pressure regulator. At the same time, press the pressure regulator in the opposite direction.
Remove the vacuum hose from the pressure regulator.
Unscrew the mounting screws and remove the pressure regulator together with the bracket.
Simtec: Remove the crankcase ventilation hose from the cylinder head cover.
Remove the vacuum hose from the pressure regulator.
Remove the mounting clamp from the pressure regulator.
Carefully remove the pressure regulator from the fuel rail.
For all: Use new O-rings during installation.
Replacing the lambda probe
The probe thread is lubricated with a special paste that prevents it from seizing. It consists of liquid graphite, which burns during operation, and glass beads. The new probe is supplied with this grease, the thread of the old one must be lubricated with it (Ope1-No. 19 48 602).
Warm up the engine. The lambda probe should only be removed when the engine is warm.
Disconnect the lambda probe wire connector in the engine compartment. The connector is located in the mount on the gearbox.
Unscrew the lambda probe from the exhaust manifold or from the front exhaust pipe.
Protect your hands from burns (gloves, rag).
When installing, tighten the probe to 30 Nm.
Pay attention to the wiring.
Visitor comments