
Maintenance work
The maintenance plan calls for the replacement of spark plugs every 30,000 km on 8-valve models and every 60,000 km on 16-valve models. This seems to us to be a realistic maintenance interval in which there is no reason to extend it. Particular attention must be paid to ensure that the ignition system is in working order, especially in vehicles with a catalytic converter.
Despite this, it is worth critically examining the dismantled candles: in the next section, read what he says «candle face».
However: if the candles are sometimes nevertheless unscrewed for checking, then, if possible, it is not necessary to clean them by hand. This damages the insulating layer of the center electrode of the spark plug (steatite). But you can check the distance between the electrodes.
Removing spark plugs
To replace spark plugs, you need an elongated, narrow spark plug wrench with a 16 mm opening. The workshop uses a special tool KM-194 V for these purposes.
16V: unscrew the fixing bolts of the ignition wire cover.
Remove the ignition wire cover.
Install the spark plug connector removal tool and remove the connectors from the spark plugs upwards. (A removable tool is located on one of the spark plug connectors.)
8 valve engine: Grasp the spark plug connectors and remove from the spark plug pins. Do not pull on spark plug wires.
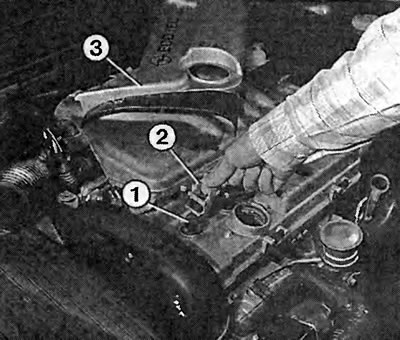
The photo shows a removable tool (2), with which you can remove the spark plug connector (1) from the cylinder head of the 16V 1.6 liter engine. Numeric (3) the coating of the ignition wire is indicated.
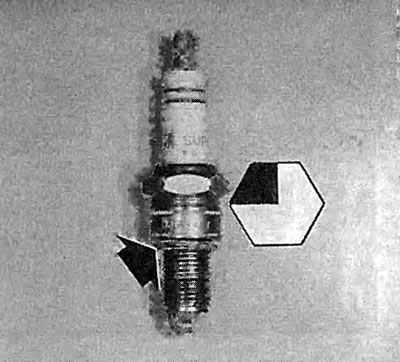
The spark plugs must be tightened to 25 Nm. If you don't have a torque wrench handy: screw in the spark plug so that the o-ring is in contact - the spark plug will then no longer be screwed in by hand or with a spark plug wrench without applying force. Now use a spark plug wrench to tighten the new spark plug exactly a quarter of a turn. A used candle can only be screwed in with a candle wrench by about 15th, this is enough.
For everyone: unscrew the spark plugs with a spark plug wrench.
Arrange the candles in a sequence of cylinders.
If the spark plugs are very tight, do not apply force, otherwise the threads of the spark plug in the light metal cylinder head may be stripped.
Warm up the engine and then remove the spark plugs. Be careful not to burn your hands.
When installing, do not screw cold candles into a heated cylinder head, otherwise they will then sit like riveted.
Spark plugs must be screwed in 25 Nm. If there is no torque wrench at hand, then screw the candle so that the sealing ring fits - it can no longer be wrapped without force by hand or a candle wrench.
Tighten the new spark plug with a spark plug wrench exactly a quarter of a turn (= 90°), It's enough.
A used spark plug with a flattened O-ring may only be screwed in by 15°.
Tips: To make screwing in the spark plug easier, you can scrape some graphite from a soft pencil onto the threads, or smear them lightly with a copper-based lubricant. Oil or regular grease bakes the spark plug into the threads of the cylinder head.
A defective candle thread is not so scary! In this case, the workshop inserts a special threaded bushing. The best known are the helix thread inserts from Bollhoff in Bielefeld.
«spark plug face»
Spark plugs are, to a certain extent, witnesses to the combustion process in the engine. By the appearance of the top of the candle («candle face») you can determine how optimally the engine works. The Vectra needs to be thoroughly warmed up first on a rural road or on the autobahn. Checking after driving a short distance may result in incorrect output. Look at the top of the insulator with the center electrode and at the side electrodes.
The top of the insulator is light gray or brownish in color: injection and ignition control is in order, the engine runs economically.
Strong deposits: The cause may be additives in the engine oil or fuel, or increased oil consumption. Change brand of oil and fuel.
Soot-like black deposits: due to frequent movement over short distances, the spark plug does not reach the self-cleaning temperature, incorrect glow number, too high CO content.
Whitish top of insulator: Ignition timing too far to one side «advancing», or the ignition timing control or knock sensor is not working.
Melted areas on the center and ground electrodes: glow ignition due to deposits in the combustion chamber, overheated valves, defective ignition timing, faulty knock sensor or heat stagnation due to insufficient cooling.
Destruction of the top of the insulator, initially visible in the form of hairline cracks: detonation combustion due to incorrect ignition timing, a defective knock sensor, insufficient engine cooling or a lean air-fuel mixture due to bypass air.
A yellowish shiny layer on the top of the insulator: deposits formed due to additives in gasoline and engine oil, which, with a sharp full load on the engine, went into a liquid state and became electrically conductive, and, as a result, misfiring. When driving short distances for weeks at a time, you should not immediately put the engine under full load.
A layer of oil on the electrodes and the inner surface of the candles: a defect in the piston rings, valve guides or valve stem gaskets.
If any features are not noticeable in the appearance of the spark plug, but the engine does not start well or twitches, the reason may still be in the candles. When starting a cold engine, invisible cracks in the ceramic insulator can fill with fuel condensate, which diverts the ignition spark. Under pressure, the candles can also fail, although in the dismantled state you can see how the spark jumps off.
Distance between electrodes
The air-fuel mixture and exhaust gases contribute to the corrosion of the metal electrodes of the spark plugs. And high voltage, when a spark jumps, tears off the smallest particles of metal from them, as a result of which the distance between the electrodes of the spark plugs increases over time.
If the distance is too long, a higher ignition voltage is required and this can lead to misfiring. Sometimes the engine won't start at all. Therefore, you must correct the distance between the electrodes in time. To measure the distance between the electrodes, a template or a special template for spark plugs is used. Its thickness is 0.7-0.8 mm. If the distance is not correct, carefully bend or approach the appropriate earth electrode accordingly.
Visitor comments