
Attention! When the wires are disconnected from the battery, all recorded fault codes are erased!
Calling fault codes from memory
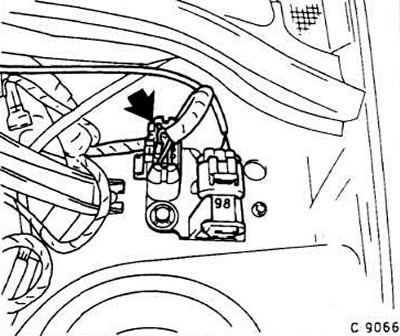
Remove the ALDL diagnostic connector (see arrow in fig.) from the nest. The ALDL connector is located behind the left shock strut near the octane coding connector.
To recall a fault code from the computer's memory:
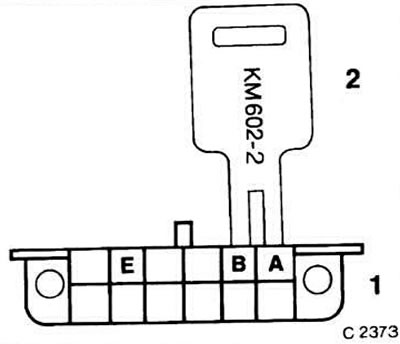
- in the presence of a diagnostic key: insert the KM-602-2 key into the sockets of contacts A and B;
- connect contact B with a piece of wire to contact "masses" A.
Note. Pin designations are on the connector body.
Attention! Contacts can be easily bent. Bad contacts in the connections can cause damage to the computer and memory failure. Therefore, it is necessary to carefully monitor the reliability of contacts.
Attention! Never connect terminal E ("+") with terminal "masses" Ah, because this will cause a short circuit!
Turn on the ignition. At the same time, the control lamp starts flashing, giving a fault code.
The code is determined by a combination of lamp flashes and pauses between them. For example, code 131 is indicated as follows: single flash, pause, three quick flashes, pause, single flash, then a longer pause and repeat the code twice.
First, code 12 is issued three times in a row, indicating the activation of the code issuance mode (single flash, pause, two flashes, then (after 3 sec.) the code is repeated two more times).
3 seconds after that, fault codes begin to appear (in the same way as described above).
Attention! Fault codes are issued in ascending order of their numbers. If only code 12 is issued, this means that there are no trouble codes in the memory.
When the codes stop being issued, turn off the ignition.
Insert the diagnostic connector into the socket and put on the cover.
Attention! If the battery is disconnected from the vehicle's on-board network for more than 10 seconds, the trouble codes in the computer's memory are erased. If the malfunction is not confirmed after 20 subsequent engine starts, the record of it is erased from the computer's memory.
Thus, if faults need to be erased from memory (e.g. after repair), it is necessary to disconnect the wire for 10 seconds "masses" from the battery.
Checking system elements
The fault code indicates which of the elements of the ignition or injection system is faulty. To identify a specific malfunction, you need to know the decoding of the codes for a specific ignition and injection system. Individual tests require special diagnostic equipment. Therefore, only general guidelines for checking system elements are given below. More complex work is carried out in specialized repair shops.
Attention! If the code indicates a malfunction of the coolant temperature sensor, the malfunction may be in the computer itself. It can be installed either by replacing the sensor, or by carrying out a series of checks using special equipment in a specialized workshop.
Disconnect the connector from the element, the malfunction of which is indicated by a code from the computer's memory, check the connection for reliable contact, remove traces of corrosion (if there).
Check the security of the wire in the connector.
Check element resistance. At the same time, one should take into account (in case of low resistance of the tested element) accuracy and internal resistance of the ohmmeter and its wires.
Check the integrity of the wires going to the computer using electrical circuits. If an error occurs "too low voltage", then first of all you should check the connection with "weight", and if - "too high voltage", then this may be due to a broken wire.
Visitor comments