
OpelBook.ru
Cars AvtoVAZ Cars Mitsubishi Cars BMW Cars Mercedes Cars Nissan Cars Toyota Cars Chevrolet
English Русский
Български
Беларускі
Український
Српски
Hrvatski
Română
Polski
Slovenský
Magyar
 |  Sitemap  |  Contacts  |    


Main Astra Corsa Insignia Kadett Omega Vectra Zafira Others Articles
Vectra A (1988-1995, petrol) Vectra A (1988-1995) Vectra B (1995-2002, petrol) Vectra B (1995-2002) Vectra C (2002-2008)
  • Main
  • Vectra
  • Vectra A
  • Chassis
  • Front suspension
  • Removal and installation front wheel hub bearings

Removal and installation front wheel hub bearings (Opel Vectra A)

            0

Contents: Removal ⬇ Installation ⬇
Signs of defective bearings are: knocking on sharp turns, difficulty turning the wheel when the brakes are released. The bearings are installed in such a way that their replacement is only possible using a special hydraulic press. Therefore, replacement should only be performed in a specialized workshop. Do not knock out the bearing with a punch!

Removal


Remove the front pillar.

Loosen the brake disc mounting bolt and remove the disc.

Attention! For cars with F-10, F-13, F-16 gearboxes, various Opel devices will be required for pressing out. You can also use short bushings of the corresponding diameter.


Press the bearing out of the hub. In cars with the F-16 gearbox, you will need the Opel KM-500-5 device for this, and with the F-10 and F-13 gearboxes, you will need the KM-466-5 (in addition, you will also need to place 2 flat or 4-sided suitable metal parts under the steering knuckle).

Attention! When pressing out, the inner bearing race remains on the hub.


Remove the brake disc shield from the steering knuckle.
Remove the brake disc shield from the steering knuckle.


(Original article on the web portal: OPELBOOK)


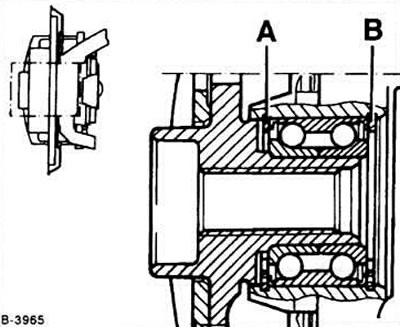
Remove retaining rings A and B using special pliers.

Press out the bearing from the steering knuckle. In cars with the F-16 gearbox and automatic gearbox, you will need the Opel KM-500-4 and KM-500-5 devices for this; in addition, you need to place the KM-200-2 part under the steering knuckle. In cars with F-10 and F-13 gearboxes, you will need the Opel KM-466-4 and KM-466-5 devices for this; in addition, it is necessary to place the KM-200-2 part under the steering knuckle.

Remove the inner bearing race from the hub. In cars with the F-16 gearbox and automatic gearbox, you will need the Opel KM-500-1 device for this, and in cars with the F-10 and F-13 gearboxes, you will need the KM-466-1.

Attention! Depending on the design of this bearing, the KM-500-1 device must be installed and secured either in the recess of the retaining ring or in the groove of the working surface of the bearing.


Installation


Attention! Do not reinstall the removed bearing!


Insert retaining ring A (fig.B-3965) into the steering knuckle. It should fit well into its recess, and the ears of the ring should be directed downwards.

Press in the new bearing until it touches the retaining ring in the steering knuckle. In cars with the F-16 gearbox and automatic gearbox, you will need the Opel KM-500-4 and KM-500-5 tools for this, and in cars with the F-10 and F-13 gearboxes, you will need the KM-466-4 and KM-466-5 tools.

Tighten the brake disc shield with a slight torque (about 4 Nm).

Insert the retaining ring B (fig.B-3965) into the steering knuckle. It should fit well into its recess, and the ears of the ring should be directed downwards.


Press the hub into the bearing. In cars with the F-16 gearbox, you will need the Opel KM-466-4 device and the KM-466-3 part, which you need to place under the inner bearing ring.

Install the brake disc and tighten its mounting bolt to a torque of 4 Nm.

Install the front pillar.


This article is available at russian, bulgarian, belarusian, ukrainian, serbian, croatian, romanian, polish, slovak, hungarian
Checking the article: Zinoviev Kirill

Share information:

Previous articles
Opel Vectra A: Front suspension
Next articles

Replacement of axle joint and joint boot
Removal and installation axle shafts
Checking the shock absorber
Removal and installation the shock absorber and front spring
Removal and installation the front pillar
Front suspension and axle shafts. Design and general information
Removal and installation the front suspension beam
Front Suspension Maintenance


See similar ones from other Opel car manuals:
▶ Front Wheel Bearings — Replacement Opel Astra G (1998-2004, petrol)
▶ Front Wheel Hub and Bearings — Removal and Installation Opel Omega B2 (1999-2003)
▶ Removal, repair and installation of front wheel disc brake… Opel Corsa B (1993-2000)
▶ Replacing the front wheel speed sensors Opel Insignia A (2008-2017)
▶ Front wheel drive Opel Kadett E (1984-1995)
Link to this page in different formats

Visitor comments


No comments yet


How much will 49 + 14 =


Vectra C (2002-2008) 
  • General information
  • User manual
  • Vehicle device
  • Maintenance
  • Troubleshooting
  • Power unit
  • Engine repair
  • Cooling system
  • Power and control system
  • Engine electrics
  • Transmission
  • Clutch
  • Car gearbox
  • Drive shafts
  • Chassis
  • Car suspension
  • Steering
  • Brake system
  • Body
  • Exterior
  • Interior
  • Doors, locks and windows
  • Heating and ventilation
  • Electrical equipment
  • Equipment and devices
  • Headlights and lighting
  • Electrical circuits
Vectra B (1995-2002) 
  • General information
  • User manual
  • Weekly checks
  • Maintenance (gasoline)
  • Maintenance (diesel)
  • Troubleshooting
  • Power unit
  • SOHC gasoline engine
  • DOHC petrol engine
  • Diesel engine 1.7 liter
  • Diesel engine 2.0 liters
  • Engine repair
  • Cooling system
  • Fuel system (gasoline)
  • Fuel system (diesel)
  • Charging system
  • Launch system
  • Ignition and preheat
  • Transmission
  • Clutch
  • Mechanical gearbox
  • Automatic gearbox
  • Drive shafts
  • Chassis
  • Brake system
  • Wheel suspension
  • Steering
  • Body
  • Exterior
  • Interior
  • Doors and windows
  • Heating and ventilation
  • Electrical equipment
  • Equipment and devices
  • Electrical circuits
Vectra B (1995-2002, petrol) 
  • General information
  • Maintenance
  • Help with malfunctions
  • Power unit
  • Engine repair
  • Exhaust system
  • Cooling system
  • Fuel system
  • Multec injection system
  • Four point injection
  • Transmission
  • Clutch
  • Gearbox and drive
  • Chassis
  • Wheel suspension
  • Steering
  • Brake system
  • Wheels and tires
  • Body
  • Exterior
  • Interior
  • Electrical equipment
  • Fuses and electronics
  • Power devices
  • Ignition system
  • Lighting and signaling
  • Equipment and devices
  • Heating and ventilation
  • Electrical circuits
Vectra A (1988-1995) 
  • Power unit
  • Engine repair
  • Ignition system
  • Lubrication system
  • Cooling system
  • Injection system
  • Fuel system (carburetor)
  • Fuel system (diesel)
  • Exhaust system
  • Transmission
  • Clutch
  • Car gearbox
  • Chassis
  • Front suspension
  • Rear suspension
  • Steering
  • Brake system
  • Wheels and tires
  • Body
  • Exterior
  • Interior
  • Electrical equipment
  • Electrical circuits
Vectra A (1988-1995, petrol) 
  • General information
  • User manual
  • Maintenance
  • Power unit
  • SOHC engine
  • DOHC engine
  • Cooling and ventilation
  • Fuel system (carburetor)
  • Fuel system (injector)
  • Exhaust converter
  • Transmission
  • Clutch
  • Mechanical gearbox
  • Automatic gearbox
  • Drive shafts
  • Chassis
  • Brake system
  • Car suspension
  • Steering
  • Body
  • Body elements
  • Electrical equipment
  • Power devices
  • Equipment and devices
  • Electrical circuits
OpelBook.ru © 2017–2026 · Mobile version · · Sitemap: EN BG BY UA RS HR RO PL SK HU · Feedback · Site search
Astra F, petrol · Astra G, petrol · Astra G · Astra H · Astra J, petrol · Corsa B · Corsa C, petrol · Corsa C · Insignia A · Kadett D · Kadett E · Omega A · Omega B · Omega B2 · Vectra A, petrol · Vectra A · Vectra B, petrol · Vectra B · Vectra C · Zafira A, petrol · Frontera A, petrol · Frontera B · Ascona C · Vivaro A ·
We want your visit to be comfortable 🤝! We use cookies 🍪 to make that happen.