


Contents: Removal ⬇ Installation ⬇
Removal
In vehicles with a catalytic converter: disconnect the connector from the lambda probe, having first removed the expansion tank for the coolant and moved it to the side without disconnecting the hoses.
Raise the engine using the Opel KM-263 lift.
Loosen the front wheel mounting bolts.
Raise the front of the car.
Remove the front wheels.
For front-wheel drive vehicles: remove the exhaust pipe.
For all-wheel drive vehicles: disconnect the exhaust pipe from the ball joint.
Remove both tie rod ends from the front strut.
Loosen the rear gearbox mounting bolts.
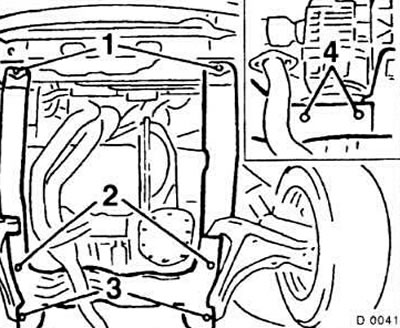
Support the front suspension beam with a hydraulic jack and unscrew bolts 1, 2 and 3.
Attention! The bolts are tightened with a high torque. Pay attention to the reliability of the installation of the raised vehicle.
Lower and remove the beam.
Installation
Raise and install the front suspension beam.
Secure the steering tips to the front strut.
Insert the box bracket into the beam and tighten to 40 Nm.
Secure the beam to the bottom (see fig.D-0041). Bolt tightening torques:
- bolts 1:115 Nm;
- bolts 2: 170 Nm;
- bolts 4: 115 Nm (only in all-wheel drive vehicles);
- bolts 3: 100 Nm and then tighten another 75°.
After tightening, tighten all bolts another 15°.
Attention! To ensure the accuracy of the angular tightening, it is advisable to make a mark on the bottom with chalk, or even better - use an angular disk (for example, Hazet 6690).
Install the exhaust pipe.
Install the front wheels and screw in the mounting bolts without tightening them.
Lower the car.
Tighten the wheel bolts crosswise to 90 Nm.
Connect the connector to the lambda probe.
Install and secure the coolant expansion tank.
[Material copied from this website: OpelBook.ru]
Visitor comments