


Contents: Removal ⬇ Installation ⬇
Removal
Mark the position of the rear wheels relative to the hub so that the balanced wheels take their original position when installed. To mark, it is enough to make a stroke with chalk or paint on the disk and hub.
Raise the rear of the car and remove the rear wheels.
Important! If the brake pads are to be reused, they must be marked before removal. Do not swap the pads from the outer to the inner side and vice versa, or from the right to the left wheel. This may result in uneven braking. It is strongly recommended to use only genuine Opel brake pads. It is essential to replace all front disc brake pads at the same time, even if only one has reached the wear limit.
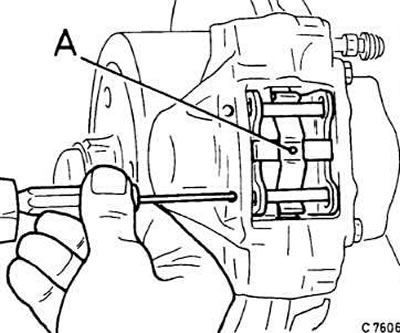
Knock out the retaining pins with a punch from the outside in. Make sure that the shoe springs do not jump out.
Material copied from this portal [OpelBook.ru]
Remove springs A (see fig.C7606).
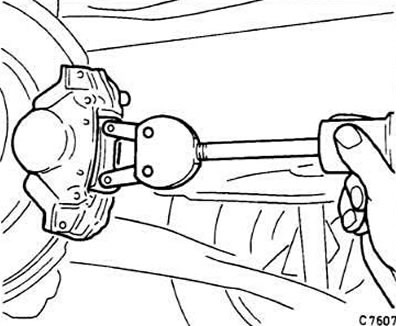
Remove the brake pads and linings with pliers, a screwdriver or an impact puller. If the pads are dirty, you will need a special puller (for example, Hazet).
Installation
Caution! When the brake pads are removed, do not press the brake pedal, otherwise the piston will fly out of the housing.
Clean the guide surfaces and the pad mounting areas in the housing with a soft metal bristle brush or wash with a cloth soaked in alcohol. Do not use any solvents containing mineral oils or sharp tools.
Before installing the pads, check the brake disc by hand for grooves. If necessary, the discs can be turned if they are thick enough.
Measure the thickness of the brake discs.
Check the boot for ruptures. Replace a damaged boot immediately, as penetrating dirt will quickly cause the caliper to lose its seal.
Press the piston with a pressing device. If there is no device, this can be done with a rod made of hard wood, paying attention to the fact that there is no distortion and so as not to damage the surface of the piston and dust cover.
Attention! When the piston is pressed, the brake fluid is squeezed out of the brake cylinders into the reservoir. Monitor the fluid level in the reservoir, pump out the excess if necessary.
When pumping out, use a plastic bottle that is used only for brake fluid. Do not use beverage bottles!
Warning! Brake fluid is poisonous! Never suck it out through the hose with your mouth!
After replacing the pads, the brake fluid level in the reservoir should not exceed the "MAX" mark, since the fluid expands when heated. Leaking brake fluid gets on the main brake cylinder, destroys the paintwork and causes corrosion.
Attention! If the pads are heavily worn, check the ease of movement of the piston by inserting a wooden block into the caliper and asking an assistant to slowly press the brake pedal. The piston should move easily. For comparison, install another brake caliper. Make sure that the piston does not jump out of the caliper. If movement is difficult, repair the piston.
Check the piston position "20°". In workshops, a special template is used for this.
Place the brake piston template on the lower guide surface. The piston position is considered correct if the attached template (position "20°") coincides with the piston bosses.
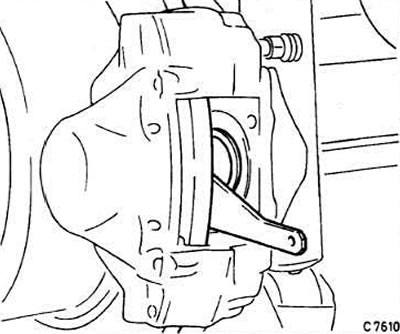
If necessary, carefully turn the piston with a special piston turning collet.
Check the ease of fitting of the pads in the guides.
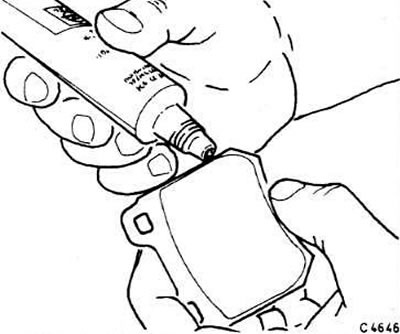
To prevent brake squealing, lubricate the side support of the rear plate of the brake shoe with a thin layer of a special paste, for example, Opel 1942585, Plastilube, Liqui Moly LM-36 or LM-508-ASC. In this case, the paste should be applied only to the rear plate; the paste should not under any circumstances get on the brake pad. If this does happen, immediately wipe the pad with a clean cloth and rinse with alcohol.
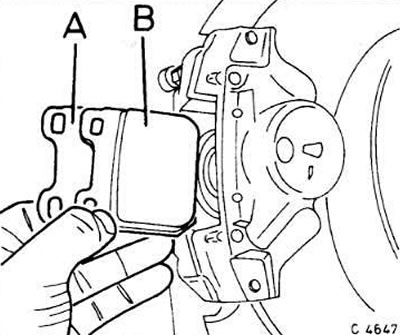
Insert brake pads B and linings A into the caliper (see fig.C4647).
Insert the spacer spring and drive in the retaining pins from the inside outwards. At the same time, press the spring with a screwdriver as shown in Figure C7606 (see above).
Install the wheels, lower the vehicle and tighten the wheel bolts crosswise to 110 Nm.
Caution! Press the brake pedal hard several times until you feel strong resistance. This will ensure that the pads are seated correctly.
Check the fluid level in the tank, if necessary, add fluid up to the "MAX" mark.
Allow the new pads to work in by braking the car several times with light pressure on the pedal from 80 km/h to 40 km/h. Allow the brakes to cool between braking.
Attention! Avoid sudden braking during the first 200 km.
Visitor comments