
OpelBook.ru
Cars AvtoVAZ Cars Mitsubishi Cars BMW Cars Mercedes Cars Nissan Cars Toyota Cars Chevrolet
English Русский
Български
Беларускі
Український
Српски
Hrvatski
Română
Polski
Slovenský
Magyar
 |  Sitemap  |  Contacts  |    


Main Astra Corsa Insignia Kadett Omega Vectra Zafira Others Articles
Frontera A (1991-1998, petrol) Frontera B (1998-2004) Ascona C (1981-1988) Vivaro A (2001-2014)
  • Main
  • Opel
  • Frontera B
  • Transmission
  • Automatic gearbox 4L30E
  • Overdrive clutch with planetary gear fastening element

Overdrive clutch with planetary gear fastening element (Opel Frontera B)

            0

Contents: Removal ⬇ Installation ⬇
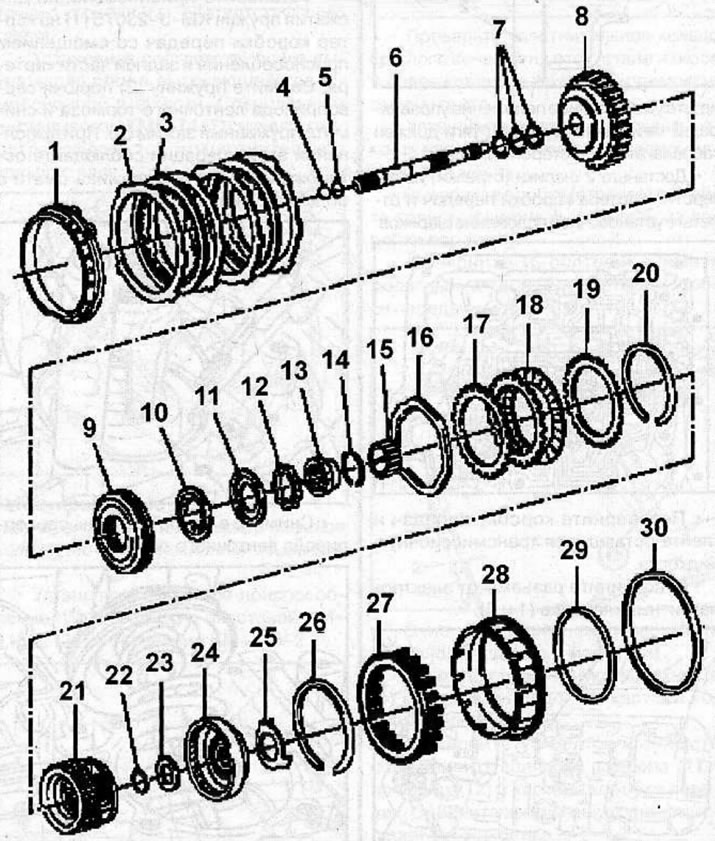
Overdrive clutch with planetary gear mounting element: 1 - 4th gear clutch lock; 2 - 4th gear…

Overdrive clutch with planetary gear mounting element: 1 - 4th gear clutch lock; 2 - 4th gear clutch steel discs; 3 - 4th gear clutch plates; 4 - retainer assembly with check valve ball; 5 - sealing ring; 6 - shaft; 7 - shaft sealing rings; 8 - overdrive clutch housing; 9 - piston of the overdrive clutch; 10 - wave spring of the overdrive clutch; 11 - Overdrive clutch return spring retainer; 12 - Accelerating gear clutch roller assembly; 13 - cams of the rollers of the overdrive clutch; 14 - overdrive clutch sleeve ring; 15 - sun gear of overdrive transmission; 16 - damping gasket; 17 - overdrive clutch disc; 18 - plates of the overdrive clutch; 19 - rear plate of the overdrive clutch; 20 - Overdrive housing retaining ring; 21 - planetary gear fastening element; 22 - retaining ring; 23 - thrust bearing; 24 - planetary gear wheel; 25 - thrust washer of planetary gear wheel; 26 - 4th gear clutch spring retaining ring; 27 - 4th gear clutch retainer and spring; 28 - 4th gear clutch piston; 29 - 4th gear clutch piston inner seal; 30 - 4th gear clutch piston outer seal


Removal


Remove the gear wheel (2) from the planetary gear mounting element.
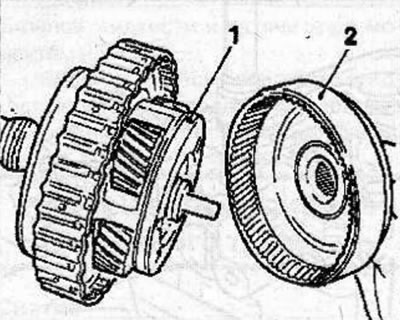
Remove the gear wheel (2) from the planetary gear mounting element.


Remove the needle bearing from the planetary gear.

Clamp the overdrive clutch in a vice with the planetary gear mounting element (1) mounted on the shaft.

Warning: Cover the jaws of the vice with soft metal.


Using special tool KM-396 (4), remove the retaining ring (3) from the shaft.

Material copied from this portal: OPELBOOK.ru
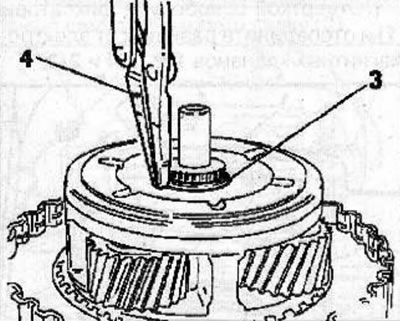
Using special tool KM-396 (4), remove the retaining ring (3) from the shaft.


Remove the overdrive clutch with the planetary gear retainer (1) from the shaft (2).
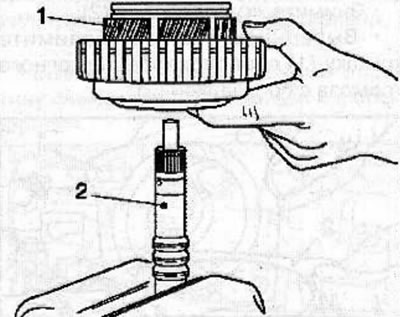
Remove the overdrive clutch with the planetary gear retainer (1) from the shaft (2).


Check the condition of the shaft sealing rings and remove the rings by moving them apart in the direction of the arrows.
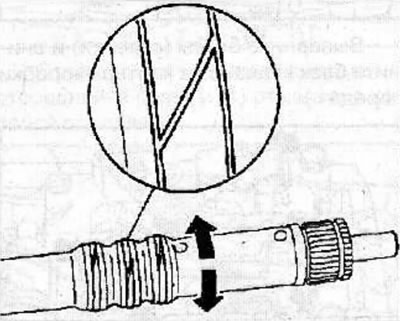


Check the condition of the shaft sealing rings and remove the rings by moving them apart in the…


Install new sealing rings on the shaft and lubricate them with transmission oil.

Remove the planetary gear retainer (1) from the overdrive clutch (2).
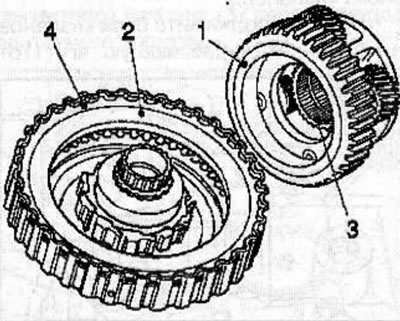
Remove the planetary gear retainer (1) from the overdrive clutch (2).


Remove the sun gear (3) from the planetary gear retainer (1).

Use a screwdriver to remove the retaining ring (4) from the overdrive clutch.

Remove the clutch discs and plates from the overdrive drum.
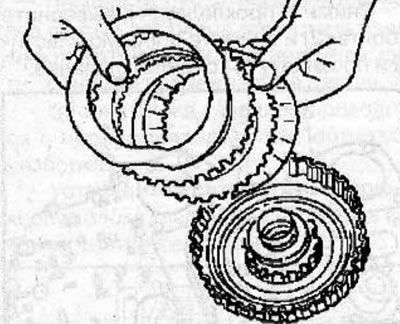
Remove the clutch discs and plates from the overdrive drum.


Warning: When reusing clutch discs and plates, install them in their original locations.


Using the special device KM-679 (2), compress the spring washer so that the retaining ring moves freely in the groove, then using the special tool KM-396 (1), remove the retaining ring.
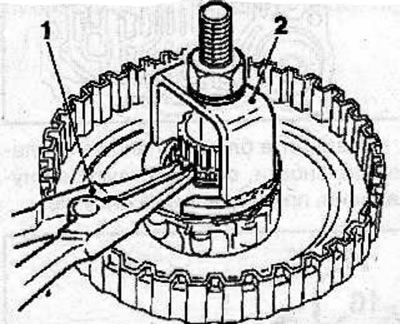
Using the special device KM-679 (2), compress the spring washer so that the retaining ring moves…


Remove the overdrive clutch assembly from the clutch sleeve.

Remove the roller assembly (5) from the cams (6) of the overdrive clutch rollers.
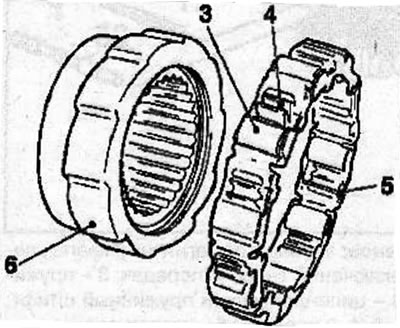
Remove the roller assembly (5) from the cams (6) of the overdrive clutch rollers.


Warning! Do not lose the spring (3) and cylindrical rollers (4).


Remove the overdrive clutch spring seat (1).

Remove the steel plates (2).
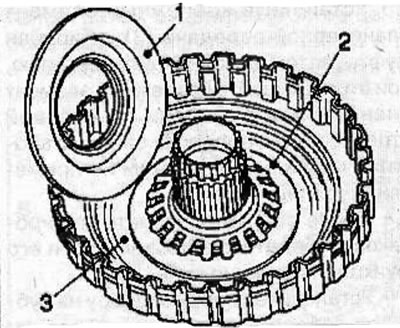
Remove the steel plates (2).


Remove the piston (3) from the clutch drum.


Installation


Check the overdrive clutch, piston and planetary gear components for wear or damage.

Using a metal feeler gauge, check the lateral clearance between the gears and the planetary gear fastener, which should be within 0.24-0.64 mm.
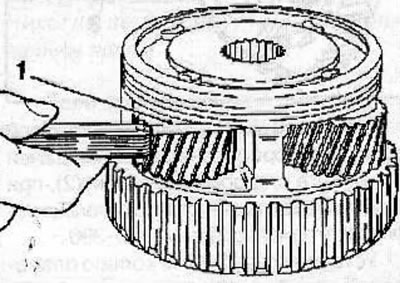
Using a metal feeler gauge, check the lateral clearance between the gears and the planetary gear…


Install the piston, piston shell and inner seal, after lubricating them with lubricant.

Install the KM-687-1 -A bushing (1) into the piston and the KM-687-2 bushing (2) onto the clutch drum bushing, which will provide protection for the working edges of the seal.
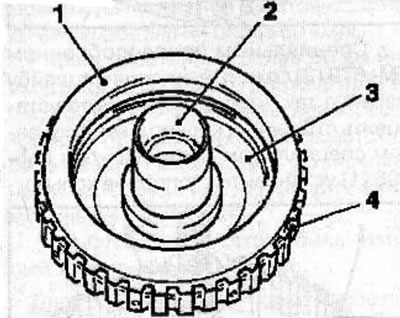
Install the KM-687-1 -A bushing (1) into the piston and the KM-687-2 bushing (2) onto the clutch…


Install the clutch piston (3) into the clutch drum (4) and remove the KM-687 bushings.

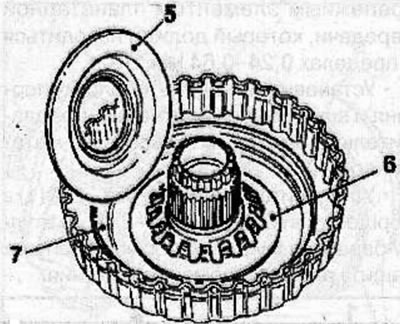
Install the spring on the clutch piston (7) and the Belleville spring washer (6).

Install the spring plate (5) into the clutch housing.


Install the roller assembly onto the cams, then install the overdrive clutch assembly onto the clutch sleeve.
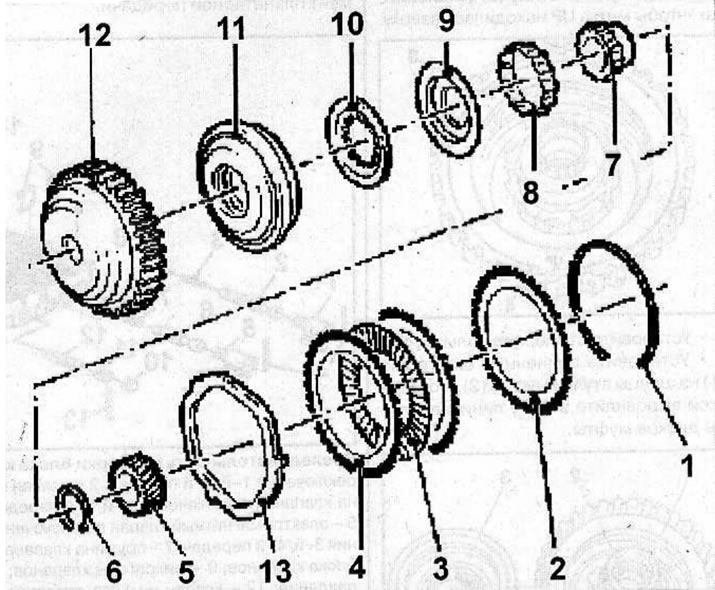
Elements of the overdrive clutch: 1 - retaining spring ring; 2 - support plate; 3 - clutch disc; 4…

Elements of the overdrive clutch: 1 - retaining spring ring; 2 - support plate; 3 - clutch disc; 4 - steel plate of the coupling; 5 - sun gear; 6 - retaining spring ring; 7 - cams of the rollers of the overdrive clutch; 8 - roller assembly; 9 - spring socket; 10 - clutch release spring; 11 - clutch piston; 12 - casing; 13 - wave gasket

Elements of the overdrive clutch: 1 - retaining spring ring; 2 - support plate; 3 - clutch disc; 4…


Using the special tool KM-679 (2), compress the Belleville spring washer so that the retaining ring can be installed in the groove, then using the special tool KM-396 (1), install the retaining ring.
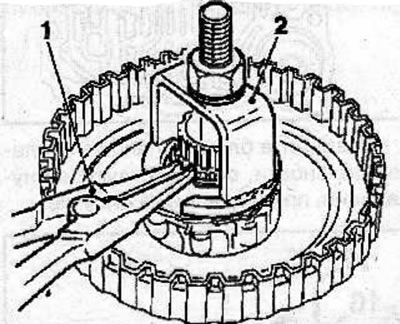
Using the special tool KM-679 (2), compress the Belleville spring washer so that the retaining ring…


Install the clutch discs and plates in the reverse order of removal.


Install the pressure plate (3) so that the UP mark is at the top.
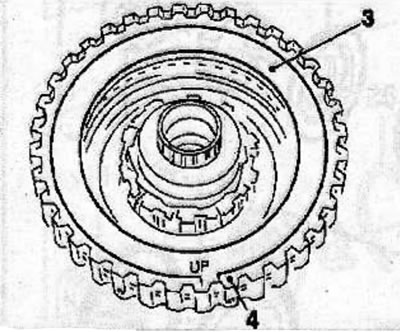
Install the pressure plate (3) so that the UP mark is at the top.


Install the retaining ring (4).

Install the sun gear (1) onto the splines of the clutch sleeve (2) and use a screwdriver to align the protrusions of the clutch discs.
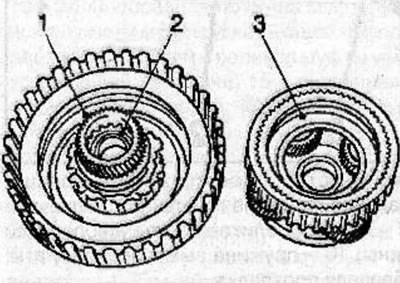
Install the sun gear (1) onto the splines of the clutch sleeve (2) and use a screwdriver to align…


Install the planetary gear retainer (3) into the clutch drum and then onto the sun gear, rotating the planetary gear retainer clockwise until it is properly seated, without applying force.

After assembly, rotate the roller assembly to ensure it functions properly.

Place the thrust washer on the planetary gear wheel (3) with the machined side of the washer facing upwards.
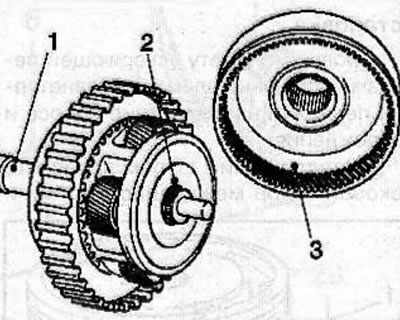
Place the thrust washer on the planetary gear wheel (3) with the machined side of the washer facing…


Install the shaft (1) into the overdrive clutch assembly with the planetary gear and secure with the retaining ring (2), using the KM-396 device to correctly install the ring.

Install the planetary gear wheel (3) onto the planetary gear retainer.


This article is available at russian, bulgarian, belarusian, ukrainian, serbian, croatian, romanian, polish, slovak, hungarian
Checking the article: Chernov Alexander

Share information:

Previous articles
Opel Frontera B: Automatic gearbox 4L30E
Next articles

Band Brake Servo Valve
Transition Crankcase Solenoid Valves
Gearbox housing solenoid valves
Electrical connectors for solenoid valves
Replacing the oil pan gasket
Gearbox operating mode switch
Valve block
Towing a car with an automatic transmission


See similar ones from other Opel car manuals:
▶ Planetary gear Opel Kadett E (1984-1995)
▶ General information about the clutch Opel Astra F (1991-1998, petrol)
▶ Replacing the filter element Opel Corsa B (1993-2000)
▶ Brake and clutch fluids Opel Insignia A (2008-2017)
▶ Replacement of air filter element — every 10,000 km Opel Omega A (1986-1993)
Link to this page in different formats

Visitor comments


No comments yet


How much will 47 + 20 =


Vivaro A (2001-2014) 
  • General information
  • User manual
  • Power unit
  • Petrol engine F4R
  • Diesel engine F9Q
  • Diesel engine G9U
  • Transmission
  • Clutch and drive shafts
  • Manual gearbox
  • Chassis
  • Front suspension
  • Rear suspension
  • Brake system
  • Body
  • Exterior
  • Interior
  • Electrical equipment
  • Heating and ventilation
  • Air conditioner
  • Equipment and devices
  • Electrical diagrams
Ascona C (1981-1988) 
  • General information
  • Maintenance
  • Power unit
  • Gasoline engines
  • Diesel engines
  • Cooling system
  • Fuel and exhaust system
  • Contact ignition system
  • Contactless ignition system
  • Transmission
  • Clutch
  • Mechanical gearbox
  • Automatic gearbox
  • Drive shafts
  • Chassis
  • Steering
  • Brake system
  • Car suspension
  • Body
  • Exterior
  • Interior
  • Doors and windows
  • Electrical equipment
  • Equipment and devices
  • Power devices
  • Electrical circuits
Frontera B (1998-2004) 
  • General information
  • User manual
  • Maintenance
  • Power unit
  • Petrol engines 2.2 l
  • Petrol engines 3.2 l
  • Diesel engines 2.2 l
  • Cooling system
  • Fuel system (petrol)
  • Fuel system (diesel)
  • Ignition system
  • Transmission
  • Clutch
  • Manual gearbox MUA5C
  • Automatic gearbox 4L30E
  • Chassis
  • Suspension and axles
  • Steering
  • Brake system
  • Body
  • Exterior
  • Interior
  • Doors, locks and windows
  • Heating and air conditioning
  • Electrical equipment
  • Power devices
  • Equipment and devices
  • Lighting and signaling
  • Electrical diagrams
Frontera A (1991-1998, petrol) 
  • General information
  • Introduction to guide
  • User manual
  • Maintenance
  • Power unit
  • Engine repair
  • Lubrication system
  • Cooling system
  • Power and exhaust system
  • Engine electrics
  • Transmission
  • Clutch
  • Mechanical gearbox
  • Cardan shafts
  • Chassis
  • Brake system
  • Front suspension
  • Rear suspension
  • Steering
  • Body
  • Repair and care
  • Electrical equipment
  • Equipment and devices
  • Electrical circuits
OpelBook.ru © 2017–2026 · Mobile version · · Sitemap: EN BG BY UA RS HR RO PL SK HU · Feedback · Site search
Astra F, petrol · Astra G, petrol · Astra G · Astra H · Astra J, petrol · Corsa B · Corsa C, petrol · Corsa C · Insignia A · Kadett D · Kadett E · Omega A · Omega B · Omega B2 · Vectra A, petrol · Vectra A · Vectra B, petrol · Vectra B · Vectra C · Zafira A, petrol · Frontera A, petrol · Frontera B · Ascona C · Vivaro A ·
We want your visit to be comfortable 🤝! We use cookies 🍪 to make that happen.