
OpelBook.ru
Cars AvtoVAZ Cars Mitsubishi Cars BMW Cars Mercedes Cars Nissan Cars Toyota Cars Chevrolet
English Русский
Български
Беларускі
Український
Српски
Hrvatski
Română
Polski
Slovenský
Magyar
 |  Sitemap  |  Contacts  |    


Main Astra Corsa Insignia Kadett Omega Vectra Zafira Others Articles
Frontera A (1991-1998, petrol) Frontera B (1998-2004) Ascona C (1981-1988) Vivaro A (2001-2014)
  • Main
  • Opel
  • Ascona C
  • Body
  • Doors and windows
  • Windshield — Removal and Installation

Windshield — Removal and Installation (Opel Ascona C)

            0

1. If your windshield needs to be removed and/or replaced for any reason, it is a job that is always best left to the professionals. They will do it in half the time and, most importantly, they will ensure that the glass is installed correctly and there are no leaks through the seal. However, if you are determined to do it yourself, follow these steps.

2. If the windshield has been broken and needs to be replaced, close the air vents in the front panel before starting work. It is also useful to coat the inside surface of the glass with adhesive film before removing it, so that the broken glass can be removed in one piece.

3. If the windshield is removed in one piece, or if it is a laminated type, you will need the help of an assistant. First, pry the rubber seal away from the body using a small blunt screwdriver, running it under the seal from the outside and inside. This operation will interrupt the action of the adhesive compound previously used. Be careful not to damage the paint on the body or puncture the seal. Remove the windshield wiper arms and outside rearview mirror and place a protective cover on the hood.

4. Remove the decorative strip from the rubber seal.

5. Have your assistant push the inner edge of the seal outward from the body opening flange. As soon as the seal starts to come off the flange, you can carefully pull the windshield outward, using the pressure of your hand. The second person must support the glass and remove it together with the seal.

Article posted on Internet portal opelbook.ru


6. Install the new seal onto the glass and ensure that all traces of old putty are removed from the body flange. Scrape it off and then wash the flange surface with a cloth soaked in gasoline.

7. Apply a layer of putty to the body flange around the entire perimeter for the windshield.

8 Prepare a piece of strong cord, longer than the perimeter of the glass, and place it on the flange of the body, in the groove for the rubber seal (see Figure 11.46).
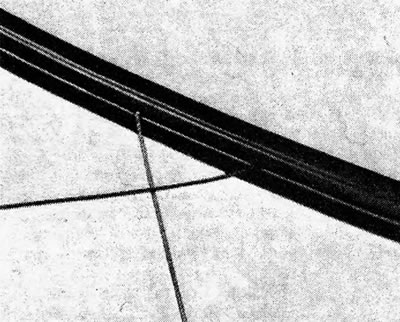
Figure 11.46. Windshield mounting cord
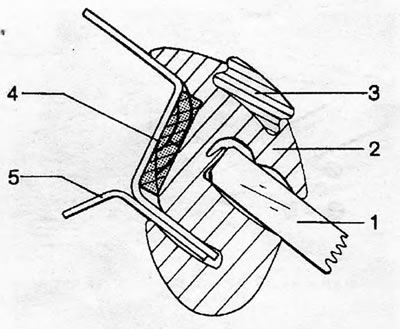
Figure 11.46. Windshield mounting cord


Figure 11.47. Sectional view of windshield installation; 1. Glass; 2. Rubber seal; 3. Decorative…

Figure 11.47. Sectional view of windshield installation; 1. Glass; 2. Rubber seal; 3. Decorative strip; 4. Mastic (putty); 5. Body flange


9. Place the glass in its place and pass the ends of the cord, located in the center of the bottom, inside the car.


10. Press the glass into place, and at the same time have your assistant pull the ends of the cord to ensure that the rubber seal is pressed against the body flange.

11. Remove excess putty with a piece of cloth soaked in paraffin.

12. Install the molding onto the seal. A special tool can make this operation easier, but be careful not to damage the edge of the seal.

13. Install the wiper arms and outside mirror.


This article is available at russian, bulgarian, belarusian, ukrainian, serbian, croatian, romanian, polish, slovak, hungarian
Checking the article: Kornev Georgy

Share information:

Previous articles
Opel Ascona C: Doors and windows
Next articles

Trunk lid lock and cylinder — removal, disassembly, assembly and installation
Trunk lid — removal and installation
Interior Trunk Trim Panels (Estate) — Removal and Installation
Rear Door Cylinder (Estate) — Removal and Installation
Rear Door Lock (Estate) — Removal and Installation
Rear Door (Estate) — Removal and Installation
Rear window or rear door glass — removal and installation
Opening side window — removal and installation
Fixed side glass — removal and installation
Roof hatch (removable type) — operation description
Sunroof (Sliding Type) — Operation, Removal and Installation
Sunroof (Sliding/Tilting Type) — Operation and Maintenance


See similar ones from other Opel car manuals:
▶ Windshield fairing panel — removal and installation Opel Astra F (1991-1998, petrol)
▶ Replacement of windshield and other fixed glass Opel Corsa B (1993-2000)
▶ Replacing windshield wiper blades Opel Insignia A (2008-2017)
▶ Removal and installation the windshield wiper gear motor Opel Kadett E (1984-1995)
▶ Windshield and rear door window/rear window — removal and… Opel Omega A (1986-1993)
Link to this page in different formats

Visitor comments


No comments yet


How much will 29 + 26 =


Vivaro A (2001-2014) 
  • General information
  • User manual
  • Power unit
  • Petrol engine F4R
  • Diesel engine F9Q
  • Diesel engine G9U
  • Transmission
  • Clutch and drive shafts
  • Manual gearbox
  • Chassis
  • Front suspension
  • Rear suspension
  • Brake system
  • Body
  • Exterior
  • Interior
  • Electrical equipment
  • Heating and ventilation
  • Air conditioner
  • Equipment and devices
  • Electrical diagrams
Ascona C (1981-1988) 
  • General information
  • Maintenance
  • Power unit
  • Gasoline engines
  • Diesel engines
  • Cooling system
  • Fuel and exhaust system
  • Contact ignition system
  • Contactless ignition system
  • Transmission
  • Clutch
  • Mechanical gearbox
  • Automatic gearbox
  • Drive shafts
  • Chassis
  • Steering
  • Brake system
  • Car suspension
  • Body
  • Exterior
  • Interior
  • Doors and windows
  • Electrical equipment
  • Equipment and devices
  • Power devices
  • Electrical circuits
Frontera B (1998-2004) 
  • General information
  • User manual
  • Maintenance
  • Power unit
  • Petrol engines 2.2 l
  • Petrol engines 3.2 l
  • Diesel engines 2.2 l
  • Cooling system
  • Fuel system (petrol)
  • Fuel system (diesel)
  • Ignition system
  • Transmission
  • Clutch
  • Manual gearbox MUA5C
  • Automatic gearbox 4L30E
  • Chassis
  • Suspension and axles
  • Steering
  • Brake system
  • Body
  • Exterior
  • Interior
  • Doors, locks and windows
  • Heating and air conditioning
  • Electrical equipment
  • Power devices
  • Equipment and devices
  • Lighting and signaling
  • Electrical diagrams
Frontera A (1991-1998, petrol) 
  • General information
  • Introduction to guide
  • User manual
  • Maintenance
  • Power unit
  • Engine repair
  • Lubrication system
  • Cooling system
  • Power and exhaust system
  • Engine electrics
  • Transmission
  • Clutch
  • Mechanical gearbox
  • Cardan shafts
  • Chassis
  • Brake system
  • Front suspension
  • Rear suspension
  • Steering
  • Body
  • Repair and care
  • Electrical equipment
  • Equipment and devices
  • Electrical circuits
OpelBook.ru © 2017–2026 · Mobile version · · Sitemap: EN BG BY UA RS HR RO PL SK HU · Feedback · Site search
Astra F, petrol · Astra G, petrol · Astra G · Astra H · Astra J, petrol · Corsa B · Corsa C, petrol · Corsa C · Insignia A · Kadett D · Kadett E · Omega A · Omega B · Omega B2 · Vectra A, petrol · Vectra A · Vectra B, petrol · Vectra B · Vectra C · Zafira A, petrol · Frontera A, petrol · Frontera B · Ascona C · Vivaro A ·
We want your visit to be comfortable 🤝! We use cookies 🍪 to make that happen.