
Note: This section provides a detailed description of the upholstery removal/installation procedure using the example of the front (driver's license) side door. For the rear door, only the features are given.
Front door
Corsa models
1. Remove the power window handle (see Section 22).
2. Remove the front door triangular trim (see Section 24).
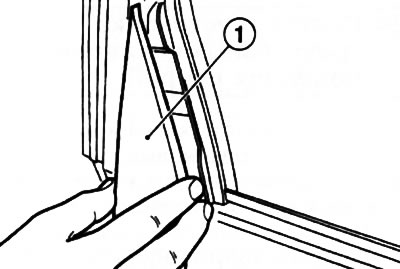
3. Using a plastic wedge, separate the bottom inner lining of the window opening from the door frame (see resist. illustration), gradually moving the wedge along the overlay. Remove the cover carefully.
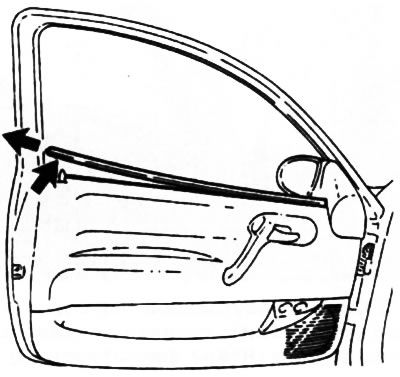
23.3. Separation of the lower inner lining of the window opening
4. Using a plastic wedge, separate the power window and door mirror switches from the inner door handle assembly (with appropriate equipment) (see chapter 12).
5. Insert the plastic wedge under the top trim of the inner door handle (see resist. illustration) and, starting at the back of the trim, separate it from the door trim.
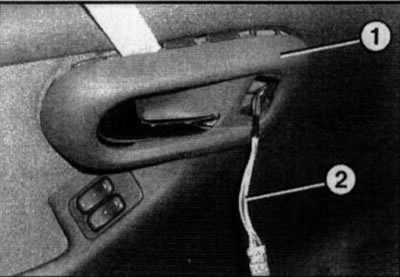
23.5. Removing the top trim (1) inside door handle: 2. Wiring harness for door mirror switches
6. Release the lower trim of the door handle from the holders (see resist. illustration) and take it off.
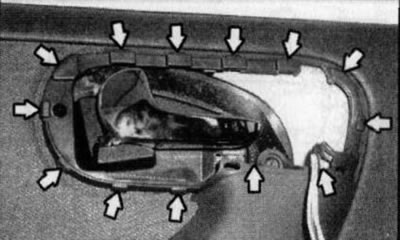
23.6. Removing the lower lining of the inner door handle - the arrows indicate the attachment points
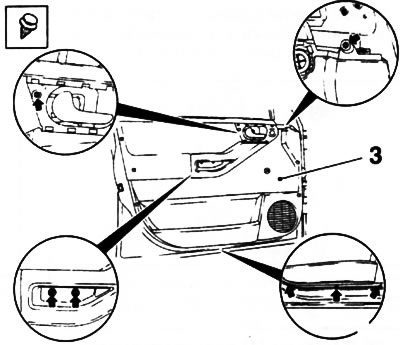
7. Turn out 6 screws of fastening of an upholstery (see resist. illustration), then with a plastic wedge (e.g. Hazet 799-3) Depress the 3 upholstery clips and remove it from the door assembly.

23.7. Upholstery fixing (1) side door (Corsa C models) - arrows indicate fixing screws
8. Installation is made in an order, the return to an order of removal. Replace any broken fasteners.
Meriva Models
9. Remove the power window handle (see Section 22).
10. Remove the triangular trim front door (see Section 24).
11. Using a plastic wedge, separate the lower inner lining of the window opening from the door frame, gradually moving the wedge along the lining - you need to start from the front side. Remove the overlay.
12. Separate the power window switches (see chapter 12).
13. Insert a plastic wedge under the lining of the inner door handle (see resist. illustration) and separate it from the door upholstery, while the door handle should be pulled back. Be careful not to damage the clips on the trim! Remove the overlay.

23.13. Removing the lining (1) interior door handle (2)
14. Turn out 7 screws of fastening of an upholstery (see resist. illustration), then with a plastic wedge (e.g. Hazet 799-3) press out the 5 upholstery fasteners.
23.14. Upholstery fixing (3) side door (Meriva models) - arrows indicate fixing screws
15. Disconnect the tweeter wiring connector and remove the upholstery from the door assembly, carefully separating it from the push-button lock of the door lock.
16. Installation is carried out in the reverse order.
Features for tailgate
17. On Corsa models, using a plastic wedge, squeeze out 3 latches and separate the triangular lining of the rear door (see resist. illustration). The wedge should be inserted from above.
23.17. Removal of a triangular overlay of a back door (Corsa C models)
18. Turn out 4 screws of fastening of an upholstery (see resist. illustrations), then with a plastic wedge (e.g. Hazet 799-3) wring out 6 clamps and remove an upholstery from door assembly.
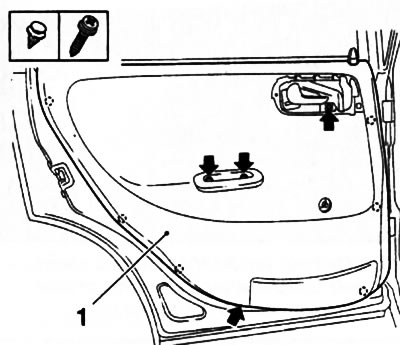
23.18a. screws (indicated by arrows) upholstery fixings (1) rear side door (Corsa C models) | 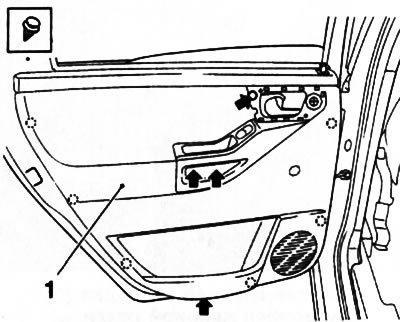
23.18b. screws (indicated by arrows) upholstery fixings (1) rear side door (Meriva models) |
Visitor comments