
OpelBook.ru
Cars AvtoVAZ Cars Mitsubishi Cars BMW Cars Mercedes Cars Nissan Cars Toyota Cars Chevrolet
English Русский
Български
Беларускі
Український
Српски
Hrvatski
Română
Polski
Slovenský
Magyar
 |  Sitemap  |  Contacts  |    


Main Astra Corsa Insignia Kadett Omega Vectra Zafira Others Articles
Omega A (1986-1993) Omega B (1993-1999) Omega B2 (1999-2003)
  • Main
  • Omega
  • Omega B2
  • Body
  • Body elements
  • Door trim — removal and installation

Door trim — removal and installation (Opel Omega B2)

            0

Contents: Removal ⬇ Installation ⬇
Removal and installation of door trim are shown using the front door as an example.

Removal


1. Remove the cover of the 1 tweeter speaker by prying it off with a small screwdriver (see arrows in the illustration).
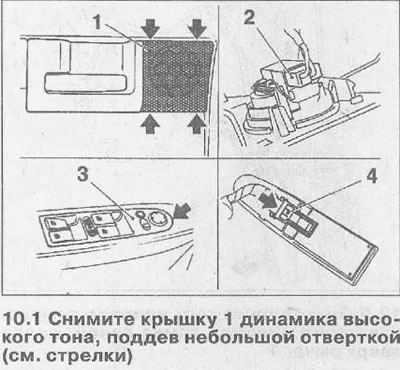
1. Remove the cover of the 1 tweeter speaker by prying it off with a small screwdriver (see arrows…


2. Move the inner door handle cover toward the tweeter and remove it.

The article was published on the website OPELBOOK

3. Disconnect the high-tone speaker plug 2 and remove the door lock switch button.

4. Carefully pry up the electric window switch unit 3 with a small screwdriver, release it from the armrest and disconnect the multi-pin connector 4 (see illustration 10.1).

5. Remove the door pocket and trim 5 (see illustration 10.5).
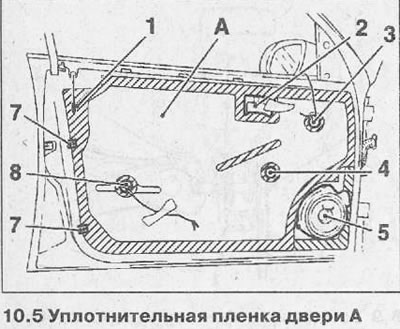
5. Remove the door pocket and trim 5 (see illustration 10.5).


6. Unscrew the screws securing the trim of the 6th door and remove it (see arrows in illustration 10.5), disconnecting the plug of the door light.


7. Remove the sealing strip A from the door, if necessary, by carefully peeling it off the door frame. The stop corners 7 should be removed first (see illustration 10.5).

Installation


When replacing the sealing film, you should cut a new one along the contours of the old one, and also make cutouts 1 and 2 for the door handle, cutouts 3 and 8 for the wires, cutout 4 for the window lifter handle, and also speaker 5 (see illustration 10.5).

8. Apply double-sided tape to the door (see shaded area in Figure 10.5) and secure the sealing film without allowing any folds.

Further installation of the door trim is carried out in the reverse order of removal.


This article is available at russian, bulgarian, belarusian, ukrainian, serbian, croatian, romanian, polish, slovak, hungarian
Checking the article: Shapovalov Yaroslav

Share information:

Previous articles
Opel Omega B2: Body elements
Next articles

Door — removal, installation and adjustment
Hood — removal and installation
Front fenders — removal and installation
Fairing — removal and installation
Rear bumper — removal and installation
Front crossmember — removal and installation
Door glass — removal, installation and adjustment
Door handles — removal and installation
Door lock — removal and installation
Center console — removal and installation
Rear Tailgate — Removal and Installation


See similar ones from other Opel car manuals:
▶ Removal and installation the rear door trim Opel Astra H (2004-2009)
▶ Removal and installation door trim Opel Corsa B (1993-2000)
▶ Replacing the interior door trim Opel Insignia A (2008-2017)
▶ Removal and installation front door trim Opel Kadett D (1979-1984)
▶ Removal and installation door trim Opel Vectra A (1988-1995)
Link to this page in different formats

Visitor comments


No comments yet


How much will 18 + 35 =


Omega B2 (1999-2003) 
  • General information
  • User manual
  • Maintenance
  • Troubleshooting
  • Power unit
  • Petrol 4-cylinder
  • Petrol 6-cylinder
  • Engine overhaul
  • Diesel engines 2.0 l
  • Diesel engines 2.5 l
  • Cooling and heating
  • Injection system (gasoline)
  • Fuel system (diesel)
  • Fuel system
  • Exhaust system
  • Ignition system
  • Transmission
  • Clutch
  • Mechanical gearbox
  • Automatic gearbox
  • Main gear and shafts
  • Chassis
  • Brake system
  • Car suspension
  • Steering
  • Body
  • Body elements
  • Electrical equipment
  • Equipment and devices
  • Electrical circuits
Omega B (1993-1999) 
  • General information
  • User manual
  • Tips for the car owner
  • Maintenance (gasoline)
  • Maintenance (diesel)
  • Power unit
  • Petrol engine SOHC 2.0 l
  • Petrol engine DOHC 2.0 l
  • Petrol engines 2.5 and 3.0 l
  • Repair of gasoline engines
  • Diesel engine 2.0 l
  • Diesel engine repair 2.0 l
  • Diesel engine 2.5 l
  • Cooling and heating
  • Power system (petrol)
  • Emission reduction
  • Fuel system (diesel 2.0 l)
  • Fuel system (diesel 2.5 l)
  • Launch system
  • Ignition system
  • Transmission
  • Clutch
  • Mechanical gearbox
  • Automatic gearbox
  • Drive shafts
  • Chassis
  • Brake system
  • Wheel suspension
  • Steering
  • Body
  • Exterior
  • Interior
  • Doors and windows
  • Electrical equipment
  • Equipment and devices
  • Wiring diagrams (early)
  • Wiring diagrams (late)
Omega A (1986-1993) 
  • General information
  • User manual
  • Maintenance
  • Changes and additions
  • Troubleshooting
  • Power unit
  • Gasoline engines
  • Diesel engines
  • Cooling system
  • Fuel system (gasoline)
  • Fuel system (diesel)
  • Ignition system
  • Transmission
  • Clutch
  • Mechanical gearbox
  • Automatic gearbox
  • Cardan shaft
  • Drive shafts
  • Chassis
  • Brake system
  • Car suspension
  • Steering
  • Body
  • Exterior
  • Interior
  • Electrical equipment
  • Power devices
  • Lighting and appliances
  • Electrical circuits
OpelBook.ru © 2017–2026 · Mobile version · · Sitemap: EN BG BY UA RS HR RO PL SK HU · Feedback · Site search
Astra F, petrol · Astra G, petrol · Astra G · Astra H · Astra J, petrol · Corsa B · Corsa C, petrol · Corsa C · Insignia A · Kadett D · Kadett E · Omega A · Omega B · Omega B2 · Vectra A, petrol · Vectra A · Vectra B, petrol · Vectra B · Vectra C · Zafira A, petrol · Frontera A, petrol · Frontera B · Ascona C · Vivaro A ·
We want your visit to be comfortable 🤝! We use cookies 🍪 to make that happen.